


How to Replace Timing Chains on a 2013 Jeep Wrangler 3.6L V6 (Trim: Sahara | Engine: V6 3.6L)
Step-by-step Pentastar timing chain diagnosis and repair with tools, parts, and safety tips for 2013
How to Replace Timing Chains on a 2013 Jeep Wrangler 3.6L V6 (Trim: Sahara | Engine: V6 3.6L)
Step-by-step Pentastar timing chain diagnosis and repair with tools, parts, and safety tips for 2013
🔧 Wrangler - Timing Drive Inspection
Your Wrangler does not use a timing belt. The 3.6L V6 uses internal timing chains, which are designed to last much longer than a belt and are not a normal maintenance replacement item.
If you are hearing chain rattle, have cam/crank correlation codes, misfires, or oil sludge concerns, the correct repair is timing chain diagnosis and possible timing chain/guide/tensioner replacement.
Difficulty Level: Advanced | Estimated Time: 10-16 hours
⚠️ Safety & Precautions
- ⚠️ This is an advanced internal engine repair. Incorrect timing can cause severe engine damage.
- ⚠️ Disconnect the negative battery cable before removing engine components.
- ⚠️ Let the engine cool completely before working near coolant, exhaust, or the front cover.
- ⚠️ Keep dirt and debris out of the open engine. Cleanliness is critical.
- ⚠️ The 3.6L timing system requires camshaft holding/alignment tools. Do not attempt this with paint marks only.
🔧 Required Tools
You'll need the following tools for this repair:
- 3/8-inch drive ratchet
- 1/2-inch drive ratchet
- Metric socket set 8mm-21mm
- Metric wrench set 8mm-21mm
- Torque wrench 10-100 ft-lbs
- Torque wrench 20-250 in-lbs
- Breaker bar 1/2-inch drive
- Crankshaft pulley holding tool (specialty)
- Harmonic balancer puller (specialty)
- 3.6L Pentastar camshaft holding tool set (specialty)
- 3.6L Pentastar timing chain wedge tool (specialty)
- Plastic trim removal tool
- Flat-blade screwdriver
- Needle-nose pliers
- Drain pan 2-gallon minimum
- Gasket scraper plastic
- Brake cleaner
- Shop towels
- Engine support bar (specialty)
- Floor jack rated 3-ton minimum
- Jack stands rated 3-ton minimum
- Wheel chocks
- Safety glasses
- Nitrile gloves
🔩 Required Parts
HowToo sells all the parts you need for this repair:
- Timing chain kit - Qty: 1
- Timing chain guides - Qty: 1 set
- Timing chain tensioners - Qty: 1 set
- Front timing cover gasket set - Qty: 1
- Valve cover gasket set - Qty: 1
- Crankshaft front seal - Qty: 1
- RTV engine sealant - Qty: 1 tube
- Engine oil 5W-20 synthetic blend or full synthetic - Qty: 6 quarts
- Oil filter - Qty: 1
- Engine coolant HOAT-compatible - Qty: as needed
- Accessory drive belt - Qty: 1
📋 Before You Begin
- Park your Wrangler on level ground, set the parking brake, and place wheel chocks behind the rear wheels.
- Let the engine sit until it is fully cool.
- Disconnect the negative battery cable using a 10mm socket.
- Take photos before removing hoses, connectors, and brackets. This helps during reassembly.
- A timing chain links the crankshaft and camshafts so the valves open at the correct time.
- A tensioner uses spring and oil pressure to keep the timing chain tight.
- A camshaft holding tool locks the camshafts in the correct position during service.
🔨 Step-by-Step Instructions
Follow these steps in order:
Step 1: Verify This Is Not a Timing Belt Job
- Open the hood and confirm the front of the engine has a sealed metal timing cover, not a plastic belt cover.
- Your Wrangler uses timing chains inside the engine, so there is no external timing belt to replace.
- If the engine runs normally and has no timing-related noise or fault codes, no timing belt maintenance is required.
Step 2: Disconnect the Battery
- Use a 10mm socket to loosen the negative battery terminal.
- Move the negative cable away from the battery post so it cannot spring back.
- Tip: Wrap the cable end with a towel.
Step 3: Raise and Secure the Front of the Vehicle
- Use a floor jack rated 3-ton minimum under the approved front axle lift point.
- Place jack stands rated 3-ton minimum under solid axle support points.
- Lower the vehicle gently onto the stands and shake it lightly to confirm it is stable.
Step 4: Drain Coolant and Engine Oil
- Place a drain pan 2-gallon minimum under the radiator drain area.
- Open the radiator drain carefully and catch the coolant.
- Use a 13mm socket to remove the engine oil drain plug.
- Reinstall the oil drain plug after draining and torque to 27 Nm (20 ft-lbs).
Step 5: Remove Intake Ducting and Engine Covers
- Use a flat-blade screwdriver to loosen the intake hose clamps.
- Use a 10mm socket to remove intake box or resonator fasteners as needed.
- Lift off the engine cover by hand.
- Tip: Label connectors with tape.
Step 6: Remove the Accessory Drive Belt
- Use a 1/2-inch drive ratchet on the belt tensioner.
- Rotate the tensioner to release belt tension.
- Slide the belt off the pulleys and remove it from the engine bay.
- Draw a belt routing sketch before removal if the underhood label is missing.
Step 7: Remove Front Engine Accessories as Needed
- Use 10mm, 13mm, and 15mm sockets to remove brackets and accessories blocking the timing cover.
- Do not disconnect A/C refrigerant lines. Move the compressor aside only if needed and support it safely.
- Use needle-nose pliers to release hose clamps where required.
Step 8: Remove Valve Covers
- Unplug ignition coil connectors by hand.
- Use a 10mm socket to remove ignition coil bolts.
- Use a 10mm socket to remove valve cover bolts.
- Lift the valve covers off carefully without prying against sealing surfaces.
- During reassembly, valve cover bolts are tightened evenly to 10 Nm (89 in-lbs).
Step 9: Remove the Harmonic Balancer
- The harmonic balancer is the large crankshaft pulley at the front of the engine.
- Use a crankshaft pulley holding tool to hold the balancer steady.
- Use a breaker bar 1/2-inch drive and correct socket to loosen the crankshaft bolt.
- Use a harmonic balancer puller to remove the balancer straight off the crankshaft.
Step 10: Remove the Front Timing Cover
- Use 8mm, 10mm, and 13mm sockets to remove the timing cover bolts.
- Note bolt locations because lengths can vary.
- Use a plastic gasket scraper to gently separate the cover.
- Do not gouge the aluminum sealing surfaces.
Step 11: Set Engine Timing Position
- Use a 1/2-inch drive ratchet on the crankshaft bolt to rotate the engine by hand clockwise only.
- Bring the engine to the correct timing service position before chain removal.
- Install the 3.6L Pentastar camshaft holding tool set to lock the camshafts.
- Install the 3.6L Pentastar timing chain wedge tool where required to prevent chain movement.
- Do not rotate the crankshaft or camshafts independently once the chains are removed.
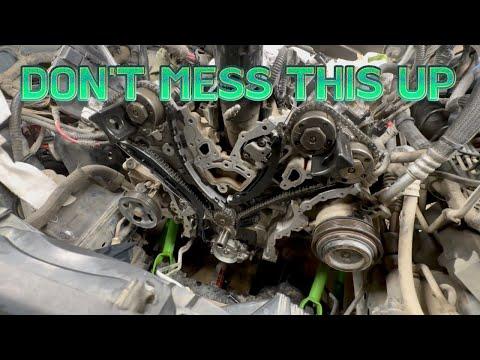
Step 12: Remove Timing Chain Tensioners, Guides, and Chains
- Use a 10mm socket to remove timing chain guide bolts.
- Use the correct metric socket to remove tensioner bolts.
- Remove the timing chains only after the camshaft holding tools are installed.
- Keep old parts arranged in order so you can compare them with the new parts.
Step 13: Install New Timing Chains, Guides, and Tensioners
- Use the timing marks on the new chains and sprockets exactly as supplied with the timing kit.
- Install new guides using a 10mm socket.
- Install new tensioners using the correct metric socket.
- Tighten timing guide and tensioner fasteners to the specification supplied with the timing kit if it differs from service data.
- Do not pull tensioner release pins until all timing marks are verified.
Step 14: Verify Timing Before Closing the Engine
- Remove holding tools only after the chains, guides, and tensioners are secured.
- Use a 1/2-inch drive ratchet to rotate the crankshaft clockwise by hand two full revolutions.
- If the engine stops suddenly, do not force it. Recheck timing alignment.
- Reinstall the holding tools and confirm the timing marks return to the correct positions.
Step 15: Clean and Reinstall the Timing Cover
- Use a plastic gasket scraper and brake cleaner to clean sealing surfaces.
- Install a new crankshaft front seal into the timing cover.
- Apply RTV engine sealant only at the required joints and corners.
- Use 8mm, 10mm, and 13mm sockets to install the timing cover bolts by hand first.
- Tighten bolts evenly in stages. Small cover bolts are commonly tightened to about 12 Nm (106 in-lbs); verify exact bolt-size torque for your fastener locations.
Step 16: Reinstall Harmonic Balancer and Accessories
- Slide the harmonic balancer onto the crankshaft by hand as straight as possible.
- Use the proper installer if resistance is high. Do not hammer it on.
- Use the crankshaft pulley holding tool and torque wrench 10-100 ft-lbs for final tightening if the service procedure requires staged torque.
- Reinstall accessories and brackets using 10mm, 13mm, and 15mm sockets.
Step 17: Reinstall Valve Covers
- Install new valve cover gaskets into the covers.
- Set the valve covers in place by hand.
- Use a 10mm socket to start all bolts by hand.
- Use a torque wrench 20-250 in-lbs and tighten evenly to 10 Nm (89 in-lbs).
Step 18: Install New Accessory Belt
- Route the new belt around the pulleys according to the underhood belt diagram.
- Use a 1/2-inch drive ratchet to rotate the tensioner.
- Slip the belt over the final pulley and slowly release the tensioner.
- Check that the belt ribs sit fully in each pulley groove.
Step 19: Refill Oil and Coolant
- Install a new oil filter by hand, then tighten according to the filter instructions.
- Add engine oil 5W-20 through the oil fill cap.
- Refill the cooling system with HOAT-compatible coolant.
- Use shop towels to clean any spilled oil or coolant.
Step 20: Reconnect Battery and Initial Start
- Use a 10mm socket to reconnect the negative battery cable.
- Start the engine and let it idle.
- Listen for abnormal rattling, knocking, or belt noise.
- Shut the engine off immediately if it runs rough or makes loud mechanical noise.
✅ After Repair
- ✅ Check for oil leaks around the timing cover, valve covers, oil filter, and drain plug.
- ✅ Check for coolant leaks after the engine reaches operating temperature.
- ✅ Monitor coolant level after the first full heat cycle and top off as needed.
- ✅ Road-test gently for 10-15 minutes, then recheck for leaks.
- ✅ If the check engine light comes on, scan for cam/crank correlation codes before driving further.
💰 DIY vs Shop Cost
Shop Cost: $1,800-$3,200+ parts + labor
DIY Cost: $350-$900 parts only
You Save: $1,200-$2,300 by doing it yourself!
Shop labor rates vary but typically run $100-$150/hour. This repair takes a shop approximately 10-16 hours.
🎯 Ready to get started?
HowToo makes it easy: same-day/2-day shipping on every part, plus all the tools and specialty tools you need! Check out the parts and tools sections below to add everything to your cart.
