


How to Replace the Water Pump on a 2018-2023 Chevrolet Traverse (Engine: V6 3.6L)
Step-by-step DIY guide with required tools, DEX-COOL coolant, torque specs, and safety tips for 2018, 2019, 2020, 2021, 2022, 2023
How to Replace the Water Pump on a 2018-2023 Chevrolet Traverse (Engine: V6 3.6L)
Step-by-step DIY guide with required tools, DEX-COOL coolant, torque specs, and safety tips for 2018, 2019, 2020, 2021, 2022, 2023
🔧 Traverse - Water Pump Replacement
Replacing the water pump on your Traverse means draining the coolant, removing the drive belt from the pump pulley, unbolting the pump, cleaning the sealing surface, and installing a new pump with a fresh gasket. The water pump circulates coolant through the engine and radiator, so a leaking or noisy pump can quickly cause overheating.
Difficulty Level: Intermediate | Estimated Time: 3-5 hours
⚠️ Safety & Precautions
- ⚠️ Let the engine cool completely before opening the cooling system. Hot coolant can cause severe burns.
- 🧤 Wear safety glasses and gloves. Coolant is toxic and slippery.
- 🐾 Keep all drained coolant away from children and pets.
- 🔋 Disconnect the negative battery cable before working near the belt drive area.
- 🚗 Support your Traverse with jack stands if you raise it. Never rely on a floor jack alone.
- 🌀 Keep fingers, tools, and clothing away from belts and pulleys any time the engine is running.
🔧 Required Tools
You'll need the following tools for this repair:
- Safety glasses
- Nitrile gloves
- Drain pan 2-gallon minimum
- Floor jack rated 3-ton minimum
- Jack stands rated 3-ton minimum
- Wheel chocks
- Ratchet 1/4-inch drive
- Ratchet 3/8-inch drive
- Breaker bar 3/8-inch drive
- Extension 3-inch 1/4-inch drive
- Extension 6-inch 3/8-inch drive
- 7mm socket
- 8mm socket
- 10mm socket
- 13mm socket
- 15mm socket
- 18mm socket
- Torque wrench 1/4-inch drive
- Torque wrench 3/8-inch drive
- Belt tensioner tool 3/8-inch drive (specialty)
- Hose clamp pliers
- Flat-blade screwdriver 1/4-inch
- Trim clip removal tool
- Plastic scraper
- Gasket pick set (specialty)
- Funnel spill-free coolant fill kit (specialty)
- Shop towels
- Paint marker
🔩 Required Parts
HowToo sells all the parts you need for this repair:
- Engine water pump - Qty: 1
- Water pump gasket - Qty: 1
- Premixed DEX-COOL 50/50 coolant - Qty: 1-2 gallons
- Serpentine belt - Qty: 1 if worn, cracked, glazed, or coolant-soaked
- Radiator hose clamp - Qty: 1 if original clamp is weak, rusty, or damaged
📋 Before You Begin
- 🅿️ Park your Traverse on level ground and set the parking brake.
- 🧱 Place wheel chocks behind the rear wheels.
- ❄️ Make sure the engine is completely cool before removing the coolant reservoir cap.
- 🔋 Disconnect the negative battery cable using a 10mm socket.
- 📱 No infotainment menu is required for this repair.
- 🛠️ A belt tensioner tool is a long, thin handle that moves the spring-loaded belt tensioner so the belt can be removed safely.
- 🧴 A spill-free coolant fill kit is a funnel that locks onto the coolant reservoir and helps purge trapped air during refill.
🔨 Step-by-Step Instructions
Follow these steps in order:
Step 1: Cool the Engine and Release Coolant Pressure
- Use safety glasses and nitrile gloves before touching the cooling system.
- Confirm the upper radiator hose is cool by touching it carefully with your hand.
- Slowly loosen the coolant reservoir cap by hand to release any remaining pressure.
- Reinstall the cap loosely after pressure is released.
- Never open it hot.
Step 2: Disconnect the Battery
- Use a 10mm socket and ratchet to loosen the negative battery terminal nut.
- Lift the negative cable off the battery post.
- Move the cable aside so it cannot accidentally touch the battery post.
Step 3: Raise and Support the Front
- Use wheel chocks behind the rear wheels.
- Use the floor jack rated 3-ton minimum to lift the front of your Traverse.
- Place jack stands rated 3-ton minimum under the front support points.
- Lower the vehicle gently onto the jack stands using the floor jack.
Step 4: Remove the Lower Splash Shield
- Use a 7mm socket and ratchet to remove the lower splash shield screws.
- Use the trim clip removal tool to remove any plastic push clips.
- Remove the splash shield and set the fasteners aside in order.
Step 5: Drain the Coolant
- Place the drain pan 2-gallon minimum under the lower radiator hose area.
- Use hose clamp pliers to compress the lower radiator hose clamp.
- Slide the clamp back from the radiator outlet.
- Twist the hose by hand to break it loose, then pull it back slightly to drain coolant into the pan.
- Push the hose back onto the radiator after coolant flow slows.
- Use hose clamp pliers to return the clamp to its original position.
- Twist first, then pull.
Step 6: Remove the Right Front Wheelhouse Access Shield
- Use a 7mm socket and ratchet to remove the right front wheelhouse liner screws near the belt area.
- Use the trim clip removal tool to release plastic clips.
- Pull the liner section back by hand to access the belt and water pump area.
Step 7: Mark the Serpentine Belt Routing
- Use a paint marker to mark belt direction if you plan to reuse the belt.
- Take a clear photo of the belt routing before removal.
- The serpentine belt is the long rubber belt that drives accessories like the alternator and water pump.
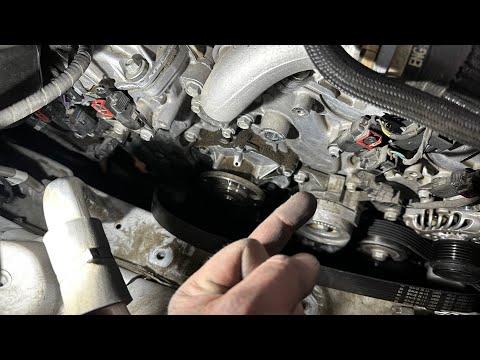
Step 8: Remove the Serpentine Belt
- Place the belt tensioner tool 3/8-inch drive or breaker bar 3/8-inch drive into the belt tensioner square drive.
- Rotate the tensioner to relieve belt tension.
- Slide the belt off the water pump pulley by hand.
- Slowly release the tensioner back to its resting position.
- Remove the belt from the remaining pulleys if replacing it.
- Release tension slowly.
Step 9: Remove the Water Pump Pulley
- Use a 10mm socket and ratchet to loosen the water pump pulley bolts.
- If the pulley turns, press the old belt against the pulley by hand to add grip while loosening.
- Remove the pulley bolts completely using the 10mm socket.
- Remove the pulley by hand and set it aside.
Step 10: Remove the Water Pump Bolts
- Use a 10mm socket, ratchet, and extension to remove the water pump mounting bolts.
- Keep track of bolt positions as you remove them.
- Use shop towels under the pump because more coolant may spill.
Step 11: Remove the Old Water Pump
- Pull the water pump straight away from the engine by hand.
- If it is stuck, gently tap the pump body by hand or wiggle it loose.
- Do not pry hard against the engine sealing surface.
- Remove the old gasket from the engine or pump using a gasket pick set if needed.
Step 12: Clean the Sealing Surface
- Use a plastic scraper to clean the water pump mounting surface.
- Use shop towels to wipe the surface dry.
- Make sure no old gasket material falls into the coolant passage.
- Do not use metal scrapers or power sanding tools.
- Smooth and dry seals best.
Step 13: Install the New Water Pump Gasket
- Position the new water pump gasket onto the new pump by hand.
- Make sure all bolt holes line up.
- Do not use RTV sealant unless the pump manufacturer specifically instructs it.
Step 14: Install the New Water Pump
- Place the new water pump against the engine by hand.
- Start all water pump bolts by hand first to avoid cross-threading.
- Use a 10mm socket and ratchet to snug the bolts evenly in a crisscross pattern.
- Use a 1/4-inch drive torque wrench with a 10mm socket to tighten the water pump bolts to Torque to 10 Nm (89 in-lbs).
Step 15: Reinstall the Water Pump Pulley
- Place the pulley onto the new water pump by hand.
- Start the pulley bolts by hand.
- Use a 10mm socket and ratchet to snug the pulley bolts evenly.
- Final-tighten the pulley bolts after the belt is installed and holding the pulley.
Step 16: Reinstall the Serpentine Belt
- Route the serpentine belt around the pulleys using your photo as a guide.
- Leave the easiest smooth pulley for last.
- Use the belt tensioner tool 3/8-inch drive to rotate the tensioner.
- Slide the belt fully onto the last pulley by hand.
- Slowly release the tensioner.
- Check that the belt ribs sit correctly in every grooved pulley.
Step 17: Torque the Water Pump Pulley Bolts
- Use a 10mm socket and 1/4-inch drive torque wrench to tighten the water pump pulley bolts.
- Tighten the pulley bolts to Torque to 10 Nm (89 in-lbs).
- Check again that the belt is seated correctly.
Step 18: Reinstall Wheelhouse and Splash Shields
- Position the right front wheelhouse access shield by hand.
- Use the trim clip removal tool by hand to reinstall plastic clips.
- Use a 7mm socket and ratchet to reinstall wheelhouse screws.
- Position the lower splash shield by hand.
- Use a 7mm socket and ratchet to reinstall the lower splash shield screws.
Step 19: Reconnect the Battery
- Use a 10mm socket and ratchet to reconnect the negative battery cable.
- Tighten the terminal nut until the cable does not twist by hand.
- Do not over-tighten the battery terminal.
Step 20: Refill the Cooling System
- Install the spill-free coolant fill kit onto the coolant reservoir.
- Add premixed DEX-COOL 50/50 coolant until the reservoir reaches the cold-fill range.
- Keep some coolant in the funnel while bleeding air from the system.
- Use only DEX-COOL compatible coolant in your Traverse.
Step 21: Bleed Air from the Cooling System
- Start the engine and let it idle with the spill-free coolant fill kit installed.
- Set the heater to full hot using the climate controls.
- Watch for air bubbles rising into the funnel.
- Add premixed DEX-COOL 50/50 coolant as the level drops.
- Let the engine reach normal operating temperature.
- Check the new water pump, hose connections, and lower radiator hose for leaks.
Step 22: Cap the System and Lower the Vehicle
- Turn the engine off and let the coolant level settle.
- Remove the spill-free coolant fill kit using the kit instructions.
- Install the coolant reservoir cap by hand until fully seated.
- Use the floor jack rated 3-ton minimum to raise the vehicle slightly off the jack stands.
- Remove the jack stands rated 3-ton minimum.
- Lower your Traverse slowly using the floor jack.
✅ After Repair
- ✅ Let the engine reach normal temperature and confirm there are no leaks from the water pump area.
- 🌡️ Watch the temperature gauge during a short test drive. It should stay in the normal range.
- 🔥 Confirm the heater blows warm air after the engine warms up.
- 👂 Listen for belt squeal, chirping, grinding, or whining near the water pump.
- ❄️ After the engine cools completely, recheck the coolant reservoir level and top off with premixed DEX-COOL 50/50 coolant if needed.
- ♻️ Recycle old coolant properly at an approved recycling location.
💰 DIY vs Shop Cost
Shop Cost: $550-$950 parts + labor
DIY Cost: $120-$300 parts only
You Save: $430-$650 by doing it yourself!
Shop labor rates vary but typically run $100-$150/hour. This repair takes a shop approximately 3-4 hours.
🎯 Ready to get started?
HowToo makes it easy: same-day/2-day shipping on every part, plus all the tools and specialty tools you need! Check out the parts and tools sections below to add everything to your cart.
