

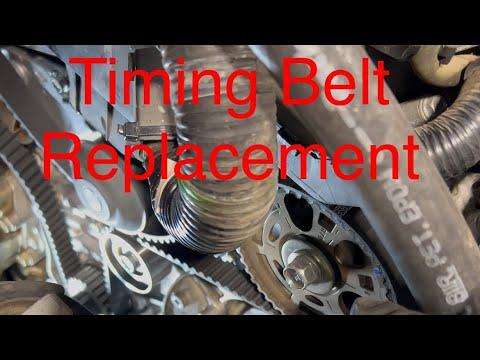



How to Replace the Water Pump on a 2018-2019 Honda Odyssey (Engine: V6 3.5L)
Step-by-step timing belt water pump guide with tools, parts, torque specs, and safety tips for 2018, 2019
How to Replace the Water Pump on a 2018-2019 Honda Odyssey (Engine: V6 3.5L)
Step-by-step timing belt water pump guide with tools, parts, torque specs, and safety tips for 2018, 2019


🔧 Odyssey - Water Pump Replacement
The water pump on your Odyssey is driven by the timing belt, so this repair requires removing the timing belt covers, setting the engine at Top Dead Center, removing the timing belt, and replacing the pump behind it. Because this job affects engine timing, accuracy is critical to prevent engine damage.
Difficulty Level: Advanced | Estimated Time: 6-9 hours
⚠️ Safety & Precautions
- ⚠️ This is an interference engine. If the timing belt is installed incorrectly, internal engine damage can occur.
- ⚠️ Disconnect the negative battery cable before working near the starter, alternator wiring, or engine mount area.
- ⚠️ Support the engine before removing the side engine mount.
- ⚠️ Never work under a vehicle supported only by a jack. Use jack stands.
- ⚠️ Coolant is toxic. Keep it away from children and pets, and dispose of it properly.
- ⚠️ Wait until the engine is completely cool before opening the cooling system.
- ⚠️ Do not rotate the crankshaft or camshafts with the timing belt removed unless the service procedure specifically calls for it.
🔧 Required Tools
You'll need the following tools for this repair:
- 10mm socket
- 12mm socket
- 14mm socket
- 17mm socket
- 19mm socket
- 10mm wrench
- 14mm wrench
- 3/8 inch ratchet
- 1/2 inch breaker bar
- 1/2 inch torque wrench 10-150 ft-lbs
- 3/8 inch torque wrench 5-80 ft-lbs
- 19mm Honda crank pulley socket (specialty)
- Honda crank pulley holding tool 50mm (specialty)
- Serpentine belt tool 14mm
- Harmonic balancer puller set (specialty)
- Floor jack rated 3-ton minimum
- Jack stands rated 3-ton minimum
- Wheel chocks
- Engine support block wood 2x4
- Drain pan 3 gallon minimum
- Coolant funnel spill-free kit
- Hose clamp pliers
- Flat blade screwdriver 1/4 inch
- Plastic scraper
- Pick tool 90 degree
- Paint marker white
- Shop light
- Shop towels
- Nitrile gloves
- Safety glasses
🔩 Required Parts
HowToo sells all the parts you need for this repair:
- Water pump with gasket - Qty: 1
- Timing belt - Qty: 1
- Timing belt hydraulic tensioner - Qty: 1
- Timing belt tensioner pulley - Qty: 1
- Timing belt idler pulley - Qty: 1
- Serpentine drive belt - Qty: 1
- Honda-compatible blue coolant premix - Qty: 2 gallons
- Crankshaft pulley bolt - Qty: 1
- Engine mount bracket bolts - Qty: As required if stretched or damaged
📋 Before You Begin
- 🚗 Park your Odyssey on level ground and let the engine cool completely.
- 🅿️ Shift to Park, set the parking brake, and place wheel chocks behind the rear wheels.
- 🔋 Disconnect the negative battery cable using a 10mm wrench.
- 🧊 Open the radiator cap only when the engine is cold.
- ℹ️ Top Dead Center means piston number 1 is at the top of its stroke and timing marks are aligned.
- ℹ️ A torque wrench tightens bolts to an exact tightness so parts are not damaged.
- ℹ️ A hydraulic tensioner is a small oil-filled part that keeps the timing belt tight.
🔨 Step-by-Step Instructions
Follow these steps in order:
Step 1: Raise and Support the Front
- Use a floor jack rated 3-ton minimum to lift the front of your Odyssey at the front center jacking point.
- Place jack stands rated 3-ton minimum under the front side support points.
- Lower the vehicle gently onto the jack stands.
- Keep the floor jack rated 3-ton minimum nearby for supporting the engine later.
Step 2: Drain the Coolant
- Place a drain pan 3 gallon minimum under the radiator drain area.
- Remove the radiator cap by hand only after the engine is cold.
- Use a flat blade screwdriver 1/4 inch if needed to open the radiator drain plug.
- Let the coolant drain fully into the pan.
- Close the drain plug snugly by hand or with the flat blade screwdriver 1/4 inch.
Step 3: Remove the Right Front Wheel and Splash Shield
- Use a 19mm socket and 1/2 inch breaker bar to loosen the right front wheel lug nuts.
- Remove the lug nuts with the 19mm socket and take off the wheel.
- Use a 10mm socket and 3/8 inch ratchet to remove the splash shield bolts.
- Use a flat blade screwdriver 1/4 inch or plastic scraper to release plastic clips.
- Remove the splash shield for crank pulley access.
Step 4: Remove the Serpentine Belt
- Use a serpentine belt tool 14mm on the belt tensioner.
- Rotate the tensioner to relieve belt tension.
- Slide the belt off the pulleys by hand.
- Release the tensioner slowly.
- Tip: Take a belt routing photo first.
Step 5: Support the Engine
- Place an engine support block wood 2x4 on the saddle of the floor jack rated 3-ton minimum.
- Position the jack under the engine oil pan area.
- Raise the jack only until it lightly supports the engine.
- Do not lift the vehicle off the jack stands.
Step 6: Remove the Right Side Engine Mount
- Use a 14mm socket, 17mm socket, and 3/8 inch ratchet to remove the right side engine mount fasteners.
- Use the floor jack rated 3-ton minimum to slightly raise or lower the engine if bolts bind.
- Remove the mount and set it aside in order.
- During installation, tighten the engine mount fasteners to the factory-spec size-based values: 14mm-head bolts to 54 Nm (40 ft-lbs) and 17mm-head bolts/nuts to 64 Nm (47 ft-lbs), unless your replacement mount instructions specify otherwise.
Step 7: Set Engine to Top Dead Center
- Install the 19mm Honda crank pulley socket (specialty) on the crankshaft pulley bolt.
- Use a 1/2 inch breaker bar to rotate the engine clockwise only.
- Align the crankshaft pulley TDC mark with the pointer on the lower timing cover.
- Use a shop light to confirm both camshaft pulley timing marks align with the rear timing cover marks.
- Use a paint marker white to mark the cam pulley marks and crank mark for easy visibility.
Step 8: Remove the Crankshaft Pulley Bolt
- Install the Honda crank pulley holding tool 50mm (specialty) onto the crank pulley.
- Use the 19mm Honda crank pulley socket (specialty) with the 1/2 inch breaker bar to loosen the crankshaft pulley bolt.
- Remove the bolt and washer.
- If the pulley is stuck, use the harmonic balancer puller set (specialty) to remove it carefully.
Step 9: Remove Timing Belt Covers
- Use a 10mm socket and 3/8 inch ratchet to remove the upper timing belt cover bolts.
- Use a 10mm socket and 3/8 inch ratchet to remove the lower timing belt cover bolts.
- Remove the covers carefully without cracking them.
Step 10: Verify Timing Marks Again
- Use a shop light to confirm the crankshaft timing mark is still aligned.
- Use a shop light to confirm both camshaft timing marks are still aligned.
- Use the paint marker white to mark the old belt-to-sprocket positions if desired.
- Tip: Check marks twice before belt removal.
Step 11: Remove the Timing Belt Tension
- Use a 12mm socket and 3/8 inch ratchet to remove the timing belt guide plate if equipped.
- Use a 14mm socket and 3/8 inch ratchet to remove the hydraulic tensioner bolts evenly.
- Remove the hydraulic tensioner.
- Use a 14mm socket and 3/8 inch ratchet to loosen the tensioner pulley bolt.
- Slide the timing belt off the cam sprockets, crank sprocket, idler pulley, and water pump.
Step 12: Remove the Water Pump
- Place the drain pan 3 gallon minimum under the water pump area.
- Use a 10mm socket and 3/8 inch ratchet to remove the water pump bolts.
- Use a plastic scraper to gently break the old pump free if it is stuck.
- Remove the water pump and gasket.
- Expect more coolant to drain from the engine block.
Step 13: Clean the Sealing Surface
- Use a plastic scraper to clean old gasket material from the engine surface.
- Use shop towels to wipe the surface dry.
- Use a pick tool 90 degree only for stubborn corners, and do not gouge the aluminum.
- The surface must be clean and smooth so the new pump does not leak.
Step 14: Install the New Water Pump
- Install the new water pump with gasket onto the engine by hand.
- Start all water pump bolts by hand first to avoid cross-threading.
- Use a 10mm socket and 3/8 inch ratchet to snug the bolts in a crisscross pattern.
- Use a 3/8 inch torque wrench 5-80 ft-lbs to tighten the water pump bolts evenly.
- Torque to 12 Nm (8.7 ft-lbs)
Step 15: Replace the Timing Belt Pulleys
- Use a 14mm socket and 3/8 inch ratchet to remove the idler pulley bolt.
- Install the new timing belt idler pulley.
- Use a 3/8 inch torque wrench 5-80 ft-lbs to tighten the idler pulley bolt.
- Torque to 45 Nm (33 ft-lbs)
- Install the new timing belt tensioner pulley using the 14mm socket and 3/8 inch ratchet.
- Leave the tensioner pulley able to move until the belt is installed.
Step 16: Install the New Timing Belt
- Use a shop light to verify all timing marks are aligned before installing the belt.
- Install the new timing belt around the crank sprocket first.
- Route it over the front cam sprocket, around the water pump, over the rear cam sprocket, around the idler, and around the tensioner pulley.
- Keep the non-tensioned side of the belt tight while routing it.
- Use your hands only. Do not pry against the belt with metal tools.
Step 17: Install the New Hydraulic Tensioner
- Install the new timing belt hydraulic tensioner with its retaining pin still installed.
- Use a 14mm socket and 3/8 inch ratchet to snug the tensioner bolts.
- Use a 3/8 inch torque wrench 5-80 ft-lbs to tighten the hydraulic tensioner bolts.
- Torque to 22 Nm (16 ft-lbs)
- Use a 14mm socket and 3/8 inch torque wrench 5-80 ft-lbs to tighten the tensioner pulley bolt.
- Torque to 44 Nm (33 ft-lbs)
- Pull the retaining pin from the hydraulic tensioner by hand to apply belt tension.
Step 18: Rotate the Engine by Hand
- Install the crank pulley bolt temporarily by hand.
- Use the 19mm Honda crank pulley socket (specialty) and 1/2 inch breaker bar to rotate the engine clockwise two full turns.
- Stop at Top Dead Center again.
- Use the shop light to verify the crank and cam timing marks align exactly.
- If marks do not line up, do not start the engine. Remove the belt and correct timing.
Step 19: Reinstall Timing Belt Covers
- Use a 10mm socket and 3/8 inch ratchet to reinstall the lower timing cover.
- Use a 10mm socket and 3/8 inch ratchet to reinstall the upper timing covers.
- Tighten cover bolts snugly.
- Torque to 12 Nm (8.7 ft-lbs)
Step 20: Reinstall the Crankshaft Pulley
- Install the crankshaft pulley by hand, aligning the keyway correctly.
- Install a new crankshaft pulley bolt by hand.
- Use the Honda crank pulley holding tool 50mm (specialty) to hold the pulley.
- Use the 19mm Honda crank pulley socket (specialty) and 1/2 inch torque wrench 10-150 ft-lbs to tighten the crank bolt.
- Torque to 64 Nm (47 ft-lbs), then tighten an additional 60 degrees
Step 21: Reinstall the Engine Mount
- Use the floor jack rated 3-ton minimum to adjust engine height until the mount holes line up.
- Start all engine mount fasteners by hand.
- Use a 14mm socket, 17mm socket, and 3/8 inch ratchet to snug the fasteners.
- Use a 3/8 inch torque wrench 5-80 ft-lbs to tighten the fasteners.
- Torque 14mm-head bolts to 54 Nm (40 ft-lbs)
- Torque 17mm-head bolts/nuts to 64 Nm (47 ft-lbs)
Step 22: Install the New Serpentine Belt
- Route the new serpentine drive belt over the pulleys using your photo as a guide.
- Use the serpentine belt tool 14mm to rotate the tensioner.
- Slip the belt over the final pulley by hand.
- Release the tensioner slowly.
- Use a shop light to confirm the belt ribs sit correctly in every pulley groove.
Step 23: Reinstall Splash Shield and Wheel
- Use a 10mm socket and 3/8 inch ratchet to reinstall the splash shield bolts.
- Use a flat blade screwdriver 1/4 inch or plastic scraper to reinstall plastic clips.
- Install the right front wheel by hand.
- Use a 19mm socket and 1/2 inch torque wrench 10-150 ft-lbs to tighten the lug nuts after lowering the vehicle.
- Torque to 108 Nm (80 ft-lbs)
Step 24: Refill the Cooling System
- Install a coolant funnel spill-free kit at the radiator fill neck.
- Pour in Honda-compatible blue coolant premix until the radiator is full.
- Fill the coolant reservoir to the MAX line.
- Reconnect the negative battery cable using a 10mm wrench.
- Torque to 5 Nm (44 in-lbs)
Step 25: Bleed Air from the Cooling System
- Start the engine and let it idle with the coolant funnel spill-free kit installed.
- Set the climate control to maximum heat and low fan speed.
- Watch for air bubbles in the funnel as the engine warms up.
- Add coolant as the level drops.
- Once the radiator fans cycle and heat blows warm, turn the engine off.
- Let the engine cool, remove the funnel, and install the radiator cap.
✅ After Repair
- ✅ Check around the water pump and radiator drain plug for leaks.
- ✅ Listen for abnormal belt noise, knocking, or chirping before driving.
- ✅ Watch the temperature gauge during the first full warm-up.
- ✅ After the first drive, let the engine cool completely and recheck coolant level.
- ✅ Recheck the right front wheel lug nut torque after driving 25-50 miles.
- ✅ No scan tool reset, battery registration, infotainment reset, EPB retraction, ADAS calibration, or coding is required.
💰 DIY vs Shop Cost
Shop Cost: $1,100-$1,800 for timing belt, water pump, tensioner components, coolant, and labor
DIY Cost: $300-$650 for parts and coolant
You Save: $800-$1,150 by doing it yourself!
Shop labor rates vary but typically run $100-$150/hour. This repair takes a shop approximately 5-7 hours.
🎯 Ready to get started?
HowToo makes it easy: same-day/2-day shipping on every part, plus all the tools and specialty tools you need! Check out the parts and tools sections below to add everything to your cart.