

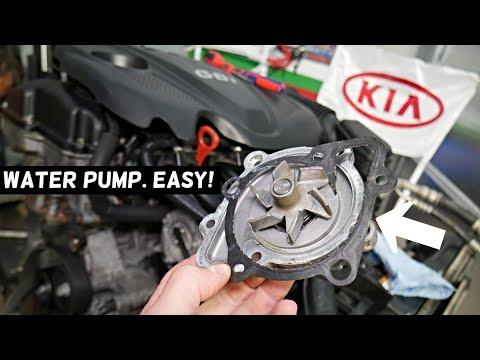







How to Replace the Water Pump on a 2016-2019 Kia Optima 2.4L (Trim: LX | Engine: Inline 4 2.4L)
Step-by-step DIY instructions with tools, parts, torque specs, coolant bleeding, and safety tips for 2016, 2017, 2018
How to Replace the Water Pump on a 2016-2019 Kia Optima 2.4L (Trim: LX | Engine: Inline 4 2.4L)
Step-by-step DIY instructions with tools, parts, torque specs, coolant bleeding, and safety tips for 2016, 2017, 2018


🔧 Optima - Water Pump Replacement
The water pump circulates coolant through your Optima’s 2.4L engine. Replacement requires draining the cooling system, removing the accessory drive belt and pulley, installing the new pump, and carefully bleeding trapped air from the system.
Difficulty Level: Intermediate | Estimated Time: 3-5 hours
⚠️ Safety & Precautions
- ⚠️ Let the engine become completely cold before opening the cooling system. Hot coolant can cause severe burns.
- 🧤 Wear gloves and safety glasses. Coolant is poisonous; immediately clean spills and keep it away from children and animals.
- 🚫 Never work beneath your Optima while it is supported only by a floor jack.
- 🔑 Keep the ignition off while working near the accessory drive belt.
- 🔋 Battery disconnection is not required for this repair.
- ♻️ Capture all drained coolant in a clean drain pan and recycle it properly.
🔧 Required Tools
You'll need the following tools for this repair:
- 3/8-inch drive ratchet
- 3/8-inch drive breaker bar
- 3/8-inch drive torque wrench (5-80 ft-lbs)
- 3/8-inch drive 6-inch extension
- 10mm socket
- 12mm socket
- 14mm socket
- 17mm socket
- 10mm combination wrench
- 12mm combination wrench
- Flat-blade screwdriver (6-inch)
- Phillips No. 2 screwdriver
- Plastic trim-clip removal tool
- Plastic gasket scraper
- Drain pan (3-gallon minimum)
- Spill-free coolant funnel kit (specialty)
- Coolant hydrometer or refractometer (specialty)
- Floor jack (rated 2-ton minimum)
- Jack stands (rated 2-ton minimum)
- Wheel chocks
- Mechanic’s gloves
- Safety glasses
- Shop towels
- Work light
🔩 Required Parts
HowToo sells all the parts you need for this repair:
- Engine water pump - Qty: 1
- Water pump gasket - Qty: 1
- Kia-compatible phosphate-based long-life coolant concentrate - Qty: 1 gallon
- Distilled water - Qty: 1 gallon
- Accessory drive belt - Qty: 1 if worn, cracked, glazed, or coolant-contaminated
- Radiator drain-plug seal - Qty: 1 if damaged
📋 Before You Begin
- 🅿️ Park your Optima on level ground, select Park, apply the parking brake, and allow the engine to cool completely.
- 🛞 Place wheel chocks behind both rear wheels.
- 📷 Photograph the accessory-belt routing with a phone before removing the belt.
- 🧪 Mix coolant concentrate with distilled water in a 50/50 ratio. Do not use hard tap water.
- 📱 No infotainment service mode, scan-tool command, coding, or battery registration is required.
- 🔎 Check that the replacement pump and gasket match the removed components before installation.
🔨 Step-by-Step Instructions
Follow these steps in order:
Step 1: Raise and Support the Front
- Use the floor jack at the front-center lifting point to raise your Optima.
- Position the jack stands beneath the reinforced front side support points, then slowly lower the vehicle onto them.
- Keep the floor jack lightly touching the lifting point as a backup without carrying the vehicle’s weight.
- Use the work light to verify that both stands are seated securely before reaching underneath.
Step 2: Remove the Lower Engine Cover
- Use the 10mm socket, Phillips No. 2 screwdriver, and plastic trim-clip removal tool to remove the lower engine-cover fasteners.
- Use the plastic trim-clip removal tool to lift each clip’s center pin before removing the clip body.
- Lower the cover and place its fasteners in a safe container.
Step 3: Drain the Coolant
- Put on the safety glasses and mechanic’s gloves.
- Position the 3-gallon drain pan beneath the radiator drain plug at the bottom of the radiator.
- Use the flat-blade screwdriver to loosen the plastic drain plug carefully. Do not force or completely remove it unless necessary.
- After coolant begins flowing, slowly remove the radiator cap to admit air and improve drainage.
- When the flow stops, use the flat-blade screwdriver to close the drain plug until snug. Do not overtighten the plastic plug.
Step 4: Loosen the Water-Pump Pulley Bolts
- Locate the water-pump pulley on the passenger side of the engine.
- Keep the accessory belt installed so its tension helps hold the pulley.
- Use the 10mm socket and ratchet to break the pulley bolts loose approximately one-quarter turn. Do not remove them yet.
- If the pulley turns, use the 10mm combination wrench on one bolt while loosening another with the 10mm socket.
- Loosen pulley bolts before removing belt tension.
Step 5: Remove the Accessory Drive Belt
- Compare the belt path with the routing photograph taken earlier.
- Use the 17mm socket and breaker bar on the automatic belt tensioner. An automatic tensioner is the spring-loaded arm that keeps the belt tight.
- Rotate the tensioner slowly to release belt tension, then slide the belt off the water-pump pulley.
- Allow the tensioner to return slowly. Do not let it snap back.
- Remove the belt and inspect it. Replace it if it is cracked, shiny, frayed, stretched, or contaminated with coolant.
Step 6: Remove the Water-Pump Pulley
- Use the 10mm socket and ratchet to remove the previously loosened pulley bolts.
- Support the pulley while removing the final bolt, then lift the pulley away from the pump.
- Use the shop towels to clean coolant or dirt from the pulley grooves.
Step 7: Remove the Old Water Pump
- Place the drain pan directly below the water pump because additional coolant will escape.
- Use the 12mm socket, extension, and ratchet to remove the water-pump mounting bolts.
- Note each bolt’s original location because bolt lengths may differ.
- Use the plastic gasket scraper to separate the pump gently if it remains stuck. Do not pry against or gouge the aluminum sealing surface.
- Remove the old pump and gasket, then allow the remaining coolant to drain into the pan.
Step 8: Clean and Inspect the Mounting Surface
- Use the plastic gasket scraper to remove old gasket material from the engine’s aluminum sealing surface.
- Use shop towels to wipe the surface clean and dry.
- Use the work light to inspect the surface for corrosion, scratches, or leftover gasket material.
- Do not use a powered abrasive disc. Abrasive debris can enter the cooling system and damage the engine.
Step 9: Install the New Water Pump
- Fit the new gasket to the replacement pump in the correct orientation.
- Do not apply RTV silicone unless the replacement-pump manufacturer specifically requires it.
- Place the pump squarely against the engine and start every mounting bolt by hand.
- Use the 12mm socket and ratchet to seat the bolts gradually in a crossing pattern.
- Use the 12mm socket and torque wrench to tighten the water-pump mounting bolts evenly to 20 Nm (15 ft-lbs).
Step 10: Install the Water-Pump Pulley
- Position the pulley on the new pump and start all pulley bolts by hand.
- Use the 10mm socket and ratchet to tighten the bolts lightly in a crossing pattern.
- Use the 10mm socket and torque wrench to tighten the pulley bolts to 10 Nm (7 ft-lbs).
- Use the 10mm combination wrench on an adjacent bolt if the pulley attempts to rotate.
Step 11: Install the Accessory Drive Belt
- Route the belt around the crankshaft, alternator, air-conditioning compressor, idler pulleys, and water-pump pulley according to the original routing photograph.
- Use the 17mm socket and breaker bar to rotate the automatic tensioner slowly.
- Slide the belt over the final smooth pulley, then release the tensioner gradually.
- Use the work light to confirm that every belt rib sits fully inside every grooved pulley.
- One misplaced rib can destroy the new belt.
Step 12: Refill the Cooling System
- Confirm that the radiator drain plug is closed.
- Install the spill-free coolant funnel on the radiator filler neck.
- Slowly add the prepared 50/50 Kia-compatible coolant mixture until the radiator remains full.
- Fill the coolant reservoir to the “F” or “MAX” mark.
- Use the coolant hydrometer or refractometer to confirm approximately 50/50 freeze protection if the coolant was mixed manually.
Step 13: Bleed Air from the Cooling System
- Leave the spill-free coolant funnel installed and keep the vehicle supported securely.
- Start the engine and set the cabin temperature to full hot with the blower at low speed.
- Use the work light to watch the coolant level and pump area while the engine idles.
- Add 50/50 coolant through the funnel as the level drops and trapped air bubbles escape.
- Allow the engine to reach normal operating temperature. Warm air from the vents indicates coolant is circulating through the heater core.
- Do not reach near the moving belt or cooling fans. Electric fans can start without warning.
- Once bubbling stops and the upper radiator hose becomes hot, switch the engine off and allow it to cool completely.
Step 14: Recheck Coolant and Install the Lower Cover
- After the engine is completely cold, use the spill-free coolant funnel to top off the radiator if needed.
- Adjust the reservoir level to the “F” or “MAX” mark.
- Remove the funnel and install the radiator cap fully.
- Raise your Optima slightly with the floor jack, remove the jack stands, and lower it to the ground.
- Use the 10mm socket, Phillips No. 2 screwdriver, and plastic trim-clip removal tool to reinstall the lower engine cover and its original fasteners.
✅ After Repair
- 🔍 Run the engine and inspect the water-pump gasket, radiator drain plug, hoses, and radiator cap for leaks.
- 🌡️ Confirm that the temperature gauge remains at its normal position and that the cabin heater produces steady heat.
- 👂 Listen for grinding, chirping, or belt squeal. Stop the engine immediately if the belt tracks off-center.
- 🧊 Recheck the radiator and reservoir levels only after the engine becomes completely cold.
- 📅 Check the coolant level again after two or three complete heat cycles and after approximately 100 miles.
- 🚨 Stop driving if the engine overheats, the heater suddenly blows cold air, or coolant continues disappearing.
💰 DIY vs Shop Cost
Shop Cost: ₹18,000-₹32,000 (parts + labor)
DIY Cost: ₹6,000-₹13,000 (parts only)
You Save: ₹12,000-₹19,000 by doing it yourself!
Local labor rates vary. This repair takes a shop approximately 2.5-4 hours.
🎯 Ready to get started?
HowToo makes it easy: same-day/2-day shipping on every part, plus all the tools and specialty tools you need! Check out the parts and tools sections below to add everything to your cart.