

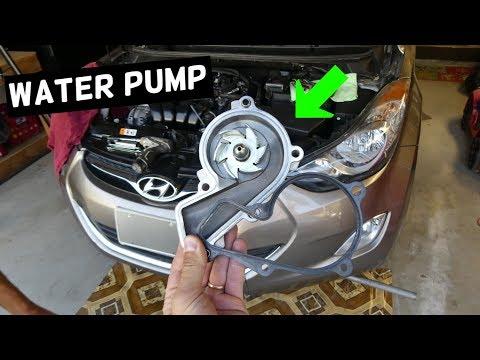




How to Replace the Water Pump on a 2015-2019 Hyundai Elantra 2.0L (Trim: SE | Engine: Inline 4 2.0L)
Step-by-step DIY instructions with tools, parts, torque specs, and safety tips for 2015, 2016
How to Replace the Water Pump on a 2015-2019 Hyundai Elantra 2.0L (Trim: SE | Engine: Inline 4 2.0L)
Step-by-step DIY instructions with tools, parts, torque specs, and safety tips for 2015, 2016


🔧 Elantra - Water Pump Replacement
The water pump circulates coolant through your Elantra’s 2.0L engine. Replacement requires draining the cooling system, removing the accessory drive belt and pump pulley, then installing the new pump with a fresh gasket.
Difficulty Level: Intermediate | Estimated Time: 3-5 hours
Assumption: This procedure applies to the factory-installed 2.0L naturally aspirated engine.
⚠️ Safety & Precautions
- ⚠️ Let the engine cool completely before opening the cooling system. Hot coolant can cause severe burns.
- 🧤 Wear gloves and safety glasses. Coolant is poisonous and must be kept away from children and animals.
- 🚫 Never work beneath your Elantra when it is supported only by a floor jack.
- 🔋 Disconnect the negative battery terminal before placing tools near the engine.
- 🧹 Immediately clean spilled coolant and take used coolant to an approved recycling facility.
- 🔧 Do not apply sealant unless the replacement-pump instructions specifically require it.
🔧 Required Tools
You'll need the following tools for this repair:
- 10mm socket
- 12mm socket
- 14mm socket
- 17mm socket
- 3/8-inch drive ratchet
- 3/8-inch drive breaker bar
- 3/8-inch drive torque wrench rated 5-80 Nm
- 150mm socket extension
- 10mm combination wrench
- 12mm combination wrench
- Flat-blade screwdriver
- Trim-clip removal tool
- Hose-clamp pliers
- Plastic gasket scraper
- 2-gallon drain pan
- Cooling-system spill-free funnel (specialty)
- Floor jack rated 2-ton minimum
- Jack stands rated 2-ton minimum
- Wheel chocks
- Nitrile mechanic gloves
- Safety glasses
- Shop towels
🔩 Required Parts
HowToo sells all the parts you need for this repair:
- Engine water pump - Qty: 1
- Water-pump gasket or O-ring - Qty: 1
- Hyundai-compatible phosphate-based coolant concentrate - Qty: 4 litres
- Distilled water - Qty: 4 litres
- Accessory drive belt - Qty: 1 if cracked, glazed, frayed, or coolant-soaked
📋 Before You Begin
- 🚗 Park your Elantra on level ground, select Park, apply the parking brake, and chock both rear wheels.
- 🌡️ Wait until the upper radiator hose feels completely cold.
- 📸 Photograph the accessory-belt routing before removing the belt.
- 🔋 Open the hood. Use a 10mm socket to disconnect the negative battery terminal and position it where it cannot touch the battery post.
- 🧊 Mix coolant concentrate with distilled water at a 50/50 ratio unless your coolant is already premixed.
🔨 Step-by-Step Instructions
Follow these steps in order:
Step 1: Raise and Secure the Vehicle
- Use the floor jack at the front-center lifting point and raise your Elantra.
- Place the jack stands beneath the reinforced front side support points, then lower the vehicle onto them.
- Gently push the body to verify that it is stable before reaching underneath.
Step 2: Remove the Lower Engine Cover
- Use a 10mm socket and trim-clip removal tool to remove the fasteners from the lower engine cover.
- Lower the cover and place its fasteners together so they are not lost.
Step 3: Drain the Coolant
- Position the 2-gallon drain pan beneath the radiator drain fitting.
- Slowly remove the radiator cap only after confirming the engine is completely cold.
- Open the plastic radiator drain fitting by hand. If necessary, use a flat-blade screwdriver with very light pressure.
- Allow the coolant to drain completely, then close the fitting by hand until snug. Do not overtighten the plastic fitting.
Step 4: Loosen the Water-Pump Pulley Bolts
- Locate the smooth metal water-pump pulley on the accessory-belt side of the engine.
- With the belt still installed to help hold the pulley, use a 10mm socket to loosen each pulley bolt about one-half turn.
- Do not remove the bolts yet.
- Loosen bolts before releasing belt tension.
Step 5: Remove the Accessory Drive Belt
- Compare the belt routing with your photograph before continuing.
- Fit a 17mm socket and breaker bar onto the automatic tensioner. The tensioner is the spring-loaded pulley that keeps the belt tight.
- Rotate the tensioner away from the belt until the belt becomes loose.
- Slide the belt off one pulley, then slowly release the tensioner. Never let it snap back.
- Remove the belt and inspect it for cracks, fraying, glazing, or coolant contamination.
Step 6: Remove the Water-Pump Pulley
- Use a 10mm socket to remove the previously loosened pulley bolts.
- Support the pulley with one hand while removing the final bolt.
- Pull the pulley straight off the pump hub. Do not bend or pry against it.
Step 7: Remove the Old Water Pump
- Place the drain pan beneath the pump because additional coolant will escape.
- Use a 12mm socket, extension, and ratchet to remove the water-pump mounting bolts.
- Note the location of every bolt because bolt lengths may differ.
- Gently move the pump from side to side and pull it away from the engine.
- If it is stuck, tap the pump body lightly with the plastic handle of the screwdriver. Do not pry against the aluminum sealing surface.
Step 8: Clean and Inspect the Mounting Surface
- Use the plastic gasket scraper to remove gasket residue without scratching the aluminum surface.
- Use shop towels to wipe the sealing surface clean and dry.
- Keep gasket debris and coolant out of the open coolant passage.
- Compare the new and old pumps. Confirm that the bolt pattern, pulley flange, and coolant passages match.
- Turn the new pump by hand. It should rotate smoothly without grinding or looseness.
Step 9: Install the New Water Pump
- Install the new gasket or O-ring in its correct position. Lightly wet an O-ring with fresh coolant if one is supplied.
- Do not use silicone sealant unless the pump manufacturer specifically directs you to use it.
- Hold the new pump squarely against the engine and install every mounting bolt by hand.
- Use a 12mm socket and torque wrench to tighten the bolts gradually in an alternating pattern.
- Torque the water-pump mounting bolts to 9.8-11.8 Nm (87-104 in-lbs).
- Hand-start every bolt to prevent thread damage.
Step 10: Reinstall the Water-Pump Pulley
- Place the pulley over the new pump hub.
- Install the pulley bolts by hand and lightly seat them with a 10mm socket.
- Do not fully tighten the bolts until the accessory belt is installed.
Step 11: Reinstall the Accessory Drive Belt
- Route the belt around the pulleys according to your photograph, leaving an easy-to-reach smooth pulley until last.
- Use the 17mm socket and breaker bar to rotate the automatic tensioner away from the belt.
- Slide the belt onto the final pulley and slowly release the tensioner.
- Inspect every pulley. The belt ribs must sit completely inside the pulley grooves.
- Turn the crankshaft clockwise two full revolutions with a 17mm socket, then recheck belt alignment.
Step 12: Tighten the Pulley Bolts
- Use a 10mm socket and torque wrench to tighten the water-pump pulley bolts evenly in stages.
- Torque the water-pump pulley bolts to 9.8-11.8 Nm (87-104 in-lbs).
Step 13: Refill and Bleed the Cooling System
- Lower your Elantra until it is level before filling the cooling system.
- Install the cooling-system spill-free funnel at the radiator filler neck.
- Slowly add the 50/50 coolant mixture until the radiator remains full.
- Fill the coolant reservoir to the “F” or “MAX” mark.
- Reconnect the negative battery terminal with a 10mm socket. Tighten it securely without crushing the terminal.
- Set the cabin heater to its hottest temperature and the blower to low.
- Start the engine and let it idle with the funnel installed. Add coolant as trapped air escapes.
- Gently squeeze the upper radiator hose several times while wearing gloves and keeping clear of the belt and fan.
- Allow the engine to warm until the upper radiator hose becomes hot and the radiator fan cycles at least once.
- Shut off the engine, let it cool completely, then top off the radiator and reservoir.
Step 14: Check for Leaks and Reinstall the Cover
- Use a flashlight to inspect the pump gasket, drain fitting, radiator hoses, and nearby surfaces for coolant leakage.
- If everything remains dry, use the floor jack and jack stands to raise and safely support your Elantra again.
- Reinstall the lower engine cover with the trim-clip removal tool and 10mm socket.
- Raise the vehicle slightly, remove the jack stands, and lower it completely.
✅ After Repair
- ✅ Confirm that the temperature gauge remains in its normal range during a 10-15 minute road test.
- 👂 Listen for squealing, grinding, or chirping from the belt side of the engine.
- 🔍 After the engine cools completely, recheck the radiator and reservoir levels and inspect the pump for leaks.
- 🧊 Recheck the coolant level over the next two or three cold starts. A small drop can occur as remaining air leaves the system.
- 🛑 Stop the engine immediately if it overheats, the heater suddenly blows cold, or coolant leaks rapidly.
- ♻️ Transfer used coolant into a sealed container and take it to an approved automotive-fluid recycling facility.
💰 DIY vs Shop Cost
Shop Cost: ₹18,000-₹35,000 (parts + labor)
DIY Cost: ₹5,000-₹12,000 (parts only)
You Save: ₹13,000-₹23,000 by doing it yourself!
Local labor rates vary. This repair takes a shop approximately 2.5-4 hours.
🎯 Ready to get started?
HowToo makes it easy: same-day/2-day shipping on every part, plus all the tools and specialty tools you need! Check out the parts and tools sections below to add everything to your cart.