




How to Replace the Water Pump on a 2012-2018 Ford Edge 3.5L V6 (Trim: Titanium | Engine: V6 3.5L)
Step-by-step internal water pump guide with timing tools, parts, torque specs, and safety tips for 2012, 2013, 2014
How to Replace the Water Pump on a 2012-2018 Ford Edge 3.5L V6 (Trim: Titanium | Engine: V6 3.5L)
Step-by-step internal water pump guide with timing tools, parts, torque specs, and safety tips for 2012, 2013, 2014


🔧 Edge - Water Pump Replacement
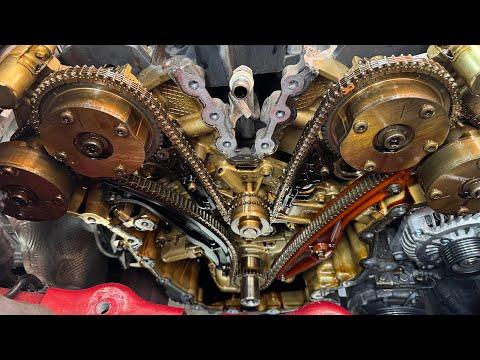
Replacing the water pump on your Edge is a major internal engine repair. On the 3.5L V6, the water pump is driven by the timing chain and is located behind the front engine cover, not externally on the belt side.
This job requires removing timing components, locking the engine timing, resealing the front cover, and refilling the cooling system. Incorrect timing can cause severe engine damage.
Difficulty Level: Advanced | Estimated Time: 8-12 hours
⚠️ Safety & Precautions
- ⚠️ Let the engine cool completely before opening the cooling system. Hot coolant can burn you badly.
- ⚠️ Disconnect the negative battery cable before working near the starter, alternator wiring, or timing components.
- ⚠️ Support the engine before removing the right-side engine mount. The engine can shift or drop if unsupported.
- ⚠️ Do not rotate the crankshaft or camshafts with the timing chain removed unless instructed. This can damage valves and pistons.
- ⚠️ Keep coolant away from pets and children. It is toxic and tastes sweet.
- ⚠️ Use only the correct Ford-compatible coolant type. Mixing coolant types can cause sludge and overheating.
- ⚠️ This engine’s water pump can leak coolant into the crankcase. If oil looks milky, change the engine oil and filter after repair.
🔧 Required Tools
You'll need the following tools for this repair:
- 8mm socket
- 10mm socket
- 13mm socket
- 15mm socket
- 18mm socket
- 21mm socket
- 1/2-inch breaker bar
- 1/2-inch drive ratchet
- 3/8-inch drive ratchet
- 3/8-inch torque wrench
- 1/2-inch torque wrench
- Metric socket extension set
- Metric combination wrench set
- Serpentine belt tool
- Harmonic balancer puller (specialty)
- Crankshaft holding tool (specialty)
- Ford 3.5L timing chain holding tools (specialty)
- Camshaft holding tool set (specialty)
- Trim clip removal tool
- Plastic gasket scraper
- Razor scraper
- Drain pan 3-gallon minimum
- Coolant funnel spill-free kit
- Floor jack rated 3-ton minimum
- Jack stands rated 3-ton minimum
- Engine support bar (specialty)
- Shop towels
- Safety glasses
- Nitrile gloves
🔩 Required Parts
HowToo sells all the parts you need for this repair:
- Internal engine water pump - Qty: 1
- Water pump gasket - Qty: 1
- Front engine cover gasket set - Qty: 1
- Valve cover gasket set - Qty: 1
- Crankshaft front seal - Qty: 1
- Timing chain tensioner gasket or seal - Qty: 1
- RTV silicone sealant compatible with engine oil and coolant - Qty: 1 tube
- Motorcraft Yellow or Ford-approved equivalent coolant - Qty: 2-3 gallons premixed
- Engine oil - Qty: 6 quarts
- Oil filter - Qty: 1
- Serpentine belt - Qty: 1
- Coolant hose O-rings or seals as needed - Qty: 1 set
- One-time-use crankshaft pulley bolt - Qty: 1
📋 Before You Begin
- 🅿️ Park your Edge on level ground, shift to Park, and set the parking brake.
- ❄️ Let the engine sit until it is fully cool.
- 🔋 Use a 10mm socket to disconnect the negative battery cable.
- 🚗 Use a floor jack rated 3-ton minimum and place the vehicle securely on jack stands rated 3-ton minimum.
- 🧰 A timing tool holds the camshafts and crankshaft in the correct position so the engine stays timed correctly.
- 🧼 Clean the work area before opening the engine. Dirt inside the timing cover can damage the engine.
- 📌 Take phone pictures before unplugging connectors or removing brackets. This helps during reassembly.
🔨 Step-by-Step Instructions
Follow these steps in order:
Step 1: Raise and Secure the Vehicle
- Use the floor jack rated 3-ton minimum to lift the front of your Edge at the correct front jacking point.
- Place jack stands rated 3-ton minimum under the approved support points.
- Gently lower the vehicle onto the jack stands and shake the vehicle lightly to confirm it is stable.
- Put on safety glasses and nitrile gloves.
Step 2: Disconnect the Battery
- Use a 10mm socket to loosen the negative battery terminal clamp.
- Remove the negative cable and position it away from the battery post.
- Always disconnect negative first.
Step 3: Drain the Coolant
- Place a drain pan 3-gallon minimum under the radiator drain area.
- Slowly loosen the coolant pressure cap only after the engine is cold.
- Open the radiator drain valve if accessible, or remove the lower radiator hose clamp with pliers if equipped.
- Allow the coolant to fully drain into the drain pan.
- Dispose of old coolant safely according to local rules.
Step 4: Remove the Right Front Wheel and Splash Shield
- Use a 21mm socket to loosen and remove the right front wheel lug nuts.
- Remove the wheel and set it aside.
- Use a trim clip removal tool and 8mm socket to remove the right inner fender splash shield fasteners.
- Remove the splash shield to access the crankshaft pulley area.
- During reassembly, tighten the wheel lug nuts to Torque to 204 Nm (150 ft-lbs).
Step 5: Remove Upper Engine Covers and Intake Ducting
- Use your hands to lift off the plastic engine appearance cover if equipped.
- Use an 8mm socket to loosen the intake duct clamps.
- Disconnect the air intake tube and move it aside.
- Use a 10mm socket to remove any intake resonator or bracket fasteners blocking access.
Step 6: Remove the Serpentine Belt
- Use the serpentine belt tool on the belt tensioner.
- Rotate the tensioner to release belt tension.
- Slide the belt off the pulleys and remove it from the engine bay.
- Take a belt routing photo first.
Step 7: Support the Engine
- Install the engine support bar across the upper body structure.
- Attach the support hook to a safe engine lifting point.
- Apply light upward tension with the engine support bar.
- Do not lift the engine hard. Only support its weight.
Step 8: Remove the Right Engine Mount
- Use a 15mm socket and 18mm socket to remove the right engine mount fasteners.
- Remove the mount and bracket as needed for timing cover access.
- Keep bolts organized by location.
- During reassembly, tighten engine mount fasteners to factory specification if available from the service data supplied with your parts. Common fasteners in this area vary by position.
Step 9: Remove the Crankshaft Pulley
- Install the crankshaft holding tool to keep the crankshaft from turning.
- Use a 1/2-inch breaker bar and correct socket to loosen the crankshaft pulley bolt.
- Remove the crankshaft pulley bolt.
- Use the harmonic balancer puller to remove the crankshaft pulley from the crankshaft.
- Discard the old crankshaft pulley bolt if it is one-time-use.
Step 10: Remove Valve Covers
- Label ignition coil connectors with tape if needed.
- Use an 8mm socket to remove ignition coil bolts.
- Disconnect the ignition coil connectors and remove the coils.
- Use an 8mm socket or 10mm socket to remove valve cover bolts.
- Carefully lift off both valve covers.
- Remove and discard the old valve cover gaskets.
Step 11: Set Engine to Top Dead Center
- Use a socket and ratchet on the crankshaft bolt area to rotate the engine clockwise only.
- Align the crankshaft and camshaft timing marks according to the Ford 3.5L timing procedure.
- Top Dead Center means piston number one is at the top of its travel on the compression stroke.
- Install the Ford 3.5L timing chain holding tools and camshaft holding tool set.
- Confirm the camshafts are locked before removing any timing components.
Step 12: Remove the Front Engine Cover
- Use an 8mm socket, 10mm socket, 13mm socket, and 15mm socket to remove front cover bolts by size and location.
- Note bolt locations carefully. Some bolts are different lengths.
- Use a plastic gasket scraper to gently separate the front cover from the engine.
- Do not pry between machined sealing surfaces with a screwdriver.
- Remove the front cover and set it on a clean workbench.
Step 13: Release Timing Chain Tension
- Use the Ford 3.5L timing chain holding tools to hold the timing chain and camshaft sprockets in place.
- Use a 10mm socket to remove timing chain tensioner fasteners as needed.
- A tensioner keeps the timing chain tight so it does not jump teeth.
- Carefully release chain tension without moving the camshafts or crankshaft.
- Mark chain and sprocket positions with a paint marker if desired.
Step 14: Remove the Water Pump
- Use an 8mm socket or 10mm socket to remove the water pump bolts.
- Pull the water pump straight out of the engine.
- Remove the old water pump gasket.
- Inspect the area for coolant sludge, broken gasket material, or metal debris.
- If coolant entered the oil, plan to replace the engine oil and oil filter before startup.
Step 15: Clean the Sealing Surfaces
- Use a plastic gasket scraper to clean the water pump mounting surface.
- Use shop towels to wipe away residue.
- Use a razor scraper only on stubborn material and keep it flat to avoid gouging.
- Do not let gasket debris fall into the engine.
- Clean surfaces prevent leaks.
Step 16: Install the New Water Pump
- Install the new water pump gasket onto the new internal engine water pump.
- Position the water pump squarely into the engine.
- Start all bolts by hand to avoid cross-threading.
- Use an 8mm socket or 10mm socket to snug the bolts evenly in a crisscross pattern.
- Tighten water pump bolts to Torque to 10 Nm (89 in-lbs), unless your included pump instructions specify otherwise.
Step 17: Reinstall Timing Components
- Use the Ford 3.5L timing chain holding tools to keep the chain aligned.
- Reinstall timing chain guides and tensioner components with a 10mm socket.
- Verify timing marks are still aligned before removing the camshaft holding tool set.
- Rotate the crankshaft clockwise two full turns by hand using a ratchet and socket.
- Recheck all timing marks after rotation.
- If any mark is off, stop and correct the timing before continuing.
Step 18: Reseal and Install the Front Engine Cover
- Use a plastic gasket scraper and shop towels to clean the front cover and engine sealing surfaces.
- Install the new crankshaft front seal into the front cover using an appropriate seal driver if available.
- Apply RTV silicone sealant compatible with engine oil and coolant only at the specified joint areas.
- Install the front engine cover carefully without smearing the sealant.
- Start all bolts by hand.
- Use an 8mm socket, 10mm socket, 13mm socket, and 15mm socket to tighten bolts evenly.
- Tighten small front cover bolts to Torque to 10 Nm (89 in-lbs) where applicable.
- Tighten larger front cover bolts to their correct factory specification by bolt size and location.
Step 19: Install the Crankshaft Pulley
- Slide the crankshaft pulley onto the crankshaft by hand.
- Install a new one-time-use crankshaft pulley bolt.
- Use the crankshaft holding tool to stop crankshaft movement.
- Use a 1/2-inch torque wrench to tighten the crankshaft pulley bolt following the Ford torque-plus-angle procedure supplied with the bolt.
- Do not reuse the old bolt if it is marked one-time-use.
Step 20: Reinstall Valve Covers
- Install new valve cover gaskets into the valve covers.
- Apply small dabs of RTV silicone sealant at timing cover-to-cylinder head joint corners if required.
- Set the valve covers in place carefully.
- Use an 8mm socket or 10mm socket to install the valve cover bolts by hand first.
- Tighten valve cover bolts to Torque to 10 Nm (89 in-lbs).
- Reinstall ignition coils using an 8mm socket.
- Reconnect all ignition coil connectors.
Step 21: Reinstall Engine Mount and Belt
- Use a 15mm socket and 18mm socket to reinstall the right engine mount and bracket.
- Remove the engine support bar only after all mount fasteners are tightened.
- Route the new serpentine belt around the pulleys using your photo as a guide.
- Use the serpentine belt tool to rotate the tensioner and slide the belt into place.
- Confirm the belt ribs sit correctly in every pulley groove.
Step 22: Reinstall Intake Ducting and Splash Shield
- Use an 8mm socket to reinstall the intake duct and tighten the clamps.
- Use a trim clip removal tool and 8mm socket to reinstall the right inner fender splash shield.
- Reinstall the right front wheel using a 21mm socket.
- Lower the vehicle with the floor jack.
- Tighten wheel lug nuts in a star pattern to Torque to 204 Nm (150 ft-lbs).
Step 23: Refill the Cooling System
- Close the radiator drain valve or reconnect the lower radiator hose.
- Install the coolant funnel spill-free kit at the coolant reservoir or fill point.
- Add Motorcraft Yellow or Ford-approved equivalent coolant slowly.
- Fill until the coolant level reaches the correct mark.
- Leave the spill-free funnel attached for air bleeding.
Step 24: Change Engine Oil if Coolant Contamination Is Suspected
- Use a drain pan 3-gallon minimum under the oil drain plug.
- Use the correct socket to remove the drain plug.
- Drain the oil fully.
- Replace the oil filter using an oil filter wrench if needed.
- Refill with the correct engine oil quantity.
- If the oil looked milky, change it again after a short warm-up cycle.
Step 25: Reconnect the Battery and Start the Engine
- Use a 10mm socket to reconnect the negative battery cable.
- Start the engine and let it idle.
- Watch the coolant level in the spill-free funnel.
- Add coolant as air bubbles come out.
- Check around the front cover, water pump area, hoses, and drain points for leaks.
✅ After Repair
- ✅ Let the engine reach normal operating temperature while watching the temperature gauge.
- ✅ Confirm the cabin heater blows warm air. This helps show coolant is circulating.
- ✅ Shut the engine off, let it cool, and recheck the coolant level.
- ✅ Recheck the oil dipstick for milky color after the first heat cycle.
- ✅ Look under your Edge for coolant or oil leaks after the first drive.
- ✅ Recheck coolant level again after 1-2 days of driving.
- ✅ If the check engine light turns on, scan for trouble codes before continuing to drive.
💰 DIY vs Shop Cost
Shop Cost: $1,800-$3,200 USD equivalent (parts + labor)
DIY Cost: $250-$700 USD equivalent (parts only)
You Save: $1,100-$2,500 USD equivalent by doing it yourself!
Shop labor rates vary but typically run $100-$150/hour. This repair takes a shop approximately 8-12 hours.
🎯 Ready to get started?
HowToo makes it easy: same-day/2-day shipping on every part, plus all the tools and specialty tools you need! Check out the parts and tools sections below to add everything to your cart.