

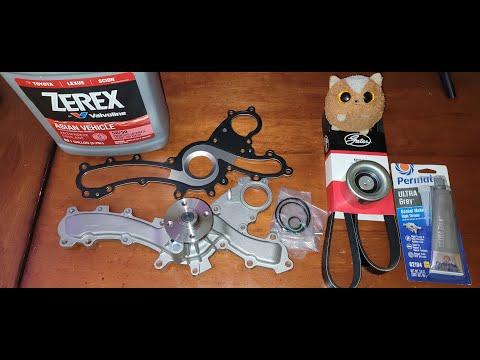





How to Replace the Water Pump on a 2009-2013 Toyota Highlander 2.7L (Engine: Inline 4 2.7L)
Step-by-step DIY guide with required tools, parts, coolant bleeding, and torque specs for 2009, 2010, 2011, 2012, 2013
How to Replace the Water Pump on a 2009-2013 Toyota Highlander 2.7L (Engine: Inline 4 2.7L)
Step-by-step DIY guide with required tools, parts, coolant bleeding, and torque specs for 2009, 2010, 2011, 2012, 2013


🔧 Highlander - Water Pump Replacement
The water pump moves coolant through your Highlander’s engine and radiator to prevent overheating. Replacing it involves draining the coolant, removing the drive belt, removing the pump, cleaning the sealing surface, and refilling/bleeding the cooling system.
Difficulty Level: Intermediate | Estimated Time: 2.5-4 hours
Assumption: This guide is for the 2.7L inline-4 Highlander with a belt-driven external engine water pump.
⚠️ Safety & Precautions
- ⚠️ Work only on a completely cool engine. Hot coolant can cause serious burns.
- ⚠️ Disconnect the negative battery cable before working near the drive belt and alternator area.
- ⚠️ Coolant is poisonous to people and pets. Catch it in a drain pan and dispose of it properly.
- ⚠️ Support the vehicle with jack stands if raising the front. Never rely on a floor jack alone.
- ⚠️ Do not use sealant unless the replacement pump instructions specifically require it. Most Toyota-style pump gaskets install dry.
🔧 Required Tools
You'll need the following tools for this repair:
- 10mm socket
- 12mm socket
- 14mm socket
- 3/8-inch ratchet
- 3/8-inch extension set
- Torque wrench rated 10-80 ft-lbs
- Serpentine belt tool 14mm
- Flat-blade screwdriver
- Plastic gasket scraper
- Coolant drain pan 2-gallon minimum
- Funnel with spill-free adapter
- Needle-nose pliers
- Floor jack rated 3-ton minimum
- Jack stands rated 3-ton minimum
- Wheel chocks
- Shop towels
- Nitrile gloves
- Safety glasses
A serpentine belt tool is a long-handled wrench used to move the belt tensioner safely.
🔩 Required Parts
HowToo sells all the parts you need for this repair:
- Engine water pump - Qty: 1
- Water pump gasket - Qty: 1
- Toyota Super Long Life Coolant pink 50/50 premix - Qty: 2 gallons
- Serpentine drive belt - Qty: 1
📋 Before You Begin
- Park your Highlander on level ground and let the engine cool fully.
- Set the parking brake and place wheel chocks behind the rear wheels.
- Open the hood and remove the negative battery cable using a 10mm socket.
- If more hand space is needed, raise the front of the vehicle with a floor jack rated 3-ton minimum and support it with jack stands rated 3-ton minimum.
- Remove the lower splash shield if needed using a 10mm socket.
🔨 Step-by-Step Instructions
Follow these steps in order:
Step 1: Drain the Coolant
- Put on safety glasses and nitrile gloves.
- Place a coolant drain pan 2-gallon minimum under the radiator drain area.
- Slowly remove the radiator cap only when the engine is cold.
- Open the radiator drain cock by hand or with needle-nose pliers if it is tight.
- Let the coolant drain until the flow slows to a drip.
- Close the radiator drain cock snugly by hand. Do not overtighten it.
Step 2: Remove the Engine Cover and Access Panels
- Use a 10mm socket to remove any upper engine cover fasteners if equipped.
- Lift the cover straight up and set it aside.
- Use a 10mm socket to remove the lower splash shield fasteners if you need access from below.
- Keep bolts grouped by location.
Step 3: Remove the Serpentine Belt
- Take a quick photo of the belt routing before removal.
- Place the serpentine belt tool 14mm or 14mm socket on the belt tensioner.
- Rotate the tensioner to release belt tension. The tensioner is the spring-loaded pulley that keeps the belt tight.
- Slide the belt off one pulley first, then slowly release the tensioner.
- Remove the belt from the engine bay.
- Never let the tensioner snap back.
Step 4: Remove Components Blocking the Water Pump
- Use a 10mm socket or 12mm socket to remove small brackets or hose retainers blocking the pump bolts.
- Move wiring and hoses gently aside by hand.
- Use a flat-blade screwdriver only to gently release plastic clips. Do not pry hard on brittle plastic.
Step 5: Remove the Water Pump Pulley if Needed
- If the pulley blocks pump bolt access, use a 10mm socket to loosen the pulley bolts.
- Hold the pulley by hand while loosening the bolts.
- If the pulley spins, temporarily wrap the old belt around the pulley for grip.
- Remove the pulley and set it aside.
Step 6: Remove the Water Pump
- Place the coolant drain pan 2-gallon minimum under the water pump area.
- Use a 10mm socket and 12mm socket to remove the water pump mounting bolts.
- Note each bolt location. Some bolts may be different lengths.
- Gently tap or wiggle the pump by hand to break the gasket seal.
- Remove the water pump from the engine.
- Expect more coolant to spill when the pump comes loose.
Step 7: Clean the Sealing Surface
- Use a plastic gasket scraper to remove old gasket material from the engine sealing surface.
- Wipe the area clean with shop towels.
- Do not gouge the aluminum surface. Deep scratches can cause leaks.
- Make sure no old gasket pieces fall into the coolant passage.
Step 8: Install the New Water Pump
- Place the new water pump gasket on the new engine water pump.
- Position the pump against the engine by hand.
- Start all water pump bolts by hand first to avoid cross-threading.
- Use a 10mm socket or 12mm socket to snug the bolts in a crisscross pattern.
- Use a torque wrench rated 10-80 ft-lbs to tighten the water pump bolts evenly to Torque to 21 Nm (15 ft-lbs).
- Even tightening prevents gasket leaks.
Step 9: Reinstall the Water Pump Pulley and Brackets
- Install the pulley by hand if it was removed.
- Use a 10mm socket to snug the pulley bolts.
- Use a torque wrench rated 10-80 ft-lbs to tighten the pulley bolts to Torque to 21 Nm (15 ft-lbs).
- Use a 10mm socket or 12mm socket to reinstall any brackets or hose retainers.
- Tighten small bracket bolts to Torque to 10 Nm (89 in-lbs) unless otherwise marked.
Step 10: Install the Serpentine Belt
- Route the new serpentine drive belt around the pulleys using your photo as a guide.
- Use the serpentine belt tool 14mm or 14mm socket to rotate the tensioner.
- Slide the belt over the final pulley, then slowly release the tensioner.
- Check that the belt ribs sit fully inside every pulley groove.
- Misrouted belts can damage accessories fast.
Step 11: Refill the Cooling System
- Install a funnel with spill-free adapter into the radiator filler neck.
- Fill slowly with Toyota Super Long Life Coolant pink 50/50 premix.
- Fill the coolant reservoir to the “FULL” line.
- Reconnect the negative battery cable using a 10mm socket.
Step 12: Bleed Air from the Cooling System
- Leave the spill-free funnel installed and partly filled with coolant.
- Start the engine and set the heater to full hot with the blower on low.
- Let the engine idle while watching the coolant level in the funnel.
- As air bubbles come out, add coolant as needed.
- When the radiator fans cycle on and warm air blows from the vents, install the radiator cap.
- Use safety glasses and keep hands away from the moving belt and fans.
Step 13: Reinstall Shields and Final Check
- Use a 10mm socket to reinstall the lower splash shield.
- Use a 10mm socket to reinstall the engine cover if removed.
- If raised, lift slightly with the floor jack rated 3-ton minimum, remove the jack stands rated 3-ton minimum, and lower your Highlander carefully.
- Check the water pump area with a flashlight for leaks.
✅ After Repair
- ✅ Let the engine cool fully, then recheck the radiator and reservoir coolant levels.
- ✅ Top off with Toyota Super Long Life Coolant pink 50/50 premix if needed.
- ✅ Test drive for 10-15 minutes while watching the temperature gauge.
- ✅ After the test drive, inspect around the water pump, radiator drain, and hoses for leaks.
- ✅ Recheck coolant level again the next morning when the engine is cold.
💰 DIY vs Shop Cost
Shop Cost: $450-$750 (parts + labor)
DIY Cost: $120-$250 (parts only)
You Save: $330-$500 by doing it yourself!
Shop labor rates vary but typically run $100-$150/hour. This repair takes a shop approximately 2-3 hours.
🎯 Ready to get started?
HowToo makes it easy: same-day/2-day shipping on every part, plus all the tools and specialty tools you need! Check out the parts and tools sections below to add everything to your cart.