

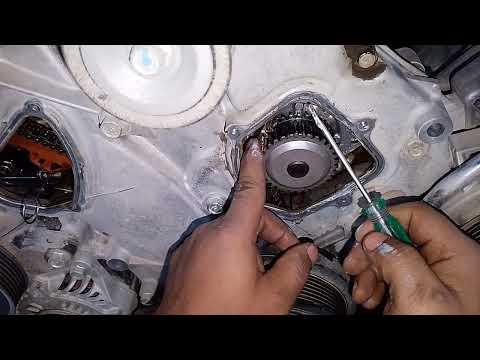




How to replace the Water pump
Step-by-step cooling system repair guide with tools, parts, coolant bleeding, torque specs, and safety tips
How to replace the Water pump
Step-by-step cooling system repair guide with tools, parts, coolant bleeding, torque specs, and safety tips


🔧 Frontier - Water Pump Replacement
The water pump on your Frontier circulates coolant through the V6 engine and radiator. Replacing it requires draining the cooling system, removing the drive belt and fan/shroud area, then installing the new pump with a fresh gasket or seal.
Difficulty Level: Intermediate | Estimated Time: 3-5 hours
⚠️ Safety & Precautions
- ⚠️ Work only on a completely cold engine. Hot coolant can spray out and cause serious burns.
- ⚠️ Do not open the radiator cap while the cooling system is hot or pressurized.
- ⚠️ Coolant is toxic. Keep it away from children and pets, and collect it in a drain pan.
- ⚠️ Support the hood securely and keep hands clear of the radiator fan area.
- ⚠️ Disconnect the negative battery cable before working near the fan, belts, and pulleys.
🔧 Required Tools
You'll need the following tools for this repair:
- 10mm socket
- 12mm socket
- 14mm socket
- 10mm wrench
- 12mm wrench
- 14mm wrench
- 3/8-inch ratchet
- 3/8-inch extension set
- 1/2-inch breaker bar
- Torque wrench inch-pound range
- Torque wrench foot-pound range
- Flat-blade screwdriver
- Phillips screwdriver #2
- Hose clamp pliers
- Plastic scraper
- Gasket pick set
- Drain pan 3-gallon minimum
- Funnel spill-free coolant fill kit
- Shop towels
- Nitrile gloves
- Safety glasses
🔩 Required Parts
HowToo sells all the parts you need for this repair:
- Engine water pump - Qty: 1
- Water pump gasket or seal - Qty: 1
- Nissan-compatible blue long-life coolant 50/50 premix - Qty: 2 gallons
- Serpentine drive belt - Qty: 1
📋 Before You Begin
- Park your Frontier on level ground and let the engine cool completely.
- Set the parking brake and open the hood.
- Use a 10mm wrench to disconnect the negative battery cable. Move the cable aside so it cannot touch the terminal.
- Set the cabin temperature control to full hot. This helps coolant move through the heater core during refilling.
- Place a 3-gallon drain pan under the radiator drain area.
- A spill-free coolant fill kit is a funnel that locks onto the radiator neck and helps remove trapped air while refilling.
🔨 Step-by-Step Instructions
Follow these steps in order:
Step 1: Drain the Cooling System
- Put on safety glasses and nitrile gloves.
- Make sure the engine is cold, then slowly remove the radiator cap by hand.
- Place the drain pan under the radiator drain cock.
- Use a flat-blade screwdriver to open the radiator drain cock, if equipped.
- If the drain cock is difficult to access, use hose clamp pliers to release the lower radiator hose clamp and drain coolant from the hose instead.
- Close the drain cock by hand once coolant stops draining. Do not overtighten plastic drain fittings.
Step 2: Remove the Engine Under Cover if Needed
- Use a 10mm socket and 3/8-inch ratchet to remove the front lower splash shield or skid plate fasteners if they block access.
- Set the fasteners aside in order.
- When reinstalling later, tighten small splash shield bolts snugly. Torque to 7 Nm (62 in-lbs)
Step 3: Remove the Air Intake Duct
- Use a flat-blade screwdriver to loosen the intake duct clamps.
- Use a 10mm socket to remove any intake duct retaining bolts.
- Lift the duct out carefully and set it aside.
- Take a photo first.
Step 4: Remove the Fan Shroud and Cooling Fan
- Use a 10mm socket and 3/8-inch ratchet to remove the upper fan shroud bolts.
- Unclip any small wiring retainers from the shroud by hand.
- Use a 10mm wrench to remove the four fan-to-water-pump pulley nuts.
- Lift the fan and shroud upward together. Work slowly to avoid hitting the radiator fins.
- A fan shroud is the plastic guide around the fan that helps pull air through the radiator.
- On reassembly, tighten the fan nuts evenly. Torque to 10 Nm (89 in-lbs)
Step 5: Remove the Serpentine Drive Belt
- Locate the belt routing decal under the hood. If it is missing, draw the belt path before removal.
- Use a 1/2-inch breaker bar on the belt tensioner square drive.
- Rotate the tensioner to release belt tension, then slide the belt off one pulley by hand.
- Slowly release the tensioner. Do not let it snap back.
- A belt tensioner is a spring-loaded pulley arm that keeps the belt tight.
Step 6: Remove the Water Pump Pulley
- Use a 10mm wrench to loosen the four pulley bolts if they are still installed.
- Hold the pulley by hand while loosening the bolts.
- Remove the bolts and take off the pulley.
- On reassembly, tighten pulley bolts evenly. Torque to 10 Nm (89 in-lbs)
Step 7: Remove Hoses or Brackets Blocking the Pump
- Use hose clamp pliers to compress the coolant hose clamps near the water pump, if they block access.
- Twist hoses gently by hand before pulling them off. Do not pry against plastic fittings.
- Use a 10mm socket or 12mm socket to remove small brackets blocking the pump bolts.
- For small bracket bolts, reinstall later and Torque to 10 Nm (89 in-lbs) unless the bracket uses larger bolts.
Step 8: Remove the Old Water Pump
- Use a 12mm socket, 3/8-inch ratchet, and extension to remove the water pump mounting bolts.
- Note each bolt location. Some bolts may be different lengths.
- Tap the pump gently by hand to break the gasket seal.
- Pull the pump straight off the engine.
- Keep the drain pan underneath because more coolant may spill.
Step 9: Clean the Mating Surface
- Use a plastic scraper to remove old gasket material from the engine surface.
- Use a gasket pick set only for stubborn pieces, and do not gouge the aluminum surface.
- Wipe the area clean with shop towels.
- The mating surface is the flat area where the pump seals to the engine.
- Clean metal seals best.
Step 10: Install the New Water Pump
- Place the new gasket or seal onto the new water pump.
- Install the pump by hand and start all bolts by hand first. This prevents cross-threading.
- Use a 12mm socket and torque wrench to tighten the water pump bolts in a crisscross pattern.
- Torque to 22 Nm (16 ft-lbs)
- If your replacement gasket instructions require sealant, use only the sealant specified with the part. Do not over-apply sealant.
Step 11: Reinstall Hoses, Brackets, Pulley, Belt, Fan, and Shroud
- Use hose clamp pliers to reinstall any coolant hoses and clamps in their original positions.
- Use a 10mm socket or 12mm socket to reinstall any brackets removed earlier.
- Use a 10mm wrench to install the water pump pulley bolts. Torque to 10 Nm (89 in-lbs)
- Use a 1/2-inch breaker bar to rotate the belt tensioner and route the serpentine belt exactly as shown on the belt decal.
- Check that the belt ribs sit fully in every grooved pulley.
- Use a 10mm wrench to reinstall the cooling fan nuts. Torque to 10 Nm (89 in-lbs)
- Use a 10mm socket to reinstall the fan shroud bolts. Torque to 7 Nm (62 in-lbs)
Step 12: Refill and Bleed the Cooling System
- Use a spill-free coolant fill kit on the radiator neck.
- Fill slowly with Nissan-compatible blue long-life coolant 50/50 premix.
- Reconnect the negative battery cable with a 10mm wrench. Torque to 5 Nm (44 in-lbs)
- Start the engine and let it idle with the heater set to full hot.
- Watch for air bubbles in the funnel as the engine warms up.
- When the upper radiator hose gets hot, the thermostat has opened and coolant should circulate.
- Keep the funnel level filled so air cannot be pulled back into the radiator.
- Install the radiator cap once bubbling stops and the coolant level stabilizes.
Step 13: Reinstall the Lower Cover
- Use a 10mm socket and 3/8-inch ratchet to reinstall the splash shield or skid plate fasteners.
- Torque to 7 Nm (62 in-lbs)
- Wipe spilled coolant from the frame, hoses, and underbody with shop towels.
✅ After Repair
- ✅ Let the engine reach normal operating temperature while watching the temperature gauge.
- ✅ Check around the water pump, hoses, radiator drain, and lower hose for leaks.
- ✅ Confirm the heater blows hot air at idle.
- ✅ Shut the engine off and let it cool fully, then recheck coolant level in the radiator and overflow reservoir.
- ✅ Top off with Nissan-compatible blue long-life coolant 50/50 premix as needed.
- ✅ Test drive your Frontier for 10-15 minutes, then recheck for leaks again.
💰 DIY vs Shop Cost
Shop Cost: $550-$900 (parts + labor)
DIY Cost: $120-$280 (parts only)
You Save: $430-$620 by doing it yourself!
Shop labor rates vary but typically run $100-$150/hour. This repair takes a shop approximately 3-4 hours.
🎯 Ready to get started?
HowToo makes it easy: same-day/2-day shipping on every part, plus all the tools and specialty tools you need! Check out the parts and tools sections below to add everything to your cart.
🔧 Frontier - Thermostat Replacement
The thermostat on your Frontier controls when coolant flows through the radiator. Replacing it helps fix overheating, slow warm-up, poor heater performance, or a thermostat stuck open or closed.
Difficulty Level: Intermediate | Estimated Time: 2-3 hours
⚠️ Safety & Precautions
- ⚠️ Work only on a fully cold engine. Hot coolant is pressurized and can cause severe burns.
- ⚠️ Never remove the radiator cap when the engine is hot.
- ⚠️ Disconnect the negative battery cable before working near the fan, belts, and pulleys.
- ⚠️ Coolant is toxic. Keep it away from children and pets, and collect it in a drain pan.
- ⚠️ Dispose of used coolant according to local waste rules in Panipat, Haryana.
🔧 Required Tools
You'll need the following tools for this repair:
- 10mm socket
- 12mm socket
- 14mm socket
- 10mm wrench
- 3/8-inch ratchet
- 3/8-inch extension set
- Torque wrench inch-pound range
- Torque wrench foot-pound range
- Flat-blade screwdriver
- Phillips screwdriver #2
- Hose clamp pliers
- Plastic scraper
- Gasket pick set
- Drain pan 3-gallon minimum
- Funnel spill-free coolant fill kit
- Shop towels
- Nitrile gloves
- Safety glasses
🔩 Required Parts
HowToo sells all the parts you need for this repair:
- Engine thermostat - Qty: 1
- Thermostat housing gasket or O-ring - Qty: 1
- Nissan-compatible blue long-life coolant 50/50 premix - Qty: 1-2 gallons
- Upper radiator hose clamp - Qty: 1 if damaged
- Lower radiator hose clamp - Qty: 1 if damaged
📋 Before You Begin
- Park your Frontier on level ground and let the engine cool completely.
- Set the parking brake and open the hood.
- Use a 10mm wrench to disconnect the negative battery cable. Move it aside so it cannot touch the terminal.
- Set the cabin temperature control to full hot before refilling later. This helps coolant move through the heater core.
- Place a 3-gallon drain pan under the radiator drain area.
- A spill-free coolant fill kit is a funnel that attaches to the radiator and helps remove trapped air during refill.
🔨 Step-by-Step Instructions
Follow these steps in order:
Step 1: Relieve Cooling System Pressure
- Put on safety glasses and nitrile gloves.
- Make sure the engine is cold.
- Slowly remove the radiator cap by hand to release any leftover pressure.
- If you hear pressure escaping, stop turning and wait until it finishes.
Step 2: Drain Some Coolant
- Place the 3-gallon drain pan under the radiator drain cock.
- Use a flat-blade screwdriver to open the radiator drain cock, if accessible.
- Drain about 1 gallon of coolant, or enough to lower the level below the thermostat housing.
- If the drain cock is hard to reach, use hose clamp pliers to release the lower radiator hose clamp and carefully drain coolant from the hose instead.
- Close the drain cock by hand. Do not overtighten the plastic fitting.
Step 3: Remove the Engine Under Cover if Needed
- Use a 10mm socket and 3/8-inch ratchet to remove the lower splash shield or skid plate fasteners if they block access.
- Set the fasteners aside in order.
- When reinstalling later, tighten the splash shield bolts snugly. Torque to 7 Nm (62 in-lbs)
Step 4: Locate the Thermostat Housing
- Follow the lower radiator hose to the engine. On your Frontier’s 4.0L V6, the thermostat is located at the lower radiator hose connection on the front of the engine.
- The thermostat housing is the metal outlet where the radiator hose attaches to the engine.
- Use a flashlight if needed to clearly see the housing bolts and hose clamp.
Step 5: Remove the Lower Radiator Hose from the Housing
- Use hose clamp pliers to squeeze the lower radiator hose clamp.
- Slide the clamp back along the hose.
- Twist the hose gently by hand to break it loose from the housing.
- Pull the hose off slowly and aim it toward the drain pan.
- If the hose is stuck, use a flat-blade screwdriver carefully at the hose edge only. Do not gouge the metal housing.
- Twist first, pull second.
Step 6: Remove the Thermostat Housing
- Use a 10mm socket, 3/8-inch ratchet, and extension to remove the thermostat housing bolts.
- Support the housing by hand as the last bolt comes out.
- Pull the housing straight away from the engine.
- More coolant may drain, so keep the drain pan underneath.
Step 7: Remove the Old Thermostat
- Remove the old thermostat by hand.
- Note the thermostat direction before removal. The spring side faces into the engine.
- Remove the old gasket or O-ring by hand or with a gasket pick set.
- Do not let old gasket pieces fall into the coolant passage.
Step 8: Clean the Sealing Surfaces
- Use a plastic scraper to clean the housing and engine mating surfaces.
- The mating surface is the flat area where the housing seals to the engine.
- Use shop towels to wipe the surfaces dry and clean.
- Use a gasket pick set only for stuck pieces. Be gentle so you do not scratch the aluminum.
- Clean surfaces prevent leaks.
Step 9: Install the New Thermostat
- Install the new thermostat into the engine opening by hand.
- Make sure the spring side faces into the engine.
- Position the jiggle valve or bleed hole at the top, if the thermostat has one.
- A jiggle valve is a small loose pin or bleed hole that helps trapped air escape.
- Install the new gasket or O-ring in the correct groove or sealing position.
Step 10: Reinstall the Thermostat Housing
- Hold the thermostat housing in place by hand.
- Start all housing bolts by hand first to avoid cross-threading.
- Use a 10mm socket and torque wrench to tighten the housing bolts evenly.
- Torque to 10 Nm (89 in-lbs)
- Do not overtighten. The housing can warp or crack.
Step 11: Reconnect the Lower Radiator Hose
- Slide the lower radiator hose fully onto the thermostat housing by hand.
- Use hose clamp pliers to move the clamp back to its original position.
- Make sure the clamp sits behind the raised bead on the housing neck.
- The raised bead is the small lip that helps keep the hose from sliding off.
Step 12: Refill the Cooling System
- Install the spill-free coolant fill kit onto the radiator neck.
- Use the funnel to slowly add Nissan-compatible blue long-life coolant 50/50 premix.
- Fill until the radiator stays full and coolant is visible in the funnel.
- Fill the overflow reservoir to the “MAX” line by hand.
Step 13: Bleed Air from the Cooling System
- Reconnect the negative battery cable with a 10mm wrench. Torque to 5 Nm (44 in-lbs)
- Start the engine and let it idle.
- Set the heater to full hot and the blower to low.
- Watch the funnel for air bubbles. Add coolant as the level drops.
- When the upper radiator hose gets hot, the thermostat has opened and coolant is circulating.
- Let the engine idle until bubbles mostly stop and the heater blows hot air.
- Install the radiator cap by hand once the coolant level stabilizes.
Step 14: Reinstall the Lower Cover
- Use a 10mm socket and 3/8-inch ratchet to reinstall the splash shield or skid plate fasteners.
- Torque to 7 Nm (62 in-lbs)
- Wipe off spilled coolant with shop towels.
✅ After Repair
- ✅ Let your Frontier reach normal operating temperature while watching the temperature gauge.
- ✅ Check the thermostat housing, lower radiator hose, and radiator drain area for leaks.
- ✅ Confirm the heater blows hot air at idle.
- ✅ Shut the engine off and let it cool completely.
- ✅ Recheck coolant level in the radiator and overflow tank, then top off if needed.
- ✅ Take a short 10-15 minute test drive and recheck for leaks after it cools again.
💰 DIY vs Shop Cost
Shop Cost: $300-$550 (parts + labor)
DIY Cost: $35-$120 (parts only)
You Save: $265-$430 by doing it yourself!
Shop labor rates vary but typically run $100-$150/hour. This repair takes a shop approximately 1.5-2.5 hours.
🎯 Ready to get started?
HowToo makes it easy: same-day/2-day shipping on every part, plus all the tools and specialty tools you need! Check out the parts and tools sections below to add everything to your cart.