

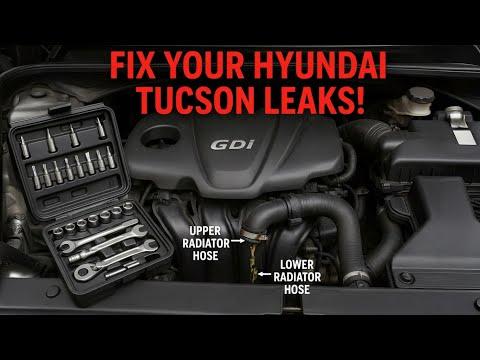







How to Replace the Upper & Lower Radiator Hoses on a 2015 Hyundai Tucson
Step-by-step cooling system DIY with tools, parts list, safety tips, coolant refill and air bleeding for 2014, 2015
How to Replace the Upper & Lower Radiator Hoses on a 2015 Hyundai Tucson
Step-by-step cooling system DIY with tools, parts list, safety tips, coolant refill and air bleeding for 2014, 2015


🔧 Tucson - Radiator Hose Replacement
Your Tucson uses radiator hoses to move coolant between the engine and radiator. Replacing a leaking, swollen, or cracked hose prevents overheating and coolant loss.
Difficulty Level: Intermediate | Estimated Time: 1.0-2.0 hours
⚠️ Safety & Precautions
- ⚠️ Never open the cooling system when hot; hot coolant can spray and burn you.
- ⚠️ Support the SUV with jack stands before working underneath.
- ⚠️ Keep coolant away from pets and kids; it’s toxic and sweet-smelling.
- ⚠️ Use only Hyundai-approved P-OAT coolant (pink) or equivalent; mixing types can cause sludge/leaks.
- 🔋 Battery disconnect is not required for this repair.
🔧 Required Tools
You'll need the following tools for this repair:
- Safety glasses
- Nitrile gloves
- Floor jack (rated 3-ton minimum)
- Jack stands (rated 3-ton minimum)
- Wheel chocks
- Drain pan (at least 2-gallon)
- Funnel with long neck
- Pliers for spring clamps
- Pick tool (small)
- Flat-blade screwdriver
- 10mm socket
- Ratchet (3/8")
- Extension (3"–6")
- Shop towels
- Work light
🔩 Required Parts
HowToo sells all the parts you need for this repair:
- Radiator hose (upper) - Qty: 1
- Radiator hose (lower) - Qty: 1
- Hose clamps - Qty: 2-4
- Engine coolant (Hyundai P-OAT, prediluted 50/50) - Qty: 1-2 gallons
📋 Before You Begin
- Park on level ground, set the parking brake, and chock the rear wheels.
- Let the engine cool completely (best: sit overnight).
- Turn the cabin heat to HOT later during bleeding (this opens the heater circuit so air can escape).
- If doing the lower hose, plan to raise the front and remove the lower splash shield.
🔨 Step-by-Step Instructions
Follow these steps in order:
Step 1: Confirm which hose you’re replacing
- Upper hose: runs from the top of the radiator to the engine.
- Lower hose: runs from the bottom of the radiator to the engine (harder to access).
- Use your work light to trace the hose and confirm the exact one.
Step 2: Relieve pressure safely
- Put on safety glasses and nitrile gloves.
- Place shop towels over the coolant reservoir cap.
- Slowly loosen the cap by hand to release any leftover pressure, then remove it.
Step 3: Drain enough coolant to get below the hose level
- Place a drain pan (at least 2-gallon) under the radiator drain area.
- If needed for access (common for lower hose), raise the front using a floor jack (rated 3-ton minimum) and support with jack stands (rated 3-ton minimum).
- Remove the lower splash shield as needed using a 10mm socket, ratchet (3/8"), and extension (3"–6").
- Open the radiator drain cock (if accessible) with a flat-blade screwdriver and drain into the pan.
- Tip: Drain just enough to stop spills.
Step 4: Remove the old hose clamps
- Move the drain pan under the hose connection you’re opening.
- If you have spring clamps, squeeze and slide them back using pliers for spring clamps. (A spring clamp is the factory “squeeze-to-move” clamp.)
- If you have worm-gear clamps, loosen them using a flat-blade screwdriver.
Step 5: Break the hose loose and remove it
- Twist the hose by hand to break it free from the fitting.
- If it’s stuck, gently work around the edge using a pick tool (small) to separate the hose from the neck.
- Pull the hose off and aim it into the drain pan (at least 2-gallon) to catch any coolant.
- Do not pry hard on the radiator neck. It can crack.
Step 6: Prep the fittings
- Wipe the radiator neck and engine neck clean using shop towels.
- Make sure the sealing surfaces are smooth and free of old rubber.
Step 7: Install the new radiator hose
- Slide the clamps onto the new hose first.
- Push the hose fully onto each fitting until it bottoms out.
- Position spring clamps back in the same grooves/marks as the original using pliers for spring clamps.
- If using worm-gear clamps, tighten with a flat-blade screwdriver until snug.
- Tip: Match the old hose routing exactly.
Step 8: Reinstall the splash shield (if removed)
- Reinstall the lower splash shield using a 10mm socket, ratchet (3/8"), and extension (3"–6").
- Tighten the fasteners securely with the 10mm socket.
Step 9: Refill coolant
- Use a funnel with long neck to refill the coolant reservoir with Hyundai P-OAT, prediluted 50/50 to the MAX line.
- If you drained a lot, refill slowly to avoid trapping air.
Step 10: Bleed air from the cooling system
- Start the engine and set the cabin heat to HOT.
- Let it idle while watching the coolant level; add coolant with the funnel with long neck as the level drops.
- Carefully squeeze the upper hose a few times (with nitrile gloves on) to help move trapped air.
- When the radiator fan cycles on and off and heat blows hot inside, install the reservoir cap hand-tight.
✅ After Repair
- With the engine running, inspect both hose ends for leaks using a work light.
- Take a short 10-15 minute drive, then recheck for leaks.
- After the engine cools fully, recheck coolant level and top off to the MAX line using the funnel with long neck.
- Dispose of old coolant properly (most parts stores accept it).
💰 DIY vs Shop Cost
Shop Cost: $250-$550 (parts + labor)
DIY Cost: $40-$140 (parts only)
You Save: $110-$510 by doing it yourself!
Shop labor rates vary but typically run $100-$150/hour. This repair takes a shop approximately 1.0-2.0 hours.
🎯 Ready to get started?
HowToo makes it easy: same-day/2-day shipping on every part, plus all the tools and specialty tools you need! Check out the parts and tools sections below to add everything to your cart.
Quick question: Are you replacing the upper hose, the lower hose, or both?