

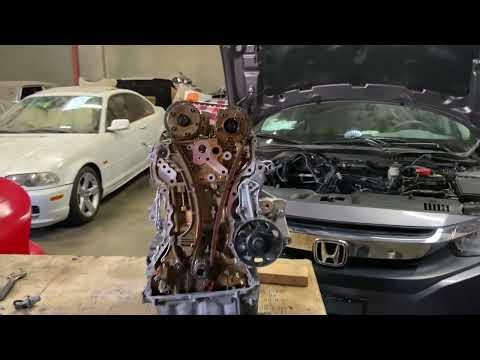







How to Replace the Timing Chain on a 2019 Honda Civic 1.5L Turbo
Diagnose timing issues and follow advanced steps, tools, parts, and safety tips
How to Replace the Timing Chain on a 2019 Honda Civic 1.5L Turbo
Diagnose timing issues and follow advanced steps, tools, parts, and safety tips


🔧 Civic - Timing Chain Replacement
Don’t replace a timing belt on your Civic because it doesn’t have one. The 1.5-liter turbo engine uses a metal timing chain. Honda service information for this engine identifies a cam chain, guides, and an automatic tensioner. static.nhtsa.gov)
A timing chain has no routine belt-style replacement interval. Replace it only after confirming chain stretch, damaged guides, a failed tensioner, incorrect cam timing, or related trouble codes. This is major engine work, not a sensible first repair for a beginner.
Difficulty Level: Advanced | Estimated Time: 10-14 hours
⚠️ Safety & Precautions
- ⚠️ Incorrect camshaft timing can bend valves and destroy the engine.
- ⚠️ Never rotate the crankshaft or camshafts independently after removing the chain.
- ⚠️ Support the engine before removing any engine mount or bracket.
- ⚠️ Never work beneath the Civic using only a floor jack.
- ⚠️ Relieve fuel pressure before disconnecting the high-pressure fuel pump.
- ⚠️ Disconnect the negative battery terminal before disassembly.
- ⚠️ Keep sealant, dirt, and loose hardware away from exposed oil passages.
🔧 Required Tools
You'll need the following tools for this repair:
- Metric socket set, 8-19mm
- Metric wrench set, 8-19mm
- 3/8-inch drive ratchet
- 1/2-inch drive breaker bar
- 1/2-inch drive torque wrench, 20-200 Nm
- 3/8-inch drive torque wrench, 5-60 Nm
- Crankshaft pulley holding tool (specialty)
- Crankshaft pulley socket (specialty)
- 1.2mm tensioner locking pin (specialty)
- Engine support bar, 500kg minimum (specialty)
- Low-profile floor jack, 2-ton minimum
- Jack stands, 2-ton minimum
- Wheel chocks
- Plastic gasket scraper
- Automotive stethoscope (specialty)
- OBD-II scan tool with live data
- Engine timing inspection scope (specialty)
- Drain pan, 10-liter minimum
- Plastic trim-clip removal tool
- Nitrile gloves
- Safety glasses
🔩 Required Parts
HowToo sells all the parts you need for this repair:
- Engine timing chain kit - Qty: 1
- Timing chain tensioner - Qty: 1 if not included in kit
- Timing chain guides - Qty: 1 complete set if not included
- Timing cover gasket and seal set - Qty: 1
- Crankshaft front oil seal - Qty: 1
- Honda-compatible liquid gasket - Qty: 1 tube
- Engine mount single-use fasteners - Qty: As required
- Engine oil of the specified grade - Qty: 4 quarts
- Engine oil filter - Qty: 1
- Honda Type 2 compatible coolant - Qty: As required
📋 Before You Begin
- Park on level, solid ground. Select first gear and apply the parking brake.
- Scan the engine computer and record all codes before disconnecting the battery.
- Confirm the fault with Honda’s camshaft timing inspection procedure before buying parts.
- Check oil level, oil pressure, tensioner operation, and cam-to-crank timing data first.
- Obtain the current Honda service procedure for the exact tightening sequence and single-use fasteners.
- Allow the engine to cool completely before opening the cooling system.
🔨 Step-by-Step Instructions
Follow these steps in order:
Step 1: Diagnose the Timing System
- Use the OBD-II scan tool to check for camshaft and crankshaft correlation codes.
- Use the automotive stethoscope to identify chain noise near the timing cover.
- Inspect cam timing before opening the engine. Chain noise alone doesn’t prove the chain is bad.
- Diagnosis is cheaper than replacing good parts.
Step 2: Disconnect and Raise the Vehicle
- Use the 10mm socket to disconnect the negative battery terminal.
- Chock the rear wheels with wheel chocks.
- Raise the front with the 2-ton floor jack and support it on 2-ton jack stands.
- Use the metric socket set and trim-clip removal tool to remove the right-front wheel, splash shield, and lower engine cover.
Step 3: Drain Fluids and Clear Access
- Place the 10-liter drain pan below the engine.
- Use the metric socket set to drain the engine oil and any coolant required by the service procedure.
- Remove the intake plumbing, ignition coils, valve cover, accessory belt, and obstructing brackets with the metric socket and wrench sets.
- Relieve fuel pressure, then remove the high-pressure fuel pump as directed by Honda’s procedure. Honda’s related 1.5-liter service instructions require this before accessing cam timing components. static.nhtsa.gov
Step 4: Support the Engine
- Install the 500kg engine support bar across approved body support points.
- Take the engine’s weight without lifting it significantly.
- Use the metric socket set to remove the right engine mount and required brackets.
- Keep every mount fastener organized because some may require replacement.
Step 5: Set Number One Cylinder to TDC
- TDC means top dead center, the reference position where the number-one piston is at the top of its compression stroke.
- Use the crankshaft pulley socket and breaker bar to rotate the engine clockwise.
- Align the crankshaft and camshaft timing marks exactly as shown in Honda service information.
- Mark the chain and sprocket timing marks before removal. Honda’s procedure also uses marked chain links at the sprocket punch marks. static.nhtsa.gov
Step 6: Lock the Chain Tensioner
- Use the crankshaft pulley socket to rotate the crankshaft slightly counterclockwise and compress the automatic tensioner.
- Insert the 1.2mm tensioner locking pin when the tensioner holes align.
- Rotate the crankshaft clockwise back to number-one TDC to secure the pin.
- Honda’s documented procedure specifies a 1.2mm, approximately 3/64-inch, locking pin. static.nhtsa.gov
Step 7: Remove the Crankshaft Pulley and Timing Cover
- Hold the pulley with the crankshaft pulley holding tool.
- Remove the pulley bolt using the crankshaft pulley socket and breaker bar.
- Use the metric socket set to remove the timing-cover fasteners in an organized pattern.
- Separate the cover carefully with the plastic gasket scraper. Don’t drive a metal screwdriver between the sealing surfaces.
Step 8: Remove the Old Timing Components
- Verify all timing marks again before loosening anything.
- Use the metric socket set to remove the tensioner, guides, and timing chain.
- Keep tension on the chain while removing the final guide so it cannot jump unexpectedly.
- Inspect the sprockets, oil-pump drive, tensioner oil passages, and timing cover for damage.
Step 9: Install the New Chain
- Position the colored chain links at the crankshaft and camshaft timing marks.
- Install the new guides and locked tensioner with the metric socket set.
- Use the 3/8-inch torque wrench and tighten every fastener to the current Honda specification for its exact location.
- Do not substitute generic torque figures. Several fasteners thread directly into the aluminum cylinder head and block.
- Remove the tensioner locking pin only after the chain, guides, and timing marks are correct.
Step 10: Verify Mechanical Timing
- Use the crankshaft pulley socket and breaker bar to rotate the crankshaft clockwise two complete revolutions by hand.
- Stop immediately if the engine binds. Never force it through resistance.
- Return number-one cylinder to TDC and confirm every timing mark realigns correctly.
- Check twice before the sealant comes out.
Step 11: Seal and Install the Timing Cover
- Clean the mating surfaces using the plastic gasket scraper.
- Install the new crankshaft seal squarely without damaging its sealing lip.
- Apply Honda-compatible liquid gasket only in the specified bead size and locations.
- Install the cover promptly and use the 3/8-inch torque wrench to follow Honda’s tightening sequence.
- Allow the sealant its specified curing time before adding oil or starting the engine.
Step 12: Reassemble the Engine
- Use the metric socket and wrench sets to reinstall the crankshaft pulley, engine mount, valve cover, fuel pump, accessory belt, intake parts, splash shields, and wheel.
- Use the 1/2-inch torque wrench for the crankshaft pulley, engine-mount, and wheel fasteners.
- Use the 3/8-inch torque wrench for smaller cover, fuel-system, and engine fasteners.
- Use new single-use fasteners wherever Honda specifies replacement.
Step 13: Refill and Start the Engine
- Install the drain plug and oil filter using the appropriate metric socket.
- Add the specified engine oil and refill the cooling system with compatible coolant.
- Reconnect the negative terminal using the 10mm socket.
- Disable fuel or ignition and crank briefly to build oil pressure before the first start.
- Start the engine and shut it off immediately if the oil-pressure warning remains on or abnormal mechanical noise occurs.
✅ After Repair
- Check the timing cover, valve cover, fuel pump, oil filter, and drain plug for leaks.
- Use the OBD-II scan tool to clear codes and monitor cam-to-crank timing data.
- Let the engine reach operating temperature while watching the coolant level and temperature.
- Perform the Honda idle-learn procedure if required after battery disconnection.
- Recheck engine oil and coolant after the engine cools.
- Inspect again after a short road test.
💰 DIY vs Shop Cost
Shop Cost: Approximately ₹90,000-₹180,000, depending on diagnosis and engine damage
DIY Cost: Approximately ₹25,000-₹60,000 for parts, fluids, and required specialty equipment
You Save: Approximately ₹40,000-₹100,000 by doing it yourself, assuming no mistakes or internal damage.
Local labor rates vary. A complete chain replacement commonly requires approximately 10-14 hours, and this job is best handled by an experienced engine technician.
🎯 Ready to get started?
My honest recommendation is to diagnose it before ordering a timing-chain kit. Your Civic doesn’t need a routine timing-belt service, and opening this engine without confirmed chain trouble creates far more risk than benefit. The matching timing-chain components are now displayed in the parts section.
HowToo makes it easy: same-day/2-day shipping on every part, plus all the tools and specialty tools you need! Check out the parts and tools sections below to add everything to your cart.