

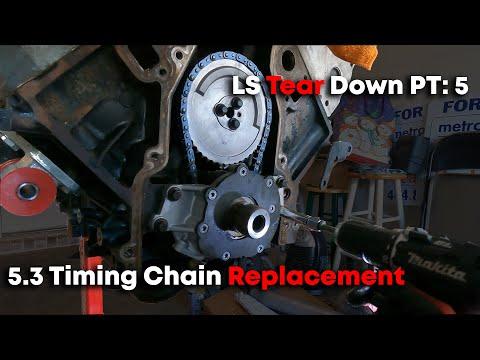




How to Replace the Timing Chain on a 2018-2022 Chevrolet Silverado 1500 5.3L V8 (Trim: LT | Engine: V8 5.3L)
Advanced step-by-step guide covering tools, parts, engine timing, sealing, and safety tips for 2018, 2019, 2020, 2021
How to Replace the Timing Chain on a 2018-2022 Chevrolet Silverado 1500 5.3L V8 (Trim: LT | Engine: V8 5.3L)
Advanced step-by-step guide covering tools, parts, engine timing, sealing, and safety tips for 2018, 2019, 2020, 2021


🔧 Silverado 1500 - Timing Chain Replacement
Your Silverado doesn’t have a timing belt. Its 5.3L V8 uses an internal, oil-lubricated timing chain. Replacing it requires removing the radiator fan, accessory drive, crankshaft pulley, water pump, oil pan fasteners, and timing cover before carefully retiming the engine.
Difficulty Level: Advanced | Estimated Time: 10-14 hours
Assumption: This procedure is for replacing the internal timing chain, not the external serpentine drive belt.
⚠️ Safety & Precautions
- ⚠️ Incorrect camshaft timing can cause severe internal engine damage. Don’t rotate the crankshaft or camshaft independently after removing the chain.
- ⚠️ Disconnect the negative battery cable before working near the electric starter circuit or cooling fan.
- ⚠️ Allow the engine to become completely cold before draining coolant or removing the water pump.
- ⚠️ Support your Silverado with rated jack stands. Never work beneath a vehicle supported only by a jack.
- ⚠️ Wear safety glasses when releasing belt tension, draining fluids, and cleaning gasket surfaces.
- ⚠️ Don’t use an impact wrench to install the crankshaft pulley or final-tighten its bolt.
- ⚠️ Exact fastener torque and angle values must be verified in current GM service information before assembly.
🔧 Required Tools
You'll need the following tools for this repair:
- 1/4-inch drive metric socket set, 7mm-15mm
- 3/8-inch drive metric socket set, 8mm-18mm
- 1/2-inch drive metric socket set, 15mm-24mm
- Crankshaft pulley bolt socket, 24mm
- 3/8-inch drive torque wrench, 10-80 ft-lbs
- 1/2-inch drive torque wrench, 30-250 ft-lbs
- 1/2-inch drive breaker bar, 24-inch minimum
- Torque-angle gauge, 1/2-inch drive
- Serpentine belt tensioner tool, 1/2-inch drive
- GM crankshaft pulley puller (specialty)
- GM crankshaft pulley installer (specialty)
- Flywheel holding tool (specialty)
- Plastic gasket scraper
- Engine support bar, 1,000-pound minimum
- Low-profile floor jack, 3-ton minimum
- Jack stands, 3-ton minimum
- Wheel chocks, rubber
- Drain pan, 15-quart minimum
- Cooling-system vacuum fill tool (specialty)
- Plastic trim-clip removal tool
- Paint marker, oil-resistant
- Shop light, LED
- Nitrile gloves, chemical-resistant
- Safety glasses, ANSI Z87.1
🔩 Required Parts
HowToo sells all the parts you need for this repair:
- INA CDC timing chain kit - Chain, crankshaft sprocket, and tensioner - Qty: 1
- FelPro SpeedFit timing cover gasket set - Qty: 1
- Camshaft sprocket and phaser assembly - Qty: 1 if worn or damaged
- Front crankshaft oil seal - Qty: 1
- Crankshaft pulley bolt - Qty: 1
- Water pump gaskets - Qty: 2
- Engine oil meeting GM specification - Qty: Full oil-change capacity
- Engine oil filter - Qty: 1
- 50/50 Dex-Cool-compatible coolant - Qty: As required
- GM-specified RTV engine sealant - Qty: 1 tube
- Brake cleaner - Qty: 2 cans
My parts pick: Start with the INA kit and FelPro cover gasket set shown in the parts list. A chain-only repair leaves old wear components behind. That’s false economy wearing safety glasses.
📋 Before You Begin
- Park your Silverado on level, solid ground and let the engine cool completely.
- Record any saved radio settings, then switch the ignition off and remove the key from the work area.
- Chock the rear wheels and raise the front only at approved frame lifting points.
- Disconnect the negative battery terminal using a 10mm socket.
- Drain the cooling system into a clean 15-quart drain pan.
- Have current GM service information available for bolt torques, torque-angle sequences, and reusable-fastener identification.
- Take clear photos before removing brackets, wiring retainers, and hoses.
🔨 Step-by-Step Instructions
Follow these steps in order:
Step 1: Disconnect Power and Drain Fluids
- Use a 10mm socket to disconnect the negative battery cable and isolate it from the terminal.
- Raise your Silverado with the 3-ton floor jack and place it securely on 3-ton jack stands.
- Position the 15-quart drain pan beneath the cooling-system drain and remove the reservoir cap only when the engine is cold.
- Drain the coolant, then drain the engine oil using the correct metric socket for the drain plug.
- Install the drain plug with a torque wrench to the specification listed for the installed oil pan and plug.
Step 2: Remove Intake and Cooling Components
- Use a 7mm or 8mm socket to loosen the intake duct clamps, then disconnect the duct without pulling on sensor wiring.
- Use a plastic trim-clip tool and metric sockets to remove the upper radiator cover and fan shroud fasteners.
- Disconnect the cooling fan electrical connector by releasing its lock with the plastic trim tool.
- Use the required metric socket to remove the fan and shroud assembly as a unit where clearance permits.
- Use hose-clamp pliers or the correct socket to disconnect hoses required for water-pump removal.
Step 3: Remove the Accessory Drive
- Draw the belt-routing path with a paint marker or photograph it before removal.
- Use the 1/2-inch serpentine belt tensioner tool to rotate the tensioner slowly and remove the belt.
- Use the metric socket set to remove brackets and accessories blocking the timing cover.
- Support heavy accessories rather than allowing them to hang from hoses or wiring.
- Label every connector before unplugging it.
Step 4: Remove the Water Pump
- Place the drain pan beneath the front of the engine because additional coolant will escape.
- Use the appropriate metric socket to remove the water-pump bolts gradually.
- Remove the pump and both gaskets without prying against the aluminum sealing surfaces.
- Use a plastic gasket scraper and brake cleaner to clean the mating surfaces.
- Final water-pump bolt torque must match current GM service information for the installed pump and fastener arrangement.
Step 5: Remove the Crankshaft Pulley
- Use the flywheel holding tool to keep the crankshaft from turning.
- Use a 24mm socket and 1/2-inch breaker bar to loosen the crankshaft pulley bolt.
- Remove the pulley with the GM crankshaft pulley puller. Don’t use a three-jaw puller against the pulley rim.
- Inspect the pulley sealing surface and rubber isolator for grooves, cracking, or separation.
- Discard the crankshaft pulley bolt if GM service information identifies it as torque-to-yield. A torque-to-yield bolt stretches during tightening and isn’t safely reusable.
Step 6: Release the Oil Pan-to-Cover Joint
- Use the metric socket set to remove the front oil-pan fasteners that pass into the timing cover.
- Support the engine with the 1,000-pound engine support bar if mounts or crossmembers must be loosened for access.
- Don’t force the timing cover away while it remains captured by the oil-pan seal.
- Mark every bolt location because timing-cover fasteners may use different lengths.
Step 7: Remove the Timing Cover
- Use the metric socket set to remove the timing-cover fasteners in stages.
- Use a plastic scraper to separate the cover only at approved pry points.
- Remove the cover straight forward to avoid damaging its sealing flange or crankshaft position components.
- Use the plastic gasket scraper and brake cleaner to remove old gasket material and RTV without gouging the aluminum.
- Block open oil passages with clean, lint-free towels while cleaning, then remove every towel before assembly.
Step 8: Position the Engine at Its Timing Reference
- Temporarily install the old crankshaft bolt and use the 24mm socket with the breaker bar to rotate the engine clockwise.
- Align the crankshaft and camshaft timing marks exactly as shown in current GM service information.
- Use the paint marker to duplicate the timing references before removing components.
- Don’t rotate the engine backward to approach the marks.
- Don’t assume that merely placing cylinder one at top dead center establishes the correct camshaft position.
Step 9: Remove the Old Timing Components
- Use the correct metric socket to remove the timing-chain tensioner while controlling its spring pressure.
- Use the flywheel holding tool and metric socket set to remove the camshaft timing fastener where required.
- Remove the chain and sprockets together without turning either shaft independently.
- Inspect the camshaft phaser, camshaft sprocket, crankshaft sprocket, tensioner contact surface, oil passages, and timing cover.
- Replace any phaser or sprocket showing looseness, chipped teeth, abnormal wear, or binding.
Step 10: Install the New Timing Set
- Compare every new component with the removed component before installation.
- Install the crankshaft sprocket, chain, and camshaft sprocket with their timing marks precisely aligned.
- Install the new tensioner using the correct metric socket, then release its retaining pin only after the chain is positioned.
- Use the torque wrench and torque-angle gauge to tighten timing fasteners to the exact GM torque-plus-angle sequence.
- Do not estimate timing fastener torque. These values vary by fastener and camshaft drive configuration.
Step 11: Verify Mechanical Timing
- Use the 24mm socket and breaker bar to rotate the crankshaft clockwise through two complete revolutions.
- Stop immediately if the crankshaft binds. Don’t force it past resistance.
- Return the engine to its timing reference and confirm that the sprocket timing marks realign correctly.
- Check chain tension and confirm the tensioner is fully engaged.
Step 12: Reseal and Install the Timing Cover
- Use the GM crankshaft seal installer or suitable seal driver to install the new front crankshaft seal squarely.
- Fit the FelPro timing-cover gasket according to its supplied instructions.
- Apply GM-specified RTV only at the oil-pan and block junctions and anywhere specifically required by the gasket instructions.
- Position the timing cover without smearing the sealing beads.
- Use the metric socket set and torque wrench to tighten cover and oil-pan fasteners in the GM sequence and to their individual specifications.
Step 13: Install the Crankshaft Pulley
- Lubricate only the surfaces specified by GM service information.
- Use the GM crankshaft pulley installer to press the pulley fully into position.
- Install the new crankshaft pulley bolt and hold the flywheel with the specialty holding tool.
- Use the 1/2-inch torque wrench and torque-angle gauge to complete the exact GM torque-plus-angle procedure.
- Never pull the pulley into place solely by tightening the crankshaft bolt.
Step 14: Reassemble the Front of the Engine
- Install the water pump with new gaskets and tighten its bolts evenly using the torque wrench.
- Reinstall all brackets and accessories using the correct metric sockets.
- Route the serpentine belt using the saved routing diagram.
- Use the belt tensioner tool to release the tensioner slowly after seating the belt in every pulley groove.
- Reinstall the fan, shroud, hoses, intake duct, connectors, and radiator cover.
Step 15: Refill Fluids and Reconnect the Battery
- Install a new oil filter and refill the engine with oil meeting the specification shown in your Silverado’s owner information.
- Use the cooling-system vacuum fill tool to refill with the correct Dex-Cool-compatible mixture.
- Use a 10mm socket to reconnect the negative battery cable.
- Before starting, disable fuel or ignition and crank briefly to build oil pressure if directed by GM service information.
✅ After Repair
- Start the engine and switch it off immediately if there is knocking, scraping, persistent chain rattle, or an oil-pressure warning.
- Inspect the timing cover, oil-pan junctions, crankshaft seal, water pump, hoses, and oil filter for leaks.
- Allow the engine to reach operating temperature while monitoring coolant temperature.
- Let the engine cool completely, then recheck the coolant and oil levels.
- Scan the engine computer for camshaft-to-crankshaft correlation and variable valve timing fault codes.
- Change the oil and filter again if coolant, gasket debris, or cleaning solvent may have entered the crankcase.
- Don’t road-test your Silverado until it idles smoothly, holds oil pressure, and remains leak-free.
💰 DIY vs Shop Cost
Shop Cost: $1,800-$3,500 equivalent, depending on local labor and whether the camshaft phaser needs replacement
DIY Cost: $300-$1,000 equivalent for parts, fluids, seals, and required specialty-tool access
You Save: Approximately $800-$2,000 by doing it yourself
Labor pricing varies considerably by region. This repair takes a professional shop approximately 8-12 hours, with additional time if oil-pan removal or phaser replacement is required.
🎯 Ready to get started?
HowToo makes it easy: same-day/2-day shipping on every part, plus all the tools and specialty tools you need! Check out the parts and tools sections below to add everything to your cart.