




How to Replace the Timing Belt on a 2005-2019 Honda Odyssey 3.5L V6 (Engine: V6 3.5L)
Step-by-step DIY guide with tools, parts, torque specs, water pump replacement, and safety tips for 2005, 2006, 2007, 2008, 2009, 2010, 2011, 2012, 2013, 2014, 2015, 2016, 2017, 2018, 2019
How to Replace the Timing Belt on a 2005-2019 Honda Odyssey 3.5L V6 (Engine: V6 3.5L)
Step-by-step DIY guide with tools, parts, torque specs, water pump replacement, and safety tips for 2005, 2006, 2007, 2008, 2009, 2010, 2011, 2012, 2013, 2014, 2015, 2016, 2017, 2018, 2019


🔧 Odyssey - Timing Belt Replacement
This repair replaces the timing belt on your Odyssey’s 3.5L V6, along with related wear items that are buried behind the timing covers. The timing belt keeps the crankshaft and camshafts synchronized; if it fails, this interference engine can suffer serious internal damage.
Difficulty Level: Advanced | Estimated Time: 5-8 hours
⚠️ Safety & Precautions
- ⚠️ This is an interference engine. Do not rotate the crankshaft or camshafts independently with the belt removed.
- ⚠️ Support the engine before removing the right-side engine mount. An unsupported engine can drop and cause injury or damage.
- ⚠️ Disconnect the negative battery cable before starting to prevent accidental cranking.
- ⚠️ Never use the starter motor to loosen the crankshaft pulley bolt.
- ⚠️ Use jack stands. A floor jack alone is not safe for working under the vehicle.
- ⚠️ Cool the engine completely before opening the cooling system.
- ⚠️ Mark timing alignment carefully. One tooth off can cause poor running or engine damage.
🔧 Required Tools
You'll need the following tools for this repair:
- 10mm socket
- 12mm socket
- 14mm socket
- 17mm socket
- 19mm socket
- 22mm socket
- 3/8-inch ratchet
- 1/2-inch breaker bar
- 1/2-inch torque wrench
- 3/8-inch torque wrench
- Honda crankshaft pulley holder 50mm hex (specialty)
- Crankshaft pulley bolt socket 19mm impact-rated
- Serpentine belt tool 14mm
- Flat-blade screwdriver
- Trim clip removal tool
- Needle-nose pliers
- Drain pan 2-gallon minimum
- Floor jack rated 3-ton minimum
- Jack stands rated 3-ton minimum
- Wood block 2x4
- Engine support bar (specialty)
- White paint marker
- Shop towels
- Safety glasses
- Nitrile gloves
🔩 Required Parts
HowToo sells all the parts you need for this repair:
- Timing belt kit - Qty: 1
- Timing belt tensioner - Qty: 1
- Timing belt idler pulley - Qty: 1
- Water pump with gasket - Qty: 1
- Crankshaft pulley bolt - Qty: 1
- Serpentine drive belt - Qty: 1
- Honda-compatible coolant - Qty: 2 gallons
- Threadlocker medium-strength - Qty: 1
📋 Before You Begin
- Park your Odyssey on level ground, shift to Park, and set the parking brake.
- Let the engine cool fully before draining coolant.
- Disconnect the negative battery cable using a 10mm socket.
- Raise the front of the vehicle with a floor jack rated 3-ton minimum and support it with jack stands rated 3-ton minimum.
- Remove the right front wheel area splash shield for access.
- A timing belt tensioner keeps the belt tight automatically. Replace it with the belt.
- A crankshaft pulley holder locks the large lower pulley so you can remove the very tight center bolt.
- Assumption: this procedure is for the U.S.-market 3.5L V6 J35 timing belt layout used in your Odyssey.
🔨 Step-by-Step Instructions
Follow these steps in order:
Step 1: Disconnect Battery and Raise Vehicle
- Use a 10mm socket to loosen the negative battery cable clamp.
- Move the cable aside so it cannot touch the battery post.
- Use a floor jack rated 3-ton minimum to lift the front of your Odyssey.
- Place jack stands rated 3-ton minimum under solid front support points.
- Wear safety glasses and nitrile gloves.
Step 2: Remove Right Front Splash Shield
- Use a trim clip removal tool to remove the plastic clips from the right front inner splash shield.
- Use a 10mm socket for any small bolts holding the shield.
- Remove the shield and set it aside.
- Keep clips grouped by location.
Step 3: Drain Coolant
- Place a drain pan 2-gallon minimum under the radiator drain area.
- Use needle-nose pliers if needed to open the radiator drain valve carefully.
- Remove the radiator cap only after the engine is fully cool.
- Drain enough coolant so the water pump can be removed without spilling heavily.
Step 4: Remove the Serpentine Drive Belt
- Use a serpentine belt tool 14mm on the belt tensioner.
- Rotate the tensioner to release belt tension.
- Slide the belt off the pulleys and remove it.
- A serpentine belt drives accessories like the alternator and A/C compressor.
Step 5: Support the Engine
- Install an engine support bar (specialty) across the upper engine bay and attach it to the engine lifting point.
- If using a jack for light support, place a wood block 2x4 between the jack and oil pan.
- Apply only light upward support. Do not lift the vehicle by the oil pan.
Step 6: Remove the Right Engine Mount Bracket
- Use a 14mm socket and 17mm socket to remove the right-side engine mount fasteners.
- Remove the mount and bracket pieces blocking the timing cover.
- Keep fasteners organized by position.
- During installation, tighten typical Honda mount fasteners securely; use service-specific torque if available for your exact bracket positions.
Step 7: Remove Upper Timing Belt Covers
- Use a 10mm socket to remove the bolts from the front and rear upper timing belt covers.
- Gently work the covers out by hand.
- Use a flat-blade screwdriver only for light persuasion. Do not crack the covers.
Step 8: Set Engine to Top Dead Center
- Use a 19mm socket and 1/2-inch breaker bar on the crankshaft bolt.
- Rotate the engine clockwise only.
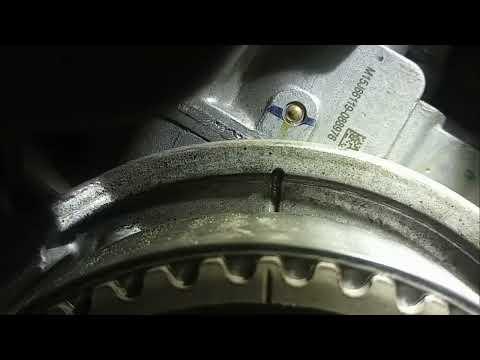
- Align the crankshaft timing mark with the pointer on the oil pump housing.
- Verify both camshaft pulley marks align with their timing cover/head reference marks.
- Use a white paint marker to mark the belt-to-cam and belt-to-crank positions.
- Clockwise only prevents belt slack errors.
Step 9: Remove the Crankshaft Pulley Bolt
- Install the Honda crankshaft pulley holder 50mm hex (specialty) into the crankshaft pulley.
- Use a crankshaft pulley bolt socket 19mm impact-rated with a 1/2-inch breaker bar to loosen the crankshaft pulley bolt.
- Remove the crankshaft pulley by hand after the bolt is out.
- This bolt is very tight from the factory. Work slowly and keep the holder fully seated.
Step 10: Remove Lower Timing Belt Cover
- Use a 10mm socket to remove the lower timing belt cover bolts.
- Remove the lower cover carefully.
- Check again that all timing marks are still aligned.
Step 11: Release Timing Belt Tension
- Use a 12mm socket to remove the timing belt tensioner mounting bolts.
- Remove the hydraulic tensioner.
- The hydraulic tensioner is a small cylinder that pushes on the belt tension pulley to keep the belt tight.
- Do not rotate the camshafts after the belt tension is released.
Step 12: Remove the Old Timing Belt
- Slide the timing belt off the camshaft pulleys, idler pulley, water pump, and crankshaft sprocket by hand.
- Use a white paint marker to compare old belt marks if you are transferring reference marks to the new belt.
- If a camshaft moves slightly, use a 17mm socket very gently on the cam bolt to return it to its mark.
- Do not force a camshaft against spring pressure.
Step 13: Replace Idler Pulley and Tensioner Pulley
- Use a 14mm socket to remove the idler pulley bolt.
- Install the new idler pulley.
- Use a 3/8-inch torque wrench and tighten the idler pulley bolt to Torque to 45 Nm (33 ft-lbs).
- Use a 14mm socket to remove and replace the tensioner pulley if included in your kit.
- Use a 3/8-inch torque wrench and tighten the tensioner pulley bolt to Torque to 45 Nm (33 ft-lbs).
Step 14: Replace the Water Pump
- Place the drain pan 2-gallon minimum below the engine.
- Use a 10mm socket to remove the water pump bolts.
- Remove the water pump and old gasket.
- Clean the sealing surface with shop towels. Do not gouge the aluminum.
- Install the new water pump with the new gasket.
- Use a 3/8-inch torque wrench to tighten water pump bolts evenly to Torque to 12 Nm (9 ft-lbs).
Step 15: Install the New Timing Belt
- Confirm the crankshaft and both camshaft timing marks are exactly aligned.
- Route the new belt by hand around the crankshaft sprocket, front camshaft pulley, water pump, rear camshaft pulley, and idler pulley.
- Keep the belt tight on the non-tensioned side while routing.
- Use the white paint marker marks as a second check.
- All timing marks must align before installing the tensioner.
Step 16: Install the New Hydraulic Tensioner
- Install the new hydraulic tensioner using a 12mm socket.
- Use a 3/8-inch torque wrench and tighten the tensioner bolts to Torque to 22 Nm (16 ft-lbs).
- Pull the tensioner retaining pin only after the belt is fully routed and marks are verified.
- Wait a few minutes for the tensioner to settle.
Step 17: Rotate Engine by Hand and Recheck Timing
- Use a 19mm socket and 1/2-inch breaker bar on the crankshaft bolt location.
- Rotate the engine clockwise two full crankshaft turns.
- Bring it back to top dead center.
- Verify the crankshaft and both camshaft marks align exactly.
- If marks are off, remove tension and reinstall the belt. Do not start the engine.
Step 18: Reinstall Timing Covers
- Use a 10mm socket to reinstall the lower timing belt cover.
- Use a 10mm socket to reinstall the upper timing belt covers.
- Tighten cover bolts snugly by hand with a ratchet. Do not overtighten plastic covers.
Step 19: Reinstall Crankshaft Pulley
- Slide the crankshaft pulley fully onto the crankshaft.
- Install a new crankshaft pulley bolt by hand.
- Use the Honda crankshaft pulley holder 50mm hex (specialty) to hold the pulley.
- Use a 1/2-inch torque wrench with the crankshaft pulley bolt socket 19mm impact-rated.
- Tighten the crankshaft pulley bolt to Torque to 245 Nm (181 ft-lbs).
Step 20: Reinstall Engine Mount
- Use the engine support bar (specialty) to align the engine height with the mount.
- Install the engine mount and bracket bolts by hand first.
- Use a 14mm socket and 17mm socket to tighten the mount fasteners.
- Use a 1/2-inch torque wrench and tighten large mount fasteners to the applicable service torque for their location.
- Remove the engine support only after all mount bolts are fully tightened.
Step 21: Install New Serpentine Belt
- Route the new serpentine belt around the pulleys following the belt routing diagram under the hood.
- Use the serpentine belt tool 14mm to rotate the tensioner.
- Slide the belt onto the final pulley and release the tensioner slowly.
- Check that the belt ribs sit correctly in every pulley groove.
Step 22: Reinstall Splash Shield and Lower Vehicle
- Use the trim clip removal tool by hand to reinstall plastic clips.
- Use a 10mm socket for any splash shield bolts.
- Remove the jack stands rated 3-ton minimum.
- Lower your Odyssey using the floor jack rated 3-ton minimum.
Step 23: Refill Coolant and Reconnect Battery
- Close the radiator drain valve using needle-nose pliers if needed.
- Refill with Honda-compatible coolant.
- Use a 10mm socket to reconnect the negative battery cable.
- Tighten the battery terminal snugly. Do not overtighten.
✅ After Repair
- Start the engine and listen carefully. It should idle smoothly with no slapping, chirping, or knocking sounds.
- Watch the temperature gauge as the engine warms up.
- Check for coolant leaks around the water pump and radiator drain.
- Top off coolant after the thermostat opens and air bubbles purge.
- Confirm the serpentine belt tracks straight on all pulleys.
- Road test gently, then recheck coolant level after the engine cools.
- If the engine runs rough, stalls, or sets misfire codes, shut it off and recheck timing marks immediately.
💰 DIY vs Shop Cost
Shop Cost: $1,100-$1,800 (parts + labor)
DIY Cost: $300-$650 (parts only)
You Save: $800-$1,150 by doing it yourself!
Shop labor rates vary but typically run $100-$150/hour. This repair takes a shop approximately 5-7 hours.
🎯 Ready to get started?
HowToo makes it easy: same-day/2-day shipping on every part, plus all the tools and specialty tools you need! Check out the parts and tools sections below to add everything to your cart.