


How to Replace the Thermostat on a 2014 Chevrolet Equinox 3.6L V6
Step-by-step instructions with tools, parts, torque specs, coolant refill, and bleeding tips for 2008, 2009
How to Replace the Thermostat on a 2014 Chevrolet Equinox 3.6L V6
Step-by-step instructions with tools, parts, torque specs, coolant refill, and bleeding tips for 2008, 2009
🔧 Thermostat - Replacement
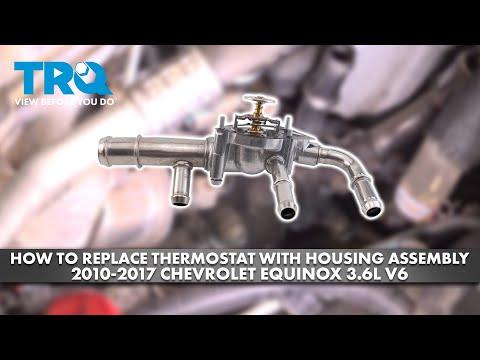
Your Equinox uses a coolant thermostat that controls engine temperature. When it sticks open or closed, you can get poor heater performance, overheating, or a check engine light. On your 3.6L V6, this job is usually done by draining some coolant, removing the thermostat housing, and installing a new thermostat and seal.
Difficulty Level: Intermediate | Estimated Time: 2-3 hours
⚠️ Safety & Precautions
- Work only on a completely cool engine. Hot coolant can cause severe burns.
- Support the vehicle securely if you need access from below.
- Use caution around the cooling fan; it may start unexpectedly.
- Keep coolant off the drive belt and pulleys.
- Battery disconnect is not required, but remove the ignition key and keep hands clear of moving parts.
🔧 Required Tools
You'll need the following tools for this repair:
- 8mm socket
- 10mm socket
- 1/4-inch ratchet
- 3/8-inch ratchet
- Short extension
- Drain pan
- Flat-blade screwdriver
- Pliers
- Torque wrench
- Plastic trim tool
- Funnel
- Coolant spill-free fill funnel (specialty)
- Safety glasses
- Nitrile gloves
🔩 Required Parts
HowToo sells all the parts you need for this repair:
- Thermostat - Qty: 1
- Thermostat housing seal or gasket - Qty: 1
- Engine coolant, Dex-Cool equivalent - Qty: 2 gallons
- Distilled water - Qty: 2 gallons
- Radiator hose clamp - Qty: 1 if damaged
📋 Before You Begin
- Park on level ground and let the engine cool fully.
- Set the parking brake.
- Have a drain pan ready before opening the cooling system.
- Assumption: this job is being done with the thermostat housing serviced as an assembly, which is the usual setup on your Equinox 3.6L.
🔨 Step-by-Step Instructions
Follow these steps in order:
Step 1: Drain enough coolant
- Place the drain pan under the radiator drain area.
- Open the radiator drain or remove the lower hose clamp with pliers or a flat-blade screwdriver, depending on the clamp style.
- Drain enough coolant so the level drops below the thermostat housing.
- Do not drain the entire system unless needed.
Step 2: Remove intake ducting if needed for access
- Use the 8mm socket or 10mm socket to remove the air inlet duct or cover pieces blocking access.
- Lift the ducting out carefully and set it aside.
Step 3: Remove the thermostat hose
- Use pliers to release the hose clamp at the thermostat housing.
- Twist the hose gently to break it free, then pull it off.
- Keep a rag under the connection to catch coolant.
Step 4: Remove the thermostat housing
- Use the 10mm socket and 1/4-inch ratchet with a short extension to remove the housing bolts.
- Lift the housing off the engine carefully.
- Note how the thermostat and seal sit in place before removing them.
Step 5: Remove the old thermostat
- Pull the thermostat and old seal out of the housing or engine side, depending on how it is seated.
- Clean the mating surfaces with a clean rag.
- Do not scratch the sealing surface.
Step 6: Install the new thermostat
- Install the new thermostat in the same orientation as the old one.
- Install the new thermostat housing seal or gasket.
- Make sure the seal is seated evenly all the way around.
Step 7: Reinstall the housing
- Set the housing back in place by hand first.
- Start the bolts by hand to avoid cross-threading.
- Use the 10mm socket to snug the bolts evenly.
- Torque to 10 Nm (89 in-lbs).
Step 8: Reconnect the hose and intake parts
- Push the radiator hose back onto the housing fully.
- Reinstall the hose clamp with pliers or a flat-blade screwdriver.
- Reinstall any intake ducting with the 8mm socket or 10mm socket.
Step 9: Refill the cooling system
- Use a funnel or coolant spill-free fill funnel (specialty) to refill with the correct coolant mix.
- Fill with Dex-Cool equivalent coolant mixed 50/50 with distilled water.
- Fill the surge tank to the proper mark.
Step 10: Bleed air from the system
- Start the engine and let it idle.
- Turn the heater to full hot.
- Watch the coolant level and add as needed as air escapes.
- Let the engine reach operating temperature and confirm the upper radiator hose gets hot.
- Check for leaks at the thermostat housing and hose connection.
✅ After Repair
- Top off coolant after the engine cools completely.
- Recheck for leaks after a short test drive.
- Watch the temperature gauge for normal operation.
- Verify the heater blows hot air and no warning lights return.
💰 DIY vs Shop Cost
Shop Cost: $350-$700 (parts + labor)
DIY Cost: $60-$140 (parts only)
You Save: $290-$560 by doing it yourself!
Shop labor rates vary but typically run $100-$150/hour. This repair takes a shop approximately 2-3 hours.
🎯 Ready to get started?
HowToo makes it easy: same-day/2-day shipping on every part, plus all the tools and specialty tools you need! Check out the parts and tools sections below to add everything to your cart.
