







How to Replace the Thermostat on a 2011-2023 Ford F-150 3.7L (Engine: V8 5.0L)
Step-by-step instructions with tools, parts, torque specs, coolant bleeding, and safety tips for 2011, 2012, 2013, 2014, 2015, 2016, 2017, 2018, 2019, 2020, 2021, 2022, 2023
How to Replace the Thermostat on a 2011-2023 Ford F-150 3.7L (Engine: V8 5.0L)
Step-by-step instructions with tools, parts, torque specs, coolant bleeding, and safety tips for 2011, 2012, 2013, 2014, 2015, 2016, 2017, 2018, 2019, 2020, 2021, 2022, 2023


🔧 F-150 - Thermostat Replacement
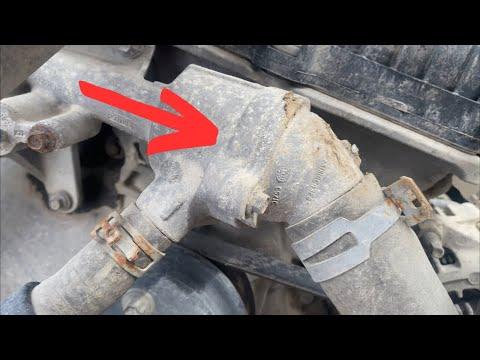
The thermostat on your F-150 sits inside the coolant outlet housing near the front of the engine. Replacing it requires draining some coolant, moving the air-intake duct, opening the housing, and carefully refilling the cooling system without trapping air.
Difficulty Level: Intermediate | Estimated Time: 1.5-2.5 hours
⚠️ Safety & Precautions
- ⚠️ Work only when the engine is completely cold. Hot coolant can cause severe burns.
- 🧤 Wear gloves and safety glasses whenever draining or handling coolant.
- 🐾 Coolant is poisonous to people and animals. Catch it in a clean drain pan and clean spills immediately.
- 🔋 Battery disconnection is not normally required for this repair.
- 🚫 Never mix Ford Specialty Orange coolant with conventional green coolant.
- ♻️ Do not pour used coolant onto the ground or into a drain.
🔧 Required Tools
You'll need the following tools for this repair:
- 8mm socket
- 10mm socket
- 1/4-inch drive ratchet
- 1/4-inch drive 6-inch extension
- Inch-pound torque wrench rated 50-150 in-lbs
- Flat-blade screwdriver
- Hose-clamp pliers
- Plastic gasket scraper
- Cooling-system funnel kit (specialty)
- Coolant drain pan rated 15 litres minimum
- Clean 4-litre measuring container
- Wheel chocks
- Nitrile gloves
- Safety glasses
- Shop towels
🔩 Required Parts
HowToo sells all the parts you need for this repair:
- Engine coolant thermostat - Qty: 1
- Thermostat sealing O-ring - Qty: 1
- Ford-specification orange coolant concentrate - Qty: 4 litres
- Distilled water - Qty: 4 litres
Use coolant meeting Ford specification WSS-M97B44-D. If using prediluted 50/50 coolant, do not add water.
📋 Before You Begin
- 🅿️ Park your F-150 on level ground, select Park, apply the parking brake, and chock the rear wheels.
- 🌡️ Allow the engine to cool completely, preferably overnight.
- 🧊 Set the cabin temperature control to full hot before shutting the ignition off.
- 🧪 If using concentrate, mix equal amounts of approved coolant and distilled water in the clean measuring container.
- 📏 Measure the coolant you drain. This provides a useful minimum refill reference.
🔨 Step-by-Step Instructions
Follow these steps in order:
Step 1: Release Cooling-System Pressure
- Put on the nitrile gloves and safety glasses.
- Confirm the upper radiator hose feels cold and soft.
- Cover the coolant reservoir cap with a shop towel, then slowly turn it counterclockwise by hand.
- Stop if you hear pressure escaping. Wait until it stops before removing the cap.
Step 2: Remove the Air-Intake Duct
- Use the 8mm socket and ratchet to loosen the clamps at the air-filter housing and throttle body.
- Disconnect the small breather hose by releasing its locking tab by hand.
- Use the flat-blade screwdriver only if needed to gently release a stubborn connector tab.
- Lift the intake duct out and place it where dirt cannot enter it.
- Cover the exposed throttle-body opening with a clean shop towel.
Step 3: Drain the Coolant
- Position the 15-litre drain pan beneath the radiator drain valve at the lower radiator area.
- Open the drain valve by hand. If access is restricted, use the flat-blade screwdriver carefully without forcing the plastic valve.
- Drain enough coolant to lower the level below the thermostat housing.
- Close the drain valve by hand until snug. Do not overtighten the plastic valve.
- Transfer the drained coolant into the clean measuring container and note the amount.
Step 4: Disconnect the Thermostat Housing Hose
- Locate the thermostat housing at the front of the 3.7L engine where the radiator hose joins the coolant outlet.
- Use the hose-clamp pliers to squeeze the spring clamp and slide it several centimetres back along the hose.
- Twist the hose gently by hand to break its seal, then pull it from the housing.
- Keep the drain pan underneath because additional coolant will escape.
- Do not pry hard against the plastic outlet. It can crack.
Step 5: Remove the Thermostat Housing
- Use the 8mm socket, extension, and ratchet to remove the thermostat housing bolts evenly.
- Note each bolt’s original location if their lengths differ.
- Pull the housing straight away from the engine. Do not wedge a screwdriver between the sealing surfaces.
- Remove the thermostat and sealing O-ring by hand.
- Note the thermostat’s direction before removal. The spring end faces the engine.
Step 6: Inspect and Clean the Housing
- Use the plastic gasket scraper to remove O-ring residue from the housing groove and mating surface.
- Wipe the surfaces with clean shop towels.
- Inspect the plastic housing for cracks, warping, damaged hose connections, or heavy corrosion. Replace it if damaged.
- Do not use abrasive discs or metal scrapers. They can damage the sealing surface.
Step 7: Install the New Thermostat
- Lightly wet the new O-ring with fresh approved coolant using a gloved finger.
- Fit the new O-ring fully into its groove without twisting it.
- Install the thermostat in the same direction as the original, with its spring end facing the engine.
- If the thermostat has a small air-bleed valve, position it at the top.
- A twisted O-ring will cause a coolant leak.
Step 8: Reinstall the Thermostat Housing
- Hold the housing squarely against the engine and start every bolt by hand.
- Use the 8mm socket and ratchet to tighten the bolts evenly in stages.
- Use the inch-pound torque wrench for final tightening: Torque to 10 Nm (89 in-lbs).
- Do not overtighten the housing bolts because the plastic housing can crack.
Step 9: Reconnect the Coolant Hose
- Push the radiator hose fully onto the housing until it reaches its original seated position.
- Use the hose-clamp pliers to return the spring clamp to its original location behind the raised hose-retaining bead.
- Confirm the clamp is straight and evenly seated.
Step 10: Reinstall the Air-Intake Duct
- Remove the shop towel from the throttle-body opening.
- Fit the intake duct fully onto the throttle body and air-filter housing.
- Reconnect the breather hose by hand until its locking tab clicks.
- Use the 8mm socket and ratchet to tighten both duct clamps snugly. Do not crush the plastic duct.
Step 11: Refill the Cooling System
- Install the cooling-system funnel kit onto the coolant reservoir. A spill-free funnel holds extra coolant while trapped air escapes.
- Slowly add the correct 50/50 coolant mixture until the level reaches the reservoir’s cold-fill mark.
- Pause several times so air can escape.
- Squeeze the upper radiator hose gently by hand to help move trapped air toward the reservoir.
- Do not exceed a 50/50 coolant-to-water mixture unless local temperature requirements specifically demand it.
Step 12: Bleed Trapped Air
- Leave the cooling-system funnel installed and start the engine.
- Set the cabin heater to maximum heat and the blower to low.
- Let the engine idle while watching the coolant level and temperature gauge.
- Add 50/50 coolant as the level drops, but do not overfill the funnel.
- When the thermostat opens, the upper radiator hose will become hot and coolant may briefly drop in the funnel.
- Wait until the heater produces steady hot air and large air bubbles stop appearing.
- Switch the engine off if the temperature gauge climbs above its normal range.
Step 13: Set the Final Coolant Level
- Turn off the engine and allow the coolant to settle for several minutes.
- Use the cooling-system funnel kit to return excess coolant to a clean container.
- Remove the funnel and install the coolant reservoir cap by hand until fully seated.
- Use shop towels to wipe away spilled coolant.
✅ After Repair
- 🔍 Run the engine and inspect the thermostat housing, hose connection, radiator drain valve, and reservoir for leaks.
- 🌡️ Confirm the temperature gauge remains in its normal range and the cabin heater produces steady heat.
- 🧊 After the engine becomes completely cold, recheck the reservoir and adjust it to the cold-fill mark with the same 50/50 coolant.
- 🛣️ Take a short test drive while monitoring the temperature gauge. Stop immediately if the engine overheats.
- 📅 Recheck for leaks and verify the cold coolant level again the next morning.
- ♻️ Take old coolant to an authorised automotive-fluid recycling facility.
💰 DIY vs Shop Cost
Shop Cost: ₹8,000-₹16,000 (parts + labour)
DIY Cost: ₹2,500-₹6,000 (parts only)
You Save: ₹5,500-₹10,000 by doing it yourself!
Labour rates around Sonīpat vary by workshop. This repair takes a shop approximately 1-2 hours, with additional time for cooling-system bleeding and testing.
🎯 Ready to get started?
HowToo makes it easy: same-day/2-day shipping on every part, plus all the tools and specialty tools you need! Check out the parts and tools sections below to add everything to your cart.