

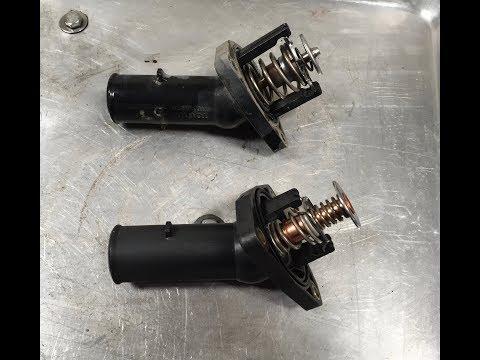






How to Replace the Thermostat on a 2003-2018 Toyota 4Runner 4.0L V6 (Engine: V6 4.0L)
Step-by-step cooling system guide with tools, parts, torque specs, bleeding, and safety tips for 2003, 2004, 2005, 2006, 2007, 2008, 2009, 2010, 2011, 2012, 2013, 2014, 2015, 2016, 2017, 2018
How to Replace the Thermostat on a 2003-2018 Toyota 4Runner 4.0L V6 (Engine: V6 4.0L)
Step-by-step cooling system guide with tools, parts, torque specs, bleeding, and safety tips for 2003, 2004, 2005, 2006, 2007, 2008, 2009, 2010, 2011, 2012, 2013, 2014, 2015, 2016, 2017, 2018


🔧 4Runner - Thermostat Replacement
The thermostat controls coolant flow between the engine and radiator. Replacement is necessary if your 4Runner overheats, warms up slowly, or has a thermostat-related diagnostic code.
Difficulty Level: Intermediate | Estimated Time: 1.5-2.5 hours
⚠️ Safety & Precautions
- ⚠️ Let the engine become completely cold before opening the cooling system. Hot coolant can cause severe burns.
- 🧤 Wear safety glasses and chemical-resistant gloves because coolant is poisonous.
- 🚫 Keep drained coolant away from children and animals; its sweet taste makes it especially dangerous.
- 🔋 Battery disconnection is not required for this repair.
- ♻️ Collect the coolant in a clean drain pan and take unwanted coolant to an approved recycling facility.
🔧 Required Tools
You'll need the following tools for this repair:
- 10mm socket
- 12mm socket
- 3/8-inch drive ratchet
- 3/8-inch drive 6-inch extension
- 3/8-inch drive torque wrench rated 5-50 Nm
- Hose-clamp pliers
- Plastic trim-clip removal tool
- Plastic gasket scraper
- Coolant drain pan rated 15 liters minimum
- Spill-free coolant funnel kit
- Shop towels
- Chemical-resistant nitrile gloves
- Safety glasses
🔩 Required Parts
HowToo sells all the parts you need for this repair:
- Engine thermostat rated 82°C - Qty: 1
- Thermostat rubber gasket - Qty: 1
- Toyota Super Long Life Coolant premix - Qty: 2 gallons
📋 Before You Begin
- 🅿️ Park your 4Runner on level ground, select Park, engage the parking brake, and allow the engine to cool completely.
- 🌡️ Confirm that the upper radiator hose feels cold before removing the radiator cap.
- 🧹 Clean dirt from around the radiator cap and thermostat housing so contamination cannot enter the cooling system.
- 🧪 Toyota Super Long Life Coolant is already mixed 50/50 with deionized water. Do not dilute premixed coolant.
- 📱 Take a photograph of the skid-plate and splash-shield fastener positions before disassembly.
🔨 Step-by-Step Instructions
Follow these steps in order:
Step 1: Remove the Front Skid Plate
- Put on the safety glasses and chemical-resistant nitrile gloves.
- Use a 12mm socket, 3/8-inch drive extension, and ratchet to remove the front skid-plate bolts.
- Support the skid plate with one hand while removing the final fastener, then lower it carefully.
- Use the plastic trim-clip removal tool to release any splash-shield clips that block access to the lower radiator hose.
Step 2: Release Cooling-System Pressure
- Place shop towels around the radiator cap.
- Use a gloved hand to press down and slowly turn the cold radiator cap counterclockwise to its first stop.
- Pause briefly, then remove the cap completely once no pressure is released.
- Never open the cap when warm.
Step 3: Drain the Coolant
- Position the 15-liter coolant drain pan beneath the radiator drain cock at the bottom of the radiator.
- Use a gloved hand to turn the plastic drain cock counterclockwise. Do not use pliers because the plastic can break.
- Allow enough coolant to drain that the level falls below the thermostat housing.
- Close the drain cock gently by hand once coolant stops flowing. Do not overtighten it.
Step 4: Disconnect the Lower Radiator Hose
- Locate the thermostat housing where the lower radiator hose connects to the front of the engine.
- Use hose-clamp pliers to compress the spring clamp, then slide the clamp several centimeters back along the hose.
- Use a gloved hand to twist the hose gently until it releases, then pull it from the water inlet.
- Catch the remaining coolant in the drain pan and use shop towels to clean spills.
- A spring clamp is a reusable metal clamp that tightens automatically when released.
Step 5: Remove the Water Inlet
- Use a 10mm socket, 6-inch extension, and ratchet to remove the two water-inlet retaining nuts.
- Pull the water inlet straight away from the engine using a gloved hand.
- Note the thermostat’s position before removing it, especially the small jiggle valve at its upper edge.
- Remove the thermostat and rubber gasket by hand.
- The jiggle valve is the small loose pin that allows trapped air to escape.
Step 6: Clean and Inspect the Sealing Surfaces
- Use shop towels to plug the open coolant passage temporarily.
- Use the plastic gasket scraper to remove gasket residue from the water inlet and engine sealing surfaces.
- Remove the shop towels and inspect the sealing surfaces for cracks, corrosion, or deep scratches.
- Do not use abrasive discs, metal scrapers, or sealant on these surfaces.
Step 7: Install the New Thermostat
- Fit the new rubber gasket evenly around the outside edge of the new thermostat using clean, gloved hands.
- Install the thermostat with its jiggle valve facing upward, positioned within approximately 10 degrees of the top.
- Hold the thermostat in place and fit the water inlet squarely over it by hand.
- Make sure the rubber gasket remains seated and is not pinched.
- Correct valve position helps trapped air escape.
Step 8: Tighten the Water Inlet
- Start both retaining nuts by hand to prevent cross-threading.
- Use the 10mm socket and ratchet to tighten the nuts evenly in alternating passes.
- Use the torque wrench and 10mm socket to tighten both nuts to 9 Nm (80 in-lbs).
- Do not overtighten the nuts because the water inlet can be damaged.
Step 9: Reconnect the Lower Radiator Hose
- Use a gloved hand to push the lower radiator hose fully onto the water-inlet neck.
- Use hose-clamp pliers to return the spring clamp to its original position over the raised portion of the neck.
- Inspect the hose and clamp visually to ensure they are straight and fully seated.
Step 10: Refill the Cooling System
- Install the spill-free coolant funnel on the radiator filler neck.
- Pour Toyota Super Long Life Coolant premix into the funnel slowly until the radiator remains full.
- Use a gloved hand to squeeze the upper and lower radiator hoses several times to help release trapped air.
- Add coolant to the expansion reservoir until it reaches the “FULL” mark.
Step 11: Bleed Air from the Cooling System
- Keep the spill-free funnel installed and start the engine with the transmission in Park.
- Set the cabin heater to maximum temperature and the blower to low using the climate-control switches.
- Allow the engine to idle while watching the coolant level in the funnel and adding premixed coolant as needed.
- Stop the engine immediately if the temperature gauge rises above its normal range.
- When the upper radiator hose becomes hot and bubbles stop appearing, switch off the engine and let it cool completely.
- Remove the funnel according to its instructions and install the radiator cap securely by hand.
Step 12: Reinstall the Skid Plate
- Use the plastic trim-clip removal tool to reinstall the splash-shield clips.
- Raise the skid plate into position and start every bolt by hand.
- Use the 12mm socket and ratchet to snug the bolts evenly.
- Use the torque wrench and 12mm socket to tighten the original Toyota skid-plate bolts to 30 Nm (22 ft-lbs).
✅ After Repair
- 🔍 Inspect the thermostat housing, lower radiator hose, radiator drain cock, and radiator cap for leaks while the engine idles.
- 🌡️ Confirm that the temperature gauge reaches its normal position and remains steady.
- 🔥 Confirm that warm air comes from the cabin vents; a lack of heat can indicate trapped air.
- 🧊 Let the engine cool completely, then check the radiator and expansion-reservoir levels again. Top up only with Toyota Super Long Life Coolant premix.
- 🛣️ Take a short test drive while monitoring the temperature gauge, then perform another leak inspection.
- ♻️ Transfer the old coolant into a sealed container and deliver it to an approved recycling facility.
💰 DIY vs Shop Cost
Shop Cost: ₹18,000-₹32,000 (parts + labor)
DIY Cost: ₹6,000-₹13,000 (parts only)
You Save: ₹12,000-₹19,000 by doing it yourself!
Imported-part pricing and labor rates around Sonīpat vary. This repair takes a shop approximately 1.5-2.0 hours.
🎯 Ready to get started?
HowToo makes it easy: same-day/2-day shipping on every part, plus all the tools and specialty tools you need! Check out the parts and tools sections below to add everything to your cart.