


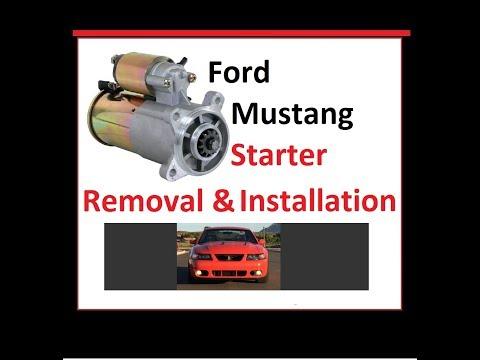


How to Replace the Starter Motor on a 2016-2023 Ford Mustang (Engine: V8 5.0L)
Step-by-step DIY guide with tools, parts, torque specs, safety tips, and costs for 2016, 2017, 2018, 2019, 2020, 2021, 2022, 2023
How to Replace the Starter Motor on a 2016-2023 Ford Mustang (Engine: V8 5.0L)
Step-by-step DIY guide with tools, parts, torque specs, safety tips, and costs for 2016, 2017, 2018, 2019, 2020, 2021, 2022, 2023
🔧 Mustang - Starter Motor Replacement
Replacing the starter motor on your Mustang involves safely disconnecting the battery, raising the front of the car, removing the lower access parts as needed, and unbolting the starter from the passenger side of the engine/transmission area.
The starter is the electric motor that cranks the engine when you press the start button. If it clicks, grinds, or does nothing with a good battery, replacement may be needed.
Difficulty Level: Intermediate | Estimated Time: 2-3 hours
⚠️ Safety & Precautions
- ⚠️ Disconnect the negative battery cable before touching the starter wiring. The starter cable is always hot when connected.
- ⚠️ Support your Mustang with jack stands. Never work under a car supported only by a jack.
- ⚠️ Let the exhaust cool fully before starting. The starter sits near hot exhaust components.
- ⚠️ Wear safety glasses. Dirt and small debris can fall while working underneath.
- ⚠️ Manual transmission note: leave the shifter in neutral when testing after repair, with the parking brake fully engaged.
🔧 Required Tools
You'll need the following tools for this repair:
- 10mm wrench
- 8mm socket
- 10mm socket
- 13mm socket
- 15mm socket
- 3/8-inch drive ratchet
- 3/8-inch drive 6-inch extension
- 3/8-inch drive universal joint adapter
- Torque wrench 10-80 ft-lb range
- Flat trim clip removal tool
- Floor jack rated 3-ton minimum
- Jack stands rated 3-ton minimum
- Wheel chocks
- Mechanic gloves
- Safety glasses
- Shop light
🔩 Required Parts
HowToo sells all the parts you need for this repair:
- Starter motor - Qty: 1
- Starter mounting bolts - Qty: 2, if damaged or corroded
- Starter electrical terminal nut - Qty: 1, if damaged or corroded
- Underbody shield clips - Qty: As needed
📋 Before You Begin
- ✅ Park your Mustang on a flat, solid surface.
- ✅ Set the parking brake firmly and place the manual transmission in neutral.
- ✅ Put wheel chocks behind the rear wheels. Wheel chocks are blocks that stop the car from rolling.
- ✅ Open the hood and let the engine and exhaust cool completely.
- ✅ Save any radio presets or settings if needed before battery disconnect.
- ✅ Disconnect the negative battery cable using a 10mm wrench and move it aside so it cannot spring back onto the terminal.
🔨 Step-by-Step Instructions
Follow these steps in order:
Step 1: Raise and Support the Front
- Use a floor jack rated 3-ton minimum to lift the front of your Mustang at the front center jacking point.
- Place jack stands rated 3-ton minimum under the approved front support points.
- Gently lower the car onto the jack stands and shake the car lightly to confirm it is stable.
- Keep the wheel chocks behind the rear wheels.
- Never trust the jack alone.
Step 2: Remove Lower Shielding if Equipped
- Put on safety glasses and use a shop light to inspect under the engine.
- Use a flat trim clip removal tool to remove plastic push clips from the lower splash shield if it blocks starter access.
- Use a 8mm socket or 10mm socket with a 3/8-inch drive ratchet to remove any small shield bolts.
- Set the shield and fasteners aside in order.
Step 3: Locate the Starter
- Use a shop light and look on the passenger side lower rear of the engine, where the engine meets the manual transmission bellhousing.
- The bellhousing is the rounded transmission case area that covers the clutch and flywheel.
- The starter is a small cylindrical motor with a heavy battery cable attached to it.
Step 4: Remove the Starter Heat Shield if Equipped
- If your Mustang has a starter heat shield, use a 10mm socket, 3/8-inch drive ratchet, and 3/8-inch drive 6-inch extension to remove the shield fasteners.
- Move the shield out of the way and remember its position for reinstallation.
- Take a quick photo first.
Step 5: Disconnect the Starter Electrical Connectors
- Confirm the negative battery cable is still disconnected.
- Use a 13mm socket with a 3/8-inch drive ratchet to remove the nut from the large starter battery cable terminal.
- Pull the large cable straight off the starter stud and move it aside.
- Use a 10mm socket or release the small connector lock by hand, depending on the connector style, to disconnect the small starter solenoid wire.
- The solenoid is the small electrical switch mounted on the starter that engages the starter gear.
- Do not pull on the wire itself. Pull on the connector body.
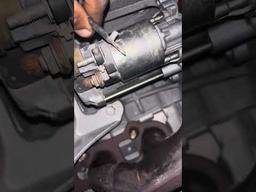
Step 6: Remove the Starter Mounting Bolts
- Support the starter with one hand. It is heavier than it looks.
- Use a 15mm socket, 3/8-inch drive ratchet, 3/8-inch drive 6-inch extension, and 3/8-inch drive universal joint adapter to remove the starter mounting bolts.
- A universal joint adapter lets the socket work at a slight angle in tight spaces.
- Remove the lower bolt first, then the upper bolt while holding the starter.
- Lower the starter out carefully.
Step 7: Compare the Old and New Starter
- Place the old and new starter motor side by side.
- Confirm the mounting ears, electrical terminals, and nose shape match.
- Use mechanic gloves to keep your hands protected from sharp edges.
Step 8: Install the New Starter
- Raise the new starter motor into position by hand.
- Start both mounting bolts by hand first to prevent cross-threading.
- Use a 15mm socket, 3/8-inch drive ratchet, and 3/8-inch drive 6-inch extension to snug the mounting bolts.
- Use a torque wrench 10-80 ft-lb range with the 15mm socket to tighten the starter mounting bolts to Torque to 35 Nm (26 ft-lbs).
Step 9: Reconnect the Starter Wiring
- Push the small starter solenoid connector fully onto the terminal until it locks.
- Install the large battery cable onto the starter stud.
- Use a 13mm socket and torque wrench 10-80 ft-lb range to tighten the large starter cable nut to Torque to 12 Nm (106 in-lbs).
- Make sure the cable does not touch the exhaust, engine block edges, or moving parts.
- Loose cables cause no-start problems.
Step 10: Reinstall the Heat Shield and Lower Shielding
- Reinstall the starter heat shield if removed.
- Use a 10mm socket and 3/8-inch drive ratchet to snug the shield fasteners.
- Reinstall the lower splash shield using the flat trim clip removal tool for clips and the 8mm socket or 10mm socket for bolts.
- Tighten small splash shield bolts snug only. Do not overtighten plastic parts.
Step 11: Lower the Vehicle
- Use the floor jack rated 3-ton minimum to raise the car slightly off the jack stands.
- Remove the jack stands rated 3-ton minimum.
- Lower your Mustang slowly to the ground.
Step 12: Reconnect the Battery
- Use a 10mm wrench to reconnect the negative battery cable.
- Tighten the clamp until it cannot rotate by hand.
- Do not overtighten the battery terminal clamp.
✅ After Repair
- ✅ Sit in the driver seat, press the clutch pedal fully, and start the engine.
- ✅ Listen for normal cranking. There should be no grinding, slow crank, or repeated clicking.
- ✅ If it does not crank, recheck the battery connection and both starter electrical connections.
- ✅ Let the engine idle for a minute and check underneath for any loose shields or rattles.
- ✅ Reset the clock and window auto-up/down if needed after battery disconnect.
- ✅ To relearn window auto function, fully lower the window, hold the switch briefly, fully raise it, then hold the switch again briefly.
💰 DIY vs Shop Cost
Shop Cost: $450-$850 USD equivalent, parts + labor
DIY Cost: $180-$450 USD equivalent, parts only
You Save: $270-$400 by doing it yourself!
Shop labor rates vary by location. This repair takes a shop approximately 1.5-2.5 hours.
🎯 Ready to get started?
HowToo makes it easy: same-day/2-day shipping on every part, plus all the tools and specialty tools you need! Check out the parts and tools sections below to add everything to your cart.
