






How to Replace the Starter Motor on a 2015 Ford F-150 5.0L
Step-by-step DIY starter removal and installation with tools, parts list, torque specs, and safety tips for your 2015 F-150 for 2015, 2016
How to Replace the Starter Motor on a 2015 Ford F-150 5.0L
Step-by-step DIY starter removal and installation with tools, parts list, torque specs, and safety tips for your 2015 F-150 for 2015, 2016


F-150 - Starter Motor Replacement 🔧
Got it—you want to replace the starter on your 2015 Platinum 5.0L 4WD. I’ll walk you through it step by step.
Safety First ⚠️
- ⚠️ Disconnect the battery before touching the starter. This prevents sparks and possible damage.
- ⚠️ Support the truck safely with jack stands if you raise it. Never rely only on a jack.
- ⚠️ Let the exhaust cool if the engine was recently running; the starter is near the exhaust.
Parts & Specs 📦
- 🔧 Starter motor assembly – 5.0L specific, for your F-150.
- 🔧 New starter mounting bolts (recommended) – Ford uses torque-to-yield style on some fasteners; fresh bolts are safer.
- 🔧 Dielectric grease (optional) – a non-conductive grease to protect electrical connections from corrosion.
Tools You’ll Need 🛠️
- 🔧 Floor jack and jack stands – to safely lift and support the front of the truck.
- 🔧 Wheel chocks – blocks to keep the truck from rolling.
- 🔧 Socket set:
- 3/8" and/or 1/2" drive ratchet
- Common sizes you’ll use: 10mm, 13mm, 15mm sockets (starter bolts are typically 13–15mm on this truck).
- 🔧 Extensions (3"–6") – metal pieces that make your ratchet longer to reach tight spots.
- 🔧 Swivel / universal joint – a joint that lets the socket bend to reach angled bolts.
- 🔧 Wrenches – 10mm and 13mm combination wrenches.
- 🔧 Torque wrench – tool that lets you tighten bolts to a specific torque value.
- 🔧 Flat screwdriver or trim tool – to release any plastic clips or wire retainers.
- 🔧 Work light – it’s dark under there.
- 🔧 Gloves and safety glasses – protect your hands and eyes.
Key Torque Specs 📏
- 🔧 Starter mounting bolts: about 35–40 lb-ft (47–54 N·m).
- 🔧 Battery terminal clamp nuts: about 7–9 lb-ft (10–12 N·m) – just snug, don’t crush them.
- 🔧 Starter main cable nut: about 9–11 lb-ft (12–15 N·m).
Tip: If a bolt feels like it’s about to strip or snap, stop and re-check size and direction.
Where the Starter Is Located 📍
- 🔧 On your 5.0L, the starter is mounted low on the passenger side of the engine, where it meets the transmission bellhousing.
- 🔧 You’ll access it from underneath the truck, behind the right front wheel area.
Step 1 – Prepare the Truck 🧱
- 🔧 Park on a flat surface, set the parking brake, and put the transmission in PARK.
- 🔧 Place wheel chocks behind the rear wheels.
- 🔧 Open the hood.
Step 2 – Disconnect the Battery 🔋
- 🔧 Locate the battery under the hood.
- 🔧 Use a 10mm socket or wrench to loosen the negative (-) terminal clamp.
- 🔧 Remove the negative cable and tuck it aside so it cannot spring back to the post.
- 🔧 If you want extra safety, also disconnect the positive (+) terminal (10mm).
Step 3 – Raise and Support the Front (If Needed) 🏗️
- 🔧 Position the floor jack under the front frame crossmember and lift the front of the truck.
- 🔧 Place jack stands under the frame rails on both sides and gently lower the truck onto them.
- 🔧 Give the truck a shake to confirm it’s stable.
Step 4 – Access the Starter 🔎
- 🔧 Slide under the truck from the front or passenger side.
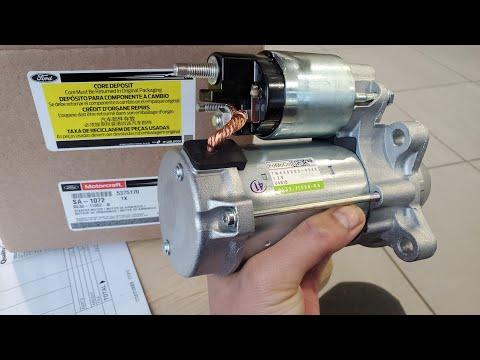
- 🔧 Look at the area where the engine meets the transmission on the passenger side; you’ll see the starter motor – a cylindrical unit with a smaller cylinder (solenoid) attached and thick cables going to it.
- 🔧 If there’s a plastic splash shield or cover in the way, remove it (usually 8mm or 10mm bolts or plastic clips).
Step 5 – Disconnect Starter Wiring 🔌
- 🔧 On the starter solenoid, you’ll typically see:
- A large cable from the battery (on a stud with a nut).
- A smaller signal wire with a push-on connector or small nut.
- 🔧 First, remove the small signal wire:
- If it’s a push-on connector, gently pry the locking tab with a flat screwdriver and pull it off.
- If it’s held by a small nut (often 8–10mm), remove the nut and lift the wire off.
- 🔧 Next, remove the large battery cable:
- Use a 13mm socket or wrench to remove the nut on the large stud.
- Pull the cable eyelet off and move the cable aside.
- 🔧 Note the routing of the cables and any plastic clips holding them; you’ll want to put them back the same way.
Step 6 – Remove the Starter Motor 🔩
- 🔧 The starter is held to the bellhousing by 2 or 3 bolts (usually 13–15mm heads) going through the starter into the transmission housing.
- 🔧 Support the starter with one hand while you loosen the bolts with a ratchet, socket, and extension.
- 🔧 Remove the lower bolt(s) first, then the upper bolt last while holding the starter so it doesn’t drop.
- 🔧 Carefully lower the starter out of the opening. You may need to twist it slightly to clear the exhaust or frame.
Step 7 – Compare Old and New Starter 🔁
- 🔧 Place the old and new starters side by side.
- 🔧 Check:
- Mounting holes line up.
- Electrical studs and connectors are in the same positions.
- Gear (pinion) size and position match.
- 🔧 If anything looks different, do not install until you confirm the part number.
Step 8 – Install the New Starter 🧩
- 🔧 Lift the new starter into position, aligning the nose into the opening in the bellhousing.
- 🔧 Start all mounting bolts by hand to avoid cross-threading (damaging threads).
- 🔧 Once all bolts are finger-tight, use your ratchet to snug them evenly.
- 🔧 Use your torque wrench to tighten the bolts to about 35–40 lb-ft (47–54 N·m).
Step 9 – Reconnect Starter Wiring 🔗
- 🔧 Reinstall the large battery cable on the main stud:
- Slide the eyelet over the stud.
- Install the nut and tighten to about 9–11 lb-ft (12–15 N·m) – snug but don’t overdo it.
- Optionally apply a thin layer of dielectric grease over the exposed metal to help prevent corrosion.
- 🔧 Reconnect the small signal wire:
- Push the connector on until it clicks, or reinstall the small nut and snug it gently.
- 🔧 Make sure the wires are routed away from the exhaust and moving parts and clipped back into any holders.
Step 10 – Reinstall Any Shields & Lower the Truck 🛡️
- 🔧 If you removed a splash shield or cover, reinstall it now.
- 🔧 Use the jack to lift the truck slightly, remove the jack stands, and lower the truck to the ground.
Step 11 – Reconnect Battery & Test 🔁
- 🔧 Reconnect the positive (+) battery terminal first (if removed), then the negative (-).
- 🔧 Tighten the 10mm nuts just enough so the clamps don’t move by hand.
- 🔧 Get in the truck and turn the key / push start:
- The engine should crank strongly and start normally.
- Listen for any grinding or unusual noises from the starter area.
Step 12 – If Something Seems Off 🧠
- 🔧 No crank at all:
- Check battery connections are tight.
- Check the small signal wire is fully seated on the starter.
- Verify you reconnected the correct cables to the correct studs.
- 🔧 Grinding noise:
- Stop immediately.
- Starter may not be seated flat or may be the wrong part.
Infotainment / Settings Note 📱
- 🔧 This job does not require any special settings or programming in your truck’s infotainment system.
- 🔧 You may see the clock or radio presets reset if the battery was disconnected for a long time; you can just set those again in the normal menus.
Want Parts & Tools? 🛒
Below this answer, HowToo will show you the correct starter, bolts, and tools for your F-150. You can add them to your cart directly from the parts section.
If you tell me whether you’re working on the ground or have access to a lift, I can give a couple of extra positioning tips to make the job easier.
HowToo makes it easy: same-day/2-day shipping on every part, plus all the tools and specialty tools you need! 🚚