

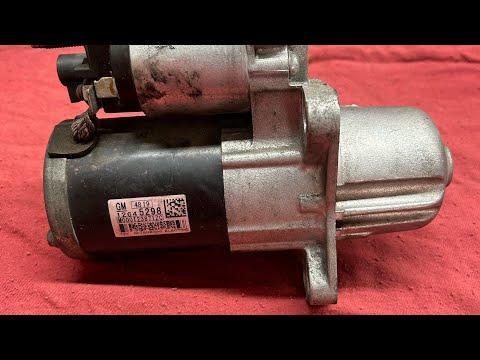





How to Replace the Starter Motor on a 2014-2020 Chevrolet Impala 3.6L V6 (Trim: LT | Engine: V6 3.6L | Body: Sedan)
Step-by-step DIY instructions with required tools, parts, torque specs, and safety tips for 2014, 2015, 2016, 2017, 2018, 2019, 2020
How to Replace the Starter Motor on a 2014-2020 Chevrolet Impala 3.6L V6 (Trim: LT | Engine: V6 3.6L | Body: Sedan)
Step-by-step DIY instructions with required tools, parts, torque specs, and safety tips for 2014, 2015, 2016, 2017, 2018, 2019, 2020


🔧 Impala - Starter Motor Replacement
Replacing the starter involves disconnecting the battery, raising your Impala, removing the lower splash shield, and replacing the starter at the engine-to-transmission joint. This procedure assumes the original starter and factory exhaust system are installed.
Difficulty Level: Intermediate | Estimated Time: 2-3 hours
⚠️ Safety & Precautions
- ⚠️ Disconnect the battery before touching the starter; its main cable is always powered.
- 🧤 Allow the engine and exhaust system to cool completely.
- 🚗 Support your Impala with jack stands on solid, level ground. Never work beneath a vehicle supported only by a jack.
- 🔑 Keep the key away from the vehicle after disconnecting the battery.
- 👓 Wear safety glasses because dirt may fall while working underneath.
- ⚡ Avoid bridging the starter terminals with a metal tool.
🔧 Required Tools
You'll need the following tools for this repair:
- 10mm socket
- 13mm socket
- 15mm socket
- 3/8-inch-drive ratchet
- 3/8-inch-drive 6-inch extension
- 3/8-inch-drive universal joint
- 3/8-inch-drive torque wrench rated 5-80 Nm
- 8mm wrench
- 10mm wrench
- Plastic trim-clip removal tool
- Flat-blade screwdriver with insulated handle
- Floor jack rated 2-ton minimum
- Jack stands rated 2-ton minimum
- Rubber wheel chocks
- LED work light
- Mechanic’s gloves
- Safety glasses
🔩 Required Parts
HowToo sells all the parts you need for this repair:
- Starter motor for 3.6L V6 - Qty: 1
- Starter terminal protective cap - Qty: 1 if damaged
- Lower splash-shield retainers - Qty: As needed
📋 Before You Begin
- 🅿️ Park on level pavement, select Park, apply the parking brake, and switch off every electrical accessory.
- 🛞 Place rubber wheel chocks firmly behind both rear wheels.
- 🌡️ Wait until the exhaust components beneath the engine are cool enough to touch.
- 🪟 Lower the driver’s window before disconnecting power so you cannot become locked out.
- 💾 Battery disconnection may reset the clock, stored radio settings, and automatic window indexing.
🔨 Step-by-Step Instructions
Follow these steps in order:
Step 1: Disconnect the Battery
- Open the hood and locate the battery at the right-front side of the engine compartment.
- Use a 10mm wrench to loosen the negative battery-terminal clamp.
- Lift the negative cable off the battery and position it where it cannot spring back onto the terminal.
- Wait at least two minutes before working on the starter wiring.
Step 2: Raise and Support the Front
- Position the 2-ton floor jack beneath the approved front-center lifting point.
- Raise the front high enough to work beneath it safely.
- Place the 2-ton jack stands beneath the reinforced front side lifting points.
- Lower the vehicle gently onto the stands, then push lightly on the body to verify stability.
- Keep the floor jack touching the lifting point without carrying the vehicle’s weight.
Step 3: Remove the Lower Splash Shield
- Use a plastic trim-clip removal tool to release the push-pin retainers from the lower engine splash shield.
- Use a 10mm socket and 3/8-inch-drive ratchet to remove any shield screws.
- Support the shield with one hand, lower it, and place its fasteners together.
Step 4: Locate the Starter
- Use the LED work light to locate the starter low on the engine at the engine-to-transmission joint.
- The starter is the cylindrical motor with one thick battery cable and one smaller control wire.
- Identify the wiring positions before removal. Take a reference photo if helpful.
- Keep every wire routed exactly as found.
Step 5: Disconnect the Starter Wiring
- Pull the rubber protective cap away from the large starter terminal by hand.
- Use a 13mm socket, 6-inch extension, and 3/8-inch-drive ratchet to remove the large cable-terminal nut.
- Lift the large cable eyelet from the terminal without twisting the cable.
- Release the small control-wire connector by hand. If needed, lift its locking tab gently with the insulated flat-blade screwdriver.
- Move both wires away from the starter so they cannot become trapped.
Step 6: Remove the Starter Motor
- Support the starter with one hand; it is heavier than it appears.
- Use a 15mm socket, 6-inch extension, and 3/8-inch-drive ratchet to loosen the starter mounting bolts.
- Use the 3/8-inch-drive universal joint only if the upper bolt cannot be reached straight.
- Remove the lower bolt, then remove the upper bolt while holding the starter.
- Move the starter straight away from the transmission housing and lower it through the available opening.
- Do not pry against the aluminum transmission housing.
Step 7: Compare and Position the New Starter
- Place the old and new starters side by side.
- Verify that the nose, mounting holes, electrical terminals, and drive gear match.
- Use a clean gloved finger to remove loose dirt from the starter mounting surface. Do not sand or grind the aluminum surface.
- Position the new starter squarely against the transmission housing.
- Start both mounting bolts several turns by hand to prevent cross-threading.
Step 8: Tighten the Starter Mounting Bolts
- Use the 15mm socket and 3/8-inch-drive torque wrench to tighten both starter mounting bolts evenly.
- Torque the starter mounting bolts to 50 Nm (37 ft-lbs).
- Confirm that the starter sits flat with no wiring trapped behind it.
Step 9: Reconnect the Starter Wiring
- Push the small control-wire connector onto its terminal until its lock clicks.
- Place the large cable eyelet squarely over the large starter terminal.
- Install the terminal nut by hand first.
- Use the 13mm socket and 3/8-inch-drive torque wrench to tighten the large terminal nut.
- Torque the large starter terminal nut to 13 Nm (115 in-lbs).
- Do not overtighten the nut; the insulated terminal can crack or rotate.
- Refit the rubber protective cap completely over the terminal.
Step 10: Reinstall the Splash Shield
- Raise the splash shield into position by hand.
- Install its screws loosely with the 10mm socket and 3/8-inch-drive ratchet.
- Install the push-pin retainers by hand, replacing any broken retainers.
- Snug the shield screws with the 10mm socket. Do not overtighten the plastic-mounted fasteners.
Step 11: Lower the Vehicle
- Use the 2-ton floor jack to raise the vehicle slightly off the jack stands.
- Remove both 2-ton jack stands.
- Lower your Impala slowly to the ground and remove the floor jack.
Step 12: Reconnect the Battery
- Place the negative battery clamp fully onto the negative post.
- Use the 10mm wrench to tighten the clamp until it cannot rotate by hand.
- Do not overtighten or deform the battery terminal.
✅ After Repair
- 👂 Start the engine and confirm that the starter engages promptly without grinding, clicking, or remaining engaged.
- 🔁 Switch the engine off, wait 30 seconds, and perform two additional starts.
- ⚡ Check that the battery warning light turns off after the engine starts.
- 🔍 Inspect the starter area for loose wiring, a displaced terminal cap, or contact with the exhaust.
- 🕒 Reset the clock and restore any radio preferences lost during battery disconnection.
- 🪟 If an automatic window loses express operation, close it fully and hold the switch upward for approximately five seconds.
💰 DIY vs Shop Cost
Shop Cost: $550-$900 (parts + labor)
DIY Cost: $180-$400 (parts only)
You Save: $370-$500 by doing it yourself!
Local labor and imported-part pricing in Sonīpat may differ. This repair takes a shop approximately 1.5-2.5 hours.
🎯 Ready to get started?
HowToo makes it easy: same-day/2-day shipping on every part, plus all the tools and specialty tools you need! Check out the parts and tools sections below to add everything to your cart.