






How to Replace the Starter Motor on a 2013 Mazda CX-5 (Step-by-Step Guide)
Tools, parts list, safety tips, access steps, wiring removal, and OEM torque spec notes for 2013, 2014, 2015, 2016
How to Replace the Starter Motor on a 2013 Mazda CX-5 (Step-by-Step Guide)
Tools, parts list, safety tips, access steps, wiring removal, and OEM torque spec notes for 2013, 2014, 2015, 2016


🔧 CX-5 - Starter Motor Replacement
The starter motor is the electric motor that cranks your engine when you turn the key. On your CX-5, it’s mounted to the transmission bellhousing, so the job is mostly about gaining access, disconnecting wiring safely, and swapping the unit.
Difficulty Level: Intermediate | Estimated Time: 1.5-3 hours
Quick questions (so I give you the exact factory torque specs and best access path):
- 🔎 Does your CX-5 have i-ELOOP (a large capacitor/module for charging), or is it a standard battery-only setup?
- 🔎 Are you replacing the starter because it won’t crank, or because it cranks slowly/clicks (battery/ground issues can mimic a bad starter)?
⚠️ Safety & Precautions
- ⚠️ Disconnect the negative (-) battery terminal first—starter wiring is always “hot” and can short easily.
- ⚠️ Let the engine cool before working near the exhaust and radiator area.
- ⚠️ If you lift the CX-5, support it with jack stands on solid ground—never rely on the floor jack.
- ⚠️ Keep the key out of the vehicle so nobody tries to start it while your hands are near the starter.
🔧 Required Tools
You'll need the following tools for this repair:
- 10mm socket
- 12mm socket
- 14mm socket
- 3/8" ratchet
- 3/8" torque wrench (10–100 Nm range)
- 6" socket extension
- 12" socket extension
- 3/8" wobble extension
- Flat-blade screwdriver
- Hose clamp pliers
- Trim clip removal tool
- Floor jack (rated 2-ton minimum)
- Jack stands (rated 2-ton minimum)
- Wheel chocks
- Work light
- Nitrile gloves
- Safety glasses
🔩 Required Parts
HowToo sells all the parts you need for this repair:
- Starter motor - Qty: 1
- Starter electrical terminal nut(s) - Qty: 1
- Dielectric grease - Qty: 1
📋 Before You Begin
- Park on level ground, set the parking brake, and place wheel chocks behind the rear wheels.
- Open the hood and make sure the ignition is OFF and the key is away from the vehicle.
- Disconnect the battery: use a 10mm socket to remove the negative (-) terminal and tuck it aside so it can’t spring back.
- If you’ll be working from underneath, lift the front with a floor jack and support with jack stands at the correct lift points.
🔨 Step-by-Step Instructions
Follow these steps in order:
Step 1: Remove the air intake ducting for access
- Use a flat-blade screwdriver to loosen the hose clamp(s) on the intake tube.
- Unclip/remove any small breather hoses using hose clamp pliers. Take a quick photo first.
- Lift out the intake tube/air box sections as needed (fasteners are typically removed with a 10mm socket).
Step 2: Remove the lower splash shield (if equipped)
- From underneath, use a trim clip removal tool for plastic clips and a 10mm socket for bolts.
- Set the shield and fasteners aside in a small pile so nothing gets lost.
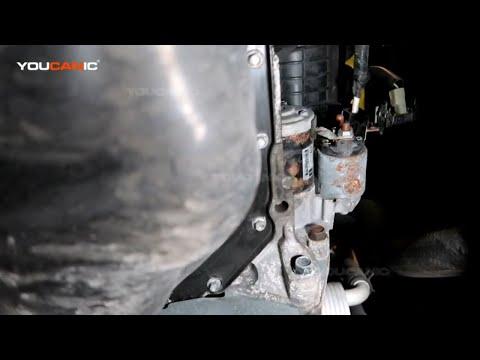
Step 3: Locate the starter on the transmission
- Look where the engine meets the transmission (the “bellhousing”). The starter is a small motor with a thicker battery cable going to it.
- A wobble extension (an extension that flexes slightly) helps reach bolts at an angle.
Step 4: Disconnect the starter wiring
- Remove the small signal connector: release the tab and pull it off by hand (use a flat-blade screwdriver gently if the tab is stubborn).
- Remove the main battery cable nut using a 12mm socket, then lift the cable off the stud.
- Cover the cable end so it can’t touch metal (even with the battery disconnected, it’s good practice).
Step 5: Remove the starter mounting bolts
- Support the starter with one hand.
- Use a 14mm socket with a 12" extension (and wobble extension if needed) to remove the starter mounting bolts.
- Remove the starter from the bellhousing and guide it out carefully.
- Torque note: I’ll give you the exact factory bolt torque once you answer the two questions above (i-ELOOP vs standard + symptom), because Mazda specs/notes can differ by equipment.
Step 6: Install the new starter
- Compare the new starter to the old one (same nose length, same electrical studs/connectors).
- Set the new starter into place and hand-thread the mounting bolts to avoid cross-threading.
- Tighten the mounting bolts evenly using a 14mm socket.
- Finish tightening with a 3/8" torque wrench: Torque to OEM spec (pending your answers).
Step 7: Reconnect the wiring
- Install the main battery cable onto the starter stud and tighten with a 12mm socket, then finish with a 3/8" torque wrench: Torque to OEM spec (pending).
- Apply a small amount of dielectric grease to the small connector seal, then reconnect the signal connector until it clicks.
Step 8: Reinstall intake parts and splash shield
- Reinstall the splash shield using a trim clip removal tool (for clips) and 10mm socket (for bolts).
- Reinstall the intake tube/air box and tighten clamps using a flat-blade screwdriver.
Step 9: Reconnect the battery
- Reconnect the negative (-) terminal using a 10mm socket.
- Make sure the terminal is snug and doesn’t rotate by hand.
✅ After Repair
- Start the engine and confirm it cranks strongly and starts normally.
- Listen for grinding or a “starter staying engaged” sound—if you hear that, shut it off immediately.
- Check that the intake tube is fully seated and clamps are tight (a loose intake can cause a rough idle or check engine light).
- If the original symptom was a single click/no crank, also inspect/clean battery terminals and grounds—poor connections can imitate a bad starter.
💰 DIY vs Shop Cost
Shop Cost: $450-$900 (parts + labor)
DIY Cost: $150-$400 (parts only)
You Save: $300-$500 by doing it yourself!
Shop labor rates vary but typically run $100-$150/hour. This repair takes a shop approximately 1.5-3 hours.
🎯 Ready to get started?
HowToo makes it easy: same-day/2-day shipping on every part, plus all the tools and specialty tools you need! Check out the parts and tools sections below to add everything to your cart.