






How to Replace the Starter Motor on a 2004-2019 Toyota Highlander (Engine: Inline 4 2.7L)
Step-by-step DIY guide with required tools, parts, torque specs, and safety tips for 2004, 2005, 2006, 2007
How to Replace the Starter Motor on a 2004-2019 Toyota Highlander (Engine: Inline 4 2.7L)
Step-by-step DIY guide with required tools, parts, torque specs, and safety tips for 2004, 2005, 2006, 2007


🔧 Highlander - Starter Motor Replacement
Replacing the starter motor on your Highlander involves disconnecting the battery, removing the intake air ducting for access, disconnecting the starter wiring, and unbolting the starter from the transmission housing.
The starter is an electric motor that cranks the engine when you turn the key. If it clicks, grinds, or does nothing with a good battery, replacement may be needed.
Difficulty Level: Intermediate | Estimated Time: 1.5-2.5 hours
⚠️ Safety & Precautions
- ⚠️ Disconnect the negative battery cable before touching the starter wiring.
- ⚠️ The starter has a direct battery cable, so accidental contact can cause sparks or burns.
- ⚠️ Work only with the engine cool to avoid burns from nearby metal parts.
- ⚠️ Keep keys out of the ignition while working.
- ⚠️ If raising the front of the vehicle, support it with jack stands. Never rely on a jack alone.
🔧 Required Tools
You'll need the following tools for this repair:
- 10mm socket
- 12mm socket
- 14mm socket
- 3/8-inch drive ratchet
- 3/8-inch drive 6-inch extension
- 3/8-inch drive torque wrench
- Flat-blade screwdriver
- Needle-nose pliers
- Trim clip removal tool
- Floor jack rated 3-ton minimum
- Jack stands rated 3-ton minimum
- Wheel chocks
- Mechanic gloves
- Safety glasses
🔩 Required Parts
HowToo sells all the parts you need for this repair:
- Starter motor - Qty: 1
- Starter terminal nut - Qty: 1
- Battery terminal corrosion protectant - Qty: 1
📋 Before You Begin
- Park your Highlander on level ground and shift the transmission to Park.
- Set the parking brake firmly.
- Place wheel chocks behind the rear wheels to keep the vehicle from rolling.
- Let the engine cool completely before starting.
- Open the hood and make sure you have good lighting.
- Disconnecting the battery may reset radio presets and clock settings.
- A torque wrench is a tool that tightens bolts to an exact tightness so they are not too loose or too tight.
🔨 Step-by-Step Instructions
Follow these steps in order:
Step 1: Disconnect the Battery
- Use a 10mm socket and 3/8-inch drive ratchet to loosen the negative battery terminal clamp.
- Remove the negative cable from the battery post and move it aside where it cannot spring back.
- Use the 10mm socket to loosen and remove the positive battery terminal if more working room is needed.
- Negative cable comes off first.
Step 2: Remove the Engine Cover and Air Intake Duct
- Lift the plastic engine cover upward by hand if equipped.
- Use a 10mm socket or flat-blade screwdriver to loosen the air intake hose clamp at the throttle body.
- Use a 10mm socket or flat-blade screwdriver to loosen the air intake hose clamp at the air cleaner box.
- Use needle-nose pliers to release any small hose clamps attached to the intake duct.
- Remove the intake duct and set it aside.
- Take a phone photo before removal.
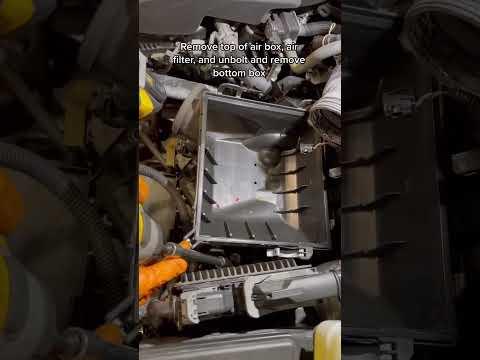
Step 3: Remove the Air Cleaner Assembly if Needed
- Use a 10mm socket and 3/8-inch drive ratchet to remove the air cleaner box mounting bolts.
- Use a trim clip removal tool to remove any plastic clips holding nearby wiring or ducting.
- Lift the air cleaner assembly out of the way to expose the starter area.
- The starter is mounted low on the engine side of the transmission housing.
Step 4: Locate the Starter Motor
- Look below the intake area toward the transmission bellhousing.
- The starter is a short cylindrical motor with one large battery cable and one small electrical connector.
- If access is tight from above, use a floor jack rated 3-ton minimum to raise the front of your Highlander at the front center jack point.
- Place jack stands rated 3-ton minimum under the front support points before going underneath.
- Never work under a jack alone.
Step 5: Disconnect the Starter Electrical Connectors
- Put on safety glasses and mechanic gloves.
- Press the tab on the small starter solenoid connector and unplug it by hand.
- The solenoid is the small switch attached to the starter that sends power to crank the engine.
- Use a 12mm socket and 3/8-inch drive ratchet to remove the nut holding the large battery cable to the starter terminal.
- Move the battery cable aside so it cannot touch metal.
Step 6: Remove the Starter Mounting Bolts
- Support the starter with one hand before removing the final bolt.
- Use a 14mm socket, 3/8-inch drive 6-inch extension, and 3/8-inch drive ratchet to remove the starter mounting bolts.
- There are typically two main starter mounting bolts on the bellhousing.
- Carefully pull the starter away from the transmission housing.
- It is heavier than it looks.
Step 7: Compare the Old and New Starter
- Place the old and new starter motor side by side on a clean surface.
- Check that the mounting holes, electrical terminals, and gear position match.
- Do not install the new starter if the gear, connector, or mounting ears are different.
Step 8: Install the New Starter Motor
- Position the new starter motor into the transmission housing by hand.
- Start both mounting bolts by hand first to avoid cross-threading.
- Use a 14mm socket, 3/8-inch drive 6-inch extension, and 3/8-inch drive ratchet to snug the bolts evenly.
- Use a 3/8-inch drive torque wrench with the 14mm socket to tighten the starter mounting bolts to Torque to 37 Nm (27 ft-lbs).
Step 9: Reconnect Starter Wiring
- Push the small solenoid connector onto the starter until it clicks.
- Install the large battery cable onto the starter terminal.
- Use a 12mm socket and 3/8-inch drive torque wrench to tighten the starter terminal nut to Torque to 9.8 Nm (87 in-lbs).
- Apply a light coat of battery terminal corrosion protectant to the exposed terminal area.
- Make sure the rubber protective boot covers the large terminal fully.
Step 10: Reinstall the Air Cleaner Assembly
- Set the air cleaner assembly back into place.
- Use a 10mm socket and 3/8-inch drive ratchet to install the air cleaner box bolts.
- Tighten the air cleaner box bolts snugly by hand tool only.
- Reinstall any plastic clips using the trim clip removal tool by gently pushing them back into place.
Step 11: Reinstall the Air Intake Duct
- Slide the intake duct back onto the throttle body and air cleaner box.
- Use a 10mm socket or flat-blade screwdriver to tighten both hose clamps securely.
- Use needle-nose pliers to reconnect any small hose clamps removed earlier.
- Reinstall the engine cover by pressing it down by hand until seated.
Step 12: Reconnect the Battery
- Reconnect the positive battery terminal first if it was removed.
- Use a 10mm socket and 3/8-inch drive ratchet to snug the positive terminal clamp.
- Reconnect the negative battery terminal last.
- Use a 10mm socket and 3/8-inch drive ratchet to snug the negative terminal clamp.
- Apply battery terminal corrosion protectant to the battery terminals.
- Positive on first, negative on last.
✅ After Repair
- Start your Highlander and listen for a clean, normal crank sound.
- If you hear grinding, stop immediately and recheck starter fitment and mounting.
- If it only clicks, recheck the battery terminals and starter cable connection.
- Let the engine idle for a minute and make sure no warning lights stay on.
- Reset the clock and radio presets if needed.
- Take a short test drive and restart the engine once more after parking.
💰 DIY vs Shop Cost
Shop Cost: $450-$750 (parts + labor)
DIY Cost: $180-$380 (parts only)
You Save: $270-$370 by doing it yourself!
Shop labor rates vary but typically run $100-$150/hour. This repair takes a shop approximately 1.5-2.0 hours.
🎯 Ready to get started?
HowToo makes it easy: same-day/2-day shipping on every part, plus all the tools and specialty tools you need! Check out the parts and tools sections below to add everything to your cart.