


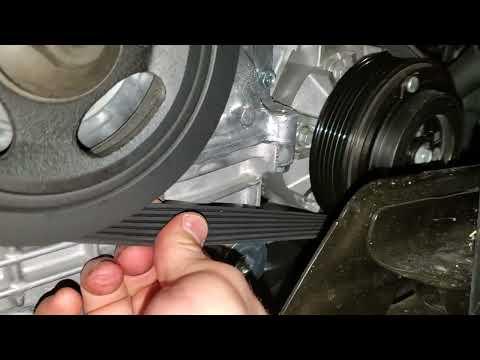







How to Replace the Serpentine Belt on a 2019-2024 Nissan Altima (Engine: Inline 4 2.0L)
Step-by-step instructions covering tools, parts, belt routing, and essential safety tips for 2019, 2020, 2021, 2022, 2023, 2024
How to Replace the Serpentine Belt on a 2019-2024 Nissan Altima (Engine: Inline 4 2.0L)
Step-by-step instructions covering tools, parts, belt routing, and essential safety tips for 2019, 2020, 2021, 2022, 2023, 2024


🔧 Altima - Serpentine Belt Replacement
This is an intermediate job, mainly because access is tight. The belt is released with the automatic tensioner, then removed through the lower passenger-side area. Nissan identifies the drive-belt location on the passenger side of the KR20DDET engine. nissanusa.com
Difficulty Level: Intermediate | Estimated Time: 1-2 hours
Assumption: These steps cover belt replacement only, with the original tensioner and pulleys remaining installed.
⚠️ Safety & Precautions
- ⚠️ Work only with the engine completely cold.
- ⚠️ Keep your fingers out of the belt path while moving the spring-loaded tensioner.
- ⚠️ Never allow the tensioner to snap back. Release it slowly.
- ⚠️ Support the Altima with jack stands. Never work beneath a vehicle supported only by a jack.
- ⚠️ Disconnect the negative battery terminal so the engine cannot be started accidentally.
- ⚠️ Do not put belt dressing, oil, grease, or coolant on the new belt.
🔧 Required Tools
You'll need the following tools for this repair:
- 10mm socket
- 3/8-inch drive ratchet
- 3/8-inch drive serpentine belt tool (specialty)
- Plastic trim-clip removal tool
- Low-profile floor jack rated 2 tons minimum
- Jack stands rated 2 tons minimum
- Wheel chocks
- LED work light
- Mechanic gloves
- Safety glasses
🔩 Required Parts
HowToo sells all the parts you need for this repair:
- Six-rib serpentine belt - Qty: 1
- Lower splash-shield clips - Qty: As needed
The matching belt aisle is open beside this guide. Two compatible belt choices are currently listed from approximately $17-$26.
📋 Before You Begin
- Park on firm, level ground and select Park.
- Apply the parking brake and place wheel chocks behind both rear tires.
- Open the hood and let the engine cool fully.
- Take a clear picture of the existing belt routing before touching the tensioner.
- Compare the new belt with the old one. The rib count and overall length should match closely.
- No infotainment service mode or scan tool is required for this repair.
🔨 Step-by-Step Instructions
Follow these steps in order:
Step 1: Disconnect the battery
- Use the 10mm socket and 3/8-inch drive ratchet to loosen the negative battery-terminal nut.
- Lift the negative terminal from the battery and position it where it cannot spring back onto the post.
Step 2: Raise and support the passenger side
- Use the low-profile floor jack at the approved front lifting point.
- Place a jack stand beneath the reinforced support point and lower the vehicle onto it.
- Give the vehicle a gentle push before getting underneath. It must remain completely stable.
Step 3: Remove the lower splash shield
- Use the 10mm socket and 3/8-inch drive ratchet to remove the shield bolts.
- Use the plastic trim-clip removal tool to lift the center pins, then remove the plastic clips.
- Lower the shield carefully and organize the fasteners by location.
- Plastic clips prefer patience over horsepower.
Step 4: Record the belt routing
- Use the LED work light to identify every pulley and the automatic tensioner.
- Confirm your routing picture clearly shows which pulleys use the ribbed side and which use the smooth back of the belt.
- If the old belt has already broken, follow the routing diagram provided with the matched belt listing rather than guessing.
Step 5: Release the automatic tensioner
- Fit the 3/8-inch drive serpentine belt tool securely into the tensioner drive point.
- Rotate the tool slowly against spring pressure until the belt becomes loose.
- Keep the tool square to the tensioner. Stop if it slips or begins rounding the engagement point.
Step 6: Remove the old belt
- While holding the tensioner released with the serpentine belt tool, slide the belt from the easiest accessible smooth pulley.
- Slowly return the tensioner to its resting position.
- Remove the belt from the remaining pulleys and guide it out through the lower opening.
Step 7: Inspect the tensioner and pulleys
- Use your gloved hand to rotate each accessible idler pulley.
- Replace any pulley that feels rough, binds, wobbles, or makes a dry grinding noise.
- Inspect the tensioner for leakage, looseness, or sideways pulley movement.
- Check for oil or coolant contamination. Repair the leak before installing the new belt.
Step 8: Route the new belt
- Route the new belt around every pulley except the easiest accessible smooth pulley.
- Keep the ribbed side seated in the grooves of each grooved pulley.
- Keep the smooth back of the belt against smooth pulleys.
- Leave a little slack near the final pulley, but do not twist the belt.
Step 9: Install the belt over the final pulley
- Use the 3/8-inch drive serpentine belt tool to rotate the tensioner fully.
- Slide the belt over the final smooth pulley.
- Slowly release the tensioner until it loads the belt.
- Remove the tool only after the tensioner has stopped moving.
Step 10: Verify every pulley
- Use the LED work light to inspect the entire visible belt path.
- Confirm every rib is inside its matching pulley groove.
- Make sure the belt is centered on every smooth pulley and is not riding over an edge.
- Correct any misalignment before starting the engine. One rib hanging off is enough to shred the belt.
Step 11: Reinstall the splash shield
- Position the shield and install its clips using your hands.
- Install the bolts with the 10mm socket and 3/8-inch drive ratchet.
- Tighten the small shield bolts until snug. Do not crush the plastic or strip the retainers.
Step 12: Lower the vehicle and reconnect the battery
- Use the floor jack to raise the vehicle slightly and remove the jack stand.
- Lower the Altima completely and remove the wheel chocks.
- Reconnect the negative battery terminal using the 10mm socket and 3/8-inch drive ratchet.
- Tighten the terminal until it cannot rotate by hand. Do not overtighten it.
✅ After Repair
- Check that all tools are clear of the engine compartment.
- Start the engine and watch the belt from a safe distance for approximately 30 seconds.
- Turn the air conditioning on and listen for chirping, slapping, or squealing.
- Shut the engine off immediately if the belt walks sideways or rides over a pulley edge.
- After the engine stops, perform one final visual check of every accessible pulley.
- If the battery disconnect resets automatic window operation, fully lower and then fully raise each affected window while holding its switch.
💰 DIY vs Shop Cost
Shop Cost: $140-$260 (parts + labor)
DIY Cost: $17-$26 for the belt, or approximately $25-$90 if you also need a belt tool
You Save: Approximately $100-$200 by doing it yourself!
Local labor pricing varies. This repair typically takes a shop approximately 0.7-1.2 hours.
🎯 Ready to get started?
HowToo makes it easy: same-day/2-day shipping on every part, plus all the tools and specialty tools you need! Check out the parts and tools sections below to add everything to your cart.
