

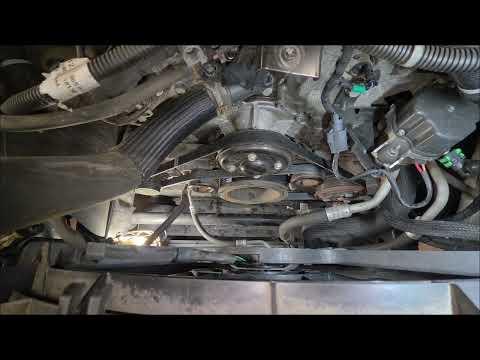





How to Replace the Serpentine Belt on a 2016-2022 GMC Canyon 2.8L Diesel (Trim: Denali | Engine: Inline 4 2.8L)
Step-by-step DIY instructions with belt routing, required tools, parts, and safety tips for 2016, 2017, 2018, 2019, 2020
How to Replace the Serpentine Belt on a 2016-2022 GMC Canyon 2.8L Diesel (Trim: Denali | Engine: Inline 4 2.8L)
Step-by-step DIY instructions with belt routing, required tools, parts, and safety tips for 2016, 2017, 2018, 2019, 2020


🔧 Canyon - Serpentine Belt Replacement
This is a manageable first repair. You’ll release the automatic tensioner, remove the old accessory belt, route the new belt, and slowly restore tension.
I’d use the Gates K060854A serpentine belt because its catalog application specifically covers the 2.8L diesel. Don’t confuse this external belt with the engine’s internal timing belt. That’s a completely different job.
Difficulty Level: Beginner | Estimated Time: 30-60 minutes
Assumption: The original accessory drive, tensioner, pulleys, and fan arrangement remain installed.
⚠️ Safety & Precautions
- ⚠️ Work only with the engine completely cool. The cooling fan and nearby components can cause serious injury.
- ⚠️ Remove the ignition key and keep it away from the truck while your hands are near the belt.
- ⚠️ Never place your fingers between the belt and a pulley.
- ⚠️ The tensioner is spring-loaded. Keep firm control of the tool and release it slowly.
- ⚠️ Battery disconnection normally isn’t required because no electrical connectors or starter wiring are disturbed.
🔧 Required Tools
You’ll need the following tools for this repair:
- Serpentine belt tool with 3/8-inch and 1/2-inch drives (specialty)
- 15mm serpentine belt tool adapter
- 16mm serpentine belt tool adapter
- 18mm serpentine belt tool adapter
- LED work light
- Mechanic’s inspection mirror
- Flat-blade trim tool
- Safety glasses
- Mechanic’s gloves
The Wilmar W84010 serpentine belt tool kit is a long, thin wrench system made specifically for reaching and moving spring-loaded belt tensioners.
🔩 Required Parts
HowToo sells all the parts you need for this repair:
- Gates K060854A serpentine belt - Qty: 1
Replace the tensioner or an idler pulley only if inspection reveals looseness, roughness, noise, or misalignment.
📋 Before You Begin
- 🅿️ Park your Canyon on level ground, select Park, apply the parking brake, and shut off the engine.
- 🌡️ Let the engine cool completely before reaching into the accessory-drive area.
- 📷 Photograph the existing belt routing from several angles.
- 🗺️ Locate the factory belt-routing diagram under the hood. If it’s missing, draw the routing before removing the old belt.
- 🔍 Identify smooth and grooved pulleys. The belt’s ribbed side runs against grooved pulleys, while its smooth back runs against smooth pulleys.
- 🧭 Note whether an intake duct or upper plastic cover blocks access. Remove only the non-structural cover or duct necessary to reach the tensioner.
🔨 Step-by-Step Instructions
Follow these steps in order:
Step 1: Inspect the Existing Belt Routing
- Use the LED work light and mechanic’s inspection mirror to trace the entire belt path.
- Compare what you see with the underhood routing diagram.
- Take a clear photograph showing the belt around every pulley.
- A routing photo is cheap insurance.
Step 2: Clear the Working Area
- Use the flat-blade trim tool to release plastic retainers only if a removable upper cover blocks access.
- If an intake duct must move, release its original clamps with the correctly fitting hand tool before lifting it aside.
- Do not disconnect coolant, refrigerant, fuel, or electrical lines for this repair.
Step 3: Engage the Automatic Tensioner
- Use the serpentine belt tool with whichever supplied drive or metric adapter fully seats on the tensioner’s tool point.
- The tensioner is the spring-loaded arm that keeps the belt tight automatically.
- Keep the tool straight and verify it cannot slip before applying force.
- Do not loosen the center bolt holding the tensioner pulley. You’re rotating the tensioner arm, not removing it.
Step 4: Release Belt Tension
- Use the serpentine belt tool to rotate the tensioner slowly in the direction that loosens the belt.
- Hold the tool firmly once the belt becomes slack.
- Slip the belt off one easy-to-reach smooth pulley with your free hand.
- Keep your fingers away from the gap between the belt and pulley.
Step 5: Remove the Old Belt
- Use the serpentine belt tool to return the tensioner slowly to its resting position.
- Remove the old belt from the remaining pulleys by hand.
- Use the LED work light to check whether the belt is glazed, cracked, frayed, oil-soaked, or missing ribs.
- If the belt is oily, repair the oil or coolant leak before installing the new one.
Step 6: Inspect the Tensioner and Pulleys
- Use your gloved hand to spin each accessible idler pulley and accessory pulley gently.
- Stop if a pulley feels gritty, binds, wobbles, or makes a dry bearing noise.
- Use the mechanic’s inspection mirror to inspect pulley grooves for packed rubber, rust, or damage.
- Check that the tensioner arm moves smoothly and doesn’t sit crooked.
- Sonīpat’s heat and dust can be rough on bearings, so don’t ignore a pulley that feels sandy.
Step 7: Route the New Belt
- Route the new belt by hand using your photograph and the factory diagram.
- Leave one easy-to-reach smooth pulley for last.
- Seat the belt’s ribs completely inside every grooved pulley.
- Make sure the belt’s smooth side contacts only smooth pulley surfaces.
- Use the LED work light and mechanic’s inspection mirror to inspect the lower pulleys.
Step 8: Install the Belt Over the Final Pulley
- Use the serpentine belt tool to rotate the tensioner and create slack.
- Slide the belt over the final smooth pulley by hand.
- Do not pry the belt into place with a screwdriver because that can cut its internal cords.
- Slowly release the tensioner until it applies full belt tension.
Step 9: Verify Alignment
- Use the LED work light to inspect every visible pulley.
- Use the mechanic’s inspection mirror to check the lower and rear pulley edges.
- Confirm every belt rib is seated in a matching groove and no belt edge hangs over a pulley.
- Reinstall any removed duct or plastic cover with the same tools used during removal.
✅ After Repair
- ✅ Remove every tool, rag, and loose item from the engine compartment.
- ✅ Start the engine while standing clear of the belt and fan.
- ✅ Watch the belt briefly. It should run centered without walking sideways, fluttering heavily, or squealing.
- ✅ Shut the engine off immediately if the belt rides off-center or the tensioner jumps excessively.
- ✅ After shutdown, wait for all movement to stop and recheck the belt’s seating with the LED work light.
- ✅ No belt-tension gauge or manual adjustment is required because the spring-loaded tensioner sets operating tension.
💰 DIY vs Shop Cost
Shop Cost: $140-$260 (parts + labor)
DIY Cost: $84-$147 (belt and optional specialty tool)
You Save: Approximately $55-$175 by doing it yourself!
Shop labor rates vary by location. This repair typically takes a shop approximately 0.5-1.0 hour.
🎯 Ready to get started?
HowToo makes it easy: same-day/2-day shipping on every part, plus all the tools and specialty tools you need! Check out the parts and tools sections below to add everything to your cart.