

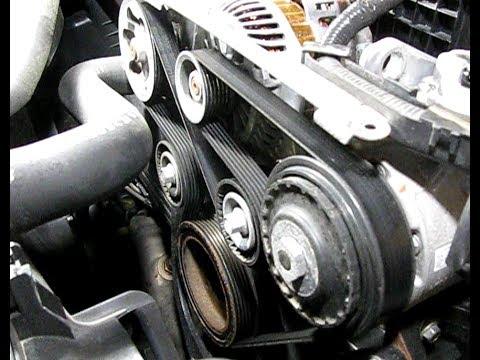





How to Replace the Serpentine Belt on a 2010-2014 Subaru Outback (Engine: Flat 4 2.5L)
Step-by-step DIY guide with belt routing, tension specs, tools, parts, and safety tips for 2010, 2011, 2012
How to Replace the Serpentine Belt on a 2010-2014 Subaru Outback (Engine: Flat 4 2.5L)
Step-by-step DIY guide with belt routing, tension specs, tools, parts, and safety tips for 2010, 2011, 2012


🔧 Serpentine Belt - Replacement
Your Outback uses one external drive belt to run front engine accessories. Replacing it means loosening the belt tension, removing the old belt, routing the new belt correctly, and setting the belt tension so it does not squeal or slip.
Difficulty Level: Beginner | Estimated Time: 30-60 minutes
⚠️ Safety & Precautions
- ⚠️ Work only with the engine completely off and cool.
- ⚠️ Keep hands, sleeves, hair, and tools away from the belt path.
- ⚠️ Do not start the engine while any tool is on the tensioner, idler, or alternator bracket.
- ⚠️ Disconnecting the battery is not normally required for this job, but remove the key from the ignition before working.
- ⚠️ If the old belt shredded, inspect around the crank pulley and accessory pulleys for wrapped belt pieces before starting the engine.
🔧 Required Tools
You'll need the following tools for this repair:
- 10mm socket
- 12mm socket
- 14mm socket
- 3/8-inch drive ratchet
- 3/8-inch drive 6-inch extension
- 12mm combination wrench
- 14mm combination wrench
- Flathead screwdriver
- Belt tension gauge (specialty)
- Flashlight
- Mechanic gloves
- Safety glasses
🔩 Required Parts
HowToo sells all the parts you need for this repair:
- Serpentine drive belt - Qty: 1
📋 Before You Begin
- 🅿️ Park your Outback on level ground and set the parking brake.
- ❄️ Let the engine cool fully so you do not burn your hands near the radiator, pulleys, or engine.
- 🔑 Remove the ignition key and keep it away from the vehicle.
- 📸 Take a photo of the belt routing before removal. Belt routing means the exact path the belt follows around each pulley.
- 🔍 Compare the new belt to the old belt before installation. The rib count and length should match.
🔨 Step-by-Step Instructions
Follow these steps in order:
Step 1: Open the Hood and Locate the Belt
- Use the hood prop rod to secure the hood.
- Use a flashlight to look at the front of the engine. The serpentine belt is the ribbed rubber belt running around the pulleys.
- Use your phone to take a clear photo of the belt routing before removing anything.
- Photo first, wrench second.
Step 2: Remove the Front Belt Cover if Equipped
- Use a 10mm socket and 3/8-inch drive ratchet to remove the small front belt cover fasteners if your Outback has the cover installed.
- Lift the cover out by hand and set it aside with its bolts.
- Use a flathead screwdriver only if a plastic clip needs gentle help releasing.
Step 3: Identify the Adjuster and Lock Bolts
- Your Outback uses a manual belt adjuster, not a spring-loaded automatic tensioner.
- The adjuster bolt is a long bolt used to move the accessory and change belt tightness.
- The lock bolt holds the accessory in place after tension is set.
- Use a flashlight to identify the alternator/power steering belt adjuster area before loosening anything.
Step 4: Loosen the Lock Bolt
- Use a 12mm socket with a 3/8-inch drive ratchet to loosen the lock bolt on the belt adjustment bracket.
- Use a 14mm socket or 14mm combination wrench to loosen the accessory pivot bolt if the accessory does not move freely.
- Do not remove the bolts. Just loosen them enough for the accessory to slide.
Step 5: Back Off the Belt Adjuster
- Use a 12mm socket or 12mm combination wrench to turn the long adjuster bolt counterclockwise.
- Keep turning until the belt becomes loose enough to slip off the pulley by hand.
- Do not pry hard on the belt with a screwdriver because pulley edges can be damaged.
Step 6: Remove the Old Belt
- Use your hands to slide the belt off the easiest upper pulley first.
- Remove the belt from the remaining pulleys and pull it out of the engine bay.
- Use a flashlight to check each pulley groove for rubber chunks, stones, or old belt debris.
Step 7: Inspect the Pulleys
- Use your hand to spin each smooth idler pulley. An idler pulley is a free-spinning pulley that guides the belt.
- Listen for grinding, squeaking, or roughness.
- Use a flashlight to check that the ribbed pulley grooves are clean and not damaged.
- If any pulley wobbles, grinds, or feels rough, replace that pulley before installing the new belt.
Step 8: Install the New Belt
- Use your belt-routing photo to route the new serpentine belt around the pulleys.
- Make sure the ribbed side of the belt sits inside ribbed pulleys.
- Make sure the smooth side of the belt touches smooth pulleys only.
- Use your fingers to press the belt into each pulley groove.
- Every rib must sit straight.
Step 9: Set Belt Tension
- Use a 12mm socket or 12mm combination wrench to turn the adjuster bolt clockwise and tighten the belt.
- Use a belt tension gauge to check belt tension at the longest straight belt span.
- For a new belt, set tension to approximately 130-150 lbf if using a belt tension gauge.
- If you do not have a gauge, press the longest straight belt span with your thumb. It should move about 1/4-3/8 inch with firm pressure.
- Do not overtighten the belt. Too much tension can damage accessory bearings.
Step 10: Tighten the Lock and Pivot Bolts
- Use a 12mm socket and 3/8-inch drive ratchet to tighten the adjuster lock bolt.
- Use a 14mm socket or 14mm combination wrench to tighten the pivot bolt if you loosened it.
- Torque the 12mm lock bolt to 18 Nm (13 ft-lbs).
- Torque the 14mm pivot bolt to 25 Nm (18 ft-lbs).
- Recheck belt tension after tightening because the belt can shift slightly.
Step 11: Reinstall the Belt Cover
- Place the belt cover back in position by hand if it was removed.
- Use a 10mm socket and 3/8-inch drive ratchet to reinstall the cover bolts.
- Torque the belt cover bolts snug only, about 5 Nm (44 in-lbs).
Step 12: Start and Check Operation
- Remove all tools from the engine bay.
- Start the engine and watch the belt from a safe distance.
- The belt should run straight with no wobble, squeal, or walking off a pulley.
- Turn the steering wheel gently left and right while parked and listen for belt squeal.
- If it squeals, shut the engine off and add a small amount of tension using the 12mm adjuster bolt.
✅ After Repair
- ✅ Let the engine idle for 2-3 minutes and confirm the belt tracks smoothly.
- ✅ Shut the engine off and recheck that the belt ribs are fully seated in every pulley.
- ✅ After one short drive, recheck belt tension once the engine cools.
- ✅ A new belt can stretch slightly during initial use, so a small retension may be needed.
- ✅ If squealing continues after proper tensioning, inspect the pulleys and accessory bearings.
💰 DIY vs Shop Cost
Shop Cost: $130-$250 (parts + labor)
DIY Cost: $25-$60 (parts only)
You Save: $105-$190 by doing it yourself!
Shop labor rates vary but typically run $100-$150/hour. This repair takes a shop approximately 0.5-1.0 hour.
🎯 Ready to get started?
HowToo makes it easy: same-day/2-day shipping on every part, plus all the tools and specialty tools you need! Check out the parts and tools sections below to add everything to your cart.