

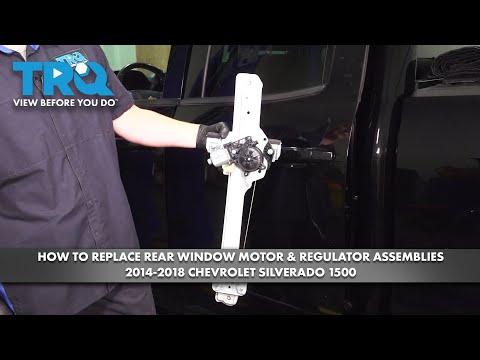






How to Replace the Rear Sliding Window Regulator on a 2014-2018 GMC Sierra 1500
Step-by-step guide with tools, parts, torque specs, safety tips, and testing for 2014, 2015, 2016, 2017, 2018
How to Replace the Rear Sliding Window Regulator on a 2014-2018 GMC Sierra 1500
Step-by-step guide with tools, parts, torque specs, safety tips, and testing for 2014, 2015, 2016, 2017, 2018


🔧 Sierra 1500 - Rear Window Regulator Replacement
Your Sierra 1500 is a standard cab pickup, so it does not have rear door window regulators like a double cab or crew cab. If you mean the rear sliding back-glass regulator/latch assembly, this repair involves removing interior trim around the rear window and replacing the slider regulator or latch hardware.
Assumption: This guide covers the rear sliding back window mechanism, not rear door windows.
Difficulty Level: Beginner to Intermediate | Estimated Time: 1-2 hours
⚠️ Safety & Precautions
- ⚠️ Wear safety glasses because glass edges and trim clips can break unexpectedly.
- ⚠️ Do not pry directly against the rear glass with metal tools; the tempered glass can shatter.
- ⚠️ Disconnect the negative battery cable if your rear slider is power-operated or has defroster wiring nearby.
- ⚠️ Be gentle with the rear trim panels; older plastic clips can crack easily.
- ⚠️ If the glass is loose or cracked, stop and have the glass stabilized before continuing.
🔧 Required Tools
You'll need the following tools for this repair:
- 10mm socket
- 7mm socket
- 1/4-inch drive ratchet
- 3-inch extension
- Plastic trim removal tool set
- Small flat-blade screwdriver
- Needle-nose pliers
- Torx T15 screwdriver
- Torx T20 screwdriver
- Painter’s tape
- Shop towels
- Safety glasses
- Mechanic gloves
🔩 Required Parts
HowToo sells all the parts you need for this repair:
- Rear sliding window regulator or latch assembly - Qty: 1
- Rear sliding window trim clips - Qty: As needed
- Rear sliding window weatherstrip seal - Qty: 1 if damaged
- Dielectric grease - Qty: 1 small tube if power slider equipped
📋 Before You Begin
- 🅿️ Park your Sierra on level ground and set the parking brake.
- 🔑 Turn the ignition off and remove the key.
- 🔋 If equipped with a power rear sliding window, use a 10mm socket to disconnect the negative battery cable.
- 🧰 A trim removal tool is a plastic pry tool that helps remove panels without scratching or cracking them.
- 🪟 Apply painter’s tape around nearby glass and painted trim to help prevent scratches.
🔨 Step-by-Step Instructions
Follow these steps in order:
Step 1: Protect the Rear Glass Area
- Use painter’s tape to cover the edges around the sliding rear window opening.
- Place shop towels on the rear seat area or floor to catch dropped screws and clips.
- Put on safety glasses and mechanic gloves.
- Work slowly around glass.
Step 2: Remove the Rear Interior Trim
- Use a plastic trim removal tool set to gently pry the rear window interior trim away from the cab panel.
- If small screw covers are present, use a small flat-blade screwdriver to lift the covers carefully.
- Use a 7mm socket and 1/4-inch drive ratchet to remove any visible trim screws.
- Pull the trim straight outward to release the clips. Do not twist the panel hard.
- Plastic clips release with steady pressure.
Step 3: Inspect the Slider Mechanism
- Use a flashlight if available to inspect the slider latch, cable, guide track, or regulator bracket.
- Move the sliding glass by hand gently and watch where the mechanism binds, pops loose, or fails to latch.
- If equipped with a power slider, locate the electrical connector and wiring near the regulator motor area.
- A regulator is the mechanism that moves or controls the window glass.
Step 4: Disconnect the Electrical Connector if Equipped
- If your Sierra has a power sliding rear window, confirm the battery negative cable is disconnected.
- Use your fingers or a small flat-blade screwdriver to gently release the connector lock tab.
- Pull the connector straight out. Do not pull on the wires.
- Apply a small amount of dielectric grease to the connector only during reassembly if the terminals are clean and dry.
Step 5: Remove the Old Regulator or Latch Assembly
- Use a Torx T15 screwdriver or Torx T20 screwdriver to remove the screws holding the latch or regulator assembly to the sliding glass frame.
- Use a 10mm socket, 3-inch extension, and 1/4-inch drive ratchet if the assembly uses small mounting bolts instead of Torx screws.
- Use needle-nose pliers to release any small cable end, spring clip, or retaining tab.
- Support the sliding glass with one hand while removing the final fastener.
- Remove the old regulator or latch assembly from the window track.
- Do not force stuck glass parts.
Step 6: Clean and Check the Window Track
- Use shop towels to wipe dirt from the window track and latch area.
- Use a plastic trim removal tool to remove loose debris from the track if needed.
- Inspect the rear sliding window weatherstrip seal for tears, bunching, or hard spots.
- Replace the rear sliding window weatherstrip seal if it is torn or causing the glass to bind.
Step 7: Install the New Regulator or Latch Assembly
- Position the new rear sliding window regulator or latch assembly into the same location as the old unit.
- Start all screws or bolts by hand first to avoid cross-threading.
- Use a Torx T15 screwdriver, Torx T20 screwdriver, or 10mm socket to snug the fasteners evenly.
- Torque small regulator or latch screws to 2-3 Nm (18-27 in-lbs) unless the replacement part instructions specify otherwise.
- Torque 10mm regulator mounting bolts to 8-10 Nm (71-89 in-lbs) if bolt-mounted.
- Reconnect any cable end or spring clip using needle-nose pliers.
Step 8: Reconnect Wiring if Equipped
- Push the electrical connector into the regulator motor or switch connector until it clicks.
- Use your fingers to tug lightly on the connector body to confirm it is locked.
- Use a 10mm socket to reconnect the negative battery cable.
- Torque the battery terminal nut to 5 Nm (44 in-lbs).
Step 9: Test the Rear Slider Before Installing Trim
- Move the sliding rear glass by hand or use the power switch if equipped.
- Confirm the glass opens, closes, and latches fully.
- If it binds, loosen the mounting screws slightly with the correct Torx screwdriver or 10mm socket, adjust the assembly, and retighten.
- Check that the seal sits flat and is not folded into the track.
Step 10: Reinstall the Rear Interior Trim
- Line up the trim clips with their holes in the cab panel.
- Press the trim firmly by hand until the clips snap into place.
- Use a 7mm socket and 1/4-inch drive ratchet to reinstall any trim screws.
- Torque interior trim screws to 2 Nm (18 in-lbs).
- Reinstall screw covers by pressing them in by hand.
✅ After Repair
- ✅ Open and close the rear sliding window at least 5 times.
- ✅ Make sure the latch fully locks when closed.
- ✅ Spray a light amount of water around the rear window and check inside for leaks.
- ✅ If power-equipped, confirm the switch works smoothly and the glass does not stop halfway.
- ✅ Listen for rattles while driving; loose trim clips can buzz over bumps.
💰 DIY vs Shop Cost
Shop Cost: $250-$650 (parts + labor)
DIY Cost: $60-$300 (parts only)
You Save: $190-$350 by doing it yourself!
Shop labor rates vary but typically run $100-$150/hour. This repair takes a shop approximately 1-2 hours.
🎯 Ready to get started?
HowToo makes it easy: same-day/2-day shipping on every part, plus all the tools and specialty tools you need! Check out the parts and tools sections below to add everything to your cart.