

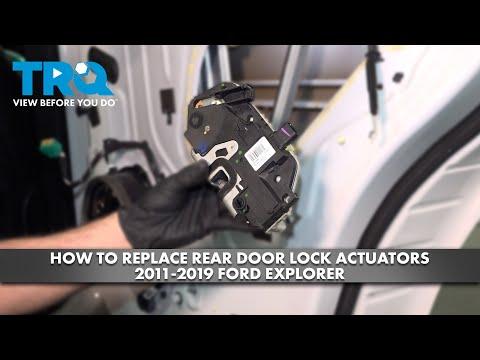






How to Replace the Rear Door Lock Actuator on a 2018 Ford Explorer
Step-by-step instructions with tools, parts, safety tips, and factory torque specs for 2011, 2012, 2013, 2014, 2015, 2016, 2017, 2018, 2019
How to Replace the Rear Door Lock Actuator on a 2018 Ford Explorer
Step-by-step instructions with tools, parts, safety tips, and factory torque specs for 2011, 2012, 2013, 2014, 2015, 2016, 2017, 2018, 2019


🔧 Rear Door Lock Actuator - Replacement
The rear door lock actuator is built into the latch assembly on your Explorer, so the repair usually means removing the inner door trim, unplugging the electrical connector, and swapping the latch/actuator unit. This fixes issues like a door that will not lock, unlock, or respond to the key fob or inside switch.
Difficulty Level: Intermediate | Estimated Time: 1.5-3 hours
⚠️ Safety & Precautions
- Disconnect the negative battery cable before starting. This helps prevent accidental short circuits and avoids setting airbag or module faults while the door panel is off.
- Be careful around the side impact airbag area in the door. Do not probe yellow connectors or wiring.
- Use a trim tool, not a metal screwdriver, to avoid cracking the door panel.
- Support the door panel as you remove the last fasteners so it does not fall and damage clips or wiring.
🔧 Required Tools
You'll need the following tools for this repair:
- 8mm socket
- 10mm socket
- Ratchet
- Extension bar
- Torx T20 screwdriver
- Trim panel removal tool
- Small flat trim tool
- Needle-nose pliers
- Torque wrench
- Safety glasses
- Gloves
🔩 Required Parts
HowToo sells all the parts you need for this repair:
- Rear door lock actuator / latch assembly - Qty: 1
- Door panel clip set - Qty: 1
- Butyl door vapor barrier sealant - Qty: 1
📋 Before You Begin
- Park on level ground and set the parking brake.
- Lower the window glass all the way down if the switch still works. This gives more room to lift the panel off later.
- Turn the ignition off and disconnect the negative battery cable. Wait at least 5 minutes before unplugging door wiring.
- Keep all clips organized.
🔨 Step-by-Step Instructions
Follow these steps in order:
Step 1: Remove the inner door trim panel
- Use a trim panel removal tool to pop off the trim caps in the pull handle and around the edges of the rear door panel.
- Use a Torx T20 screwdriver or 8mm socket to remove the visible screws, if equipped.
- Use the trim panel removal tool to release the retaining clips around the perimeter.
- Lift the door panel straight up to unhook it from the top ledge.
- Disconnect the electrical connectors for the window switch and any courtesy light.
- Pull straight on clips, not at an angle.
Step 2: Remove the moisture barrier
- Carefully peel back the vapor barrier by hand or with a small flat trim tool.
- Keep the butyl seal clean so you can reseal it later.
- If the seal tears, replace it with new butyl sealant.
Step 3: Disconnect the latch and actuator hardware
- Use a flashlight to locate the latch/actuator assembly at the rear edge of the door.
- Disconnect the electrical connector from the actuator.
- Use needle-nose pliers to release any rod retainers or locking clips, if your door has linkage rods.
- Note the position of each rod before removal.
- Take a quick photo before disconnecting rods.
Step 4: Remove the latch/actuator assembly
- Use a 10mm socket with an extension bar to remove the latch mounting bolts from the door edge.
- Support the assembly with one hand while removing the last bolt.
- Work the assembly out through the access opening in the door shell.
- If needed, rotate it slightly to clear the window track.
Step 5: Install the new actuator/latch assembly
- Compare the new part to the old one to make sure the connectors and rod points match.
- Feed the new assembly into the door opening in the same orientation as the old one.
- Install the mounting bolts by hand first.
- Tighten the bolts with a 10mm socket and torque wrench to factory specification.
- Reconnect the electrical connector and any linkage rods.
- Make sure every clip locks fully.
Step 6: Test the latch before reassembly
- Reconnect the negative battery cable temporarily.
- Use the key fob and inside lock switch to test lock and unlock operation.
- Open and close the door several times to confirm the latch works smoothly.
- If the lock does not work, recheck the connector, rod positions, and mounting alignment.
- Disconnect the battery again before final reassembly.
Step 7: Reinstall the vapor barrier and door panel
- Press the vapor barrier back into place and reseal any loose edges with butyl sealant.
- Reconnect the door panel electrical connectors.
- Hook the top of the panel onto the door frame first.
- Press around the edges to engage the clips.
- Reinstall the screws and trim caps.
- Tighten screws to factory specification.
Step 8: Final function check
- Reconnect the battery if it is still disconnected.
- Test the door lock switch, key fob, and door handle operation.
- Check that the window switch, speaker, and courtesy light still work.
- Make sure the door opens from both inside and outside.
✅ After Repair
- Cycle the lock and unlock function at least 10 times to verify consistent operation.
- Listen for unusual clicking or binding from the latch.
- Confirm the door panel sits flush and all clips are seated.
- If a warning light appears, scan for body control module codes and clear them after the repair is confirmed.
💰 DIY vs Shop Cost
Shop Cost: $350-$650 (parts + labor)
DIY Cost: $80-$220 (parts only)
You Save: $170-$430 by doing it yourself!
Shop labor rates vary but typically run $100-$150/hour. This repair takes a shop approximately 1.5-3 hours.
🎯 Ready to get started?
HowToo makes it easy: same-day/2-day shipping on every part, plus all the tools and specialty tools you need! Check out the parts and tools sections below to add everything to your cart.