

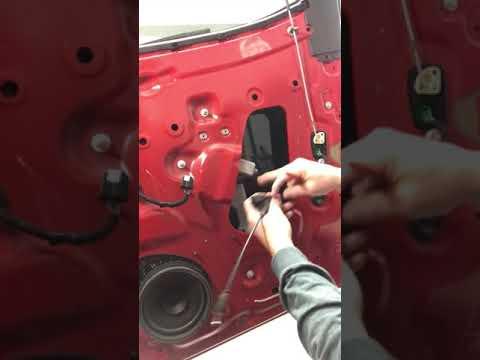






How to Replace the Rear Door Lock Actuator on a 2016-2019 Chevrolet Colorado
Step-by-step rear access door latch repair with tools, parts, torque specs, and safety tips for 2016, 2017, 2018, 2019
How to Replace the Rear Door Lock Actuator on a 2016-2019 Chevrolet Colorado
Step-by-step rear access door latch repair with tools, parts, torque specs, and safety tips for 2016, 2017, 2018, 2019


🔧 Colorado - Rear Door Lock Actuator Replacement
On your Colorado Extended Cab, the rear door lock actuator is part of the rear access door latch/lock mechanism inside the rear door. Replacing it requires removing the interior door trim, disconnecting the latch rods/cables and electrical connector, then swapping the actuator/latch assembly.
Difficulty Level: Intermediate | Estimated Time: 1.5-2.5 hours
⚠️ Safety & Precautions
- ⚠️ Work with the ignition OFF and the key removed so the power locks do not move while your hands are inside the door.
- ⚠️ Disconnect the negative battery cable before unplugging door electrical connectors. This helps prevent accidental short circuits.
- ⚠️ Door sheet metal edges can be sharp. Wear gloves and move slowly inside the door cavity.
- ⚠️ Do not slam the door until the latch operation is tested. A misconnected rod or cable can make the door hard to open again.
- ⚠️ Support trim panels by hand when removing them so clips do not snap or fly off.
🔧 Required Tools
You'll need the following tools for this repair:
- 10mm socket
- Ratchet handle
- 7mm socket
- Torx T30 socket
- Trim removal tool set
- Small flathead screwdriver
- Needle-nose pliers
- Pick tool set
- Torque wrench inch-pound range
- Painter’s tape
- Work light
- Mechanic gloves
- Safety glasses
🔩 Required Parts
HowToo sells all the parts you need for this repair:
- Rear door lock actuator/latch assembly - Qty: 1
- Rear door trim panel clips - Qty: As needed
- Butyl sealing tape - Qty: 1 roll
📋 Before You Begin
- 🅿️ Park your Colorado on level ground, shift to Park, and set the parking brake.
- 🔋 Open the hood and use a 10mm socket to disconnect the negative battery cable. Set it aside where it cannot spring back onto the battery post.
- 🚪 Open the front door first, then open the rear access door fully for working room.
- 🧠 Take photos before removing latch rods or cables. This makes reassembly much easier.
- 🧰 A trim removal tool is a plastic pry tool used to pop panels loose without scratching them.
🔨 Step-by-Step Instructions
Follow these steps in order:
Step 1: Protect the Door Trim
- Use painter’s tape around the trim edges and handle area to help prevent scratches.
- Put on mechanic gloves and safety glasses.
- Use a work light so you can see the screws and clips clearly.
Step 2: Remove Visible Door Trim Screws
- Use a small flathead screwdriver or pick tool to gently lift any small screw covers in the rear door trim panel.
- Use a 7mm socket with a ratchet handle to remove the interior trim screws.
- Place the screws in a cup or small tray so they do not get lost.
- Take photos as you go.
Step 3: Release the Rear Door Trim Panel
- Slide a trim removal tool between the door trim panel and the metal door shell.
- Gently pry outward near each clip until it pops free.
- Work around the panel slowly. Do not yank the panel because wiring or cables may still be attached.
- Lift the panel upward once all clips are loose, then support it by hand.
Step 4: Disconnect Electrical Connectors and Handle Cable
- Use your fingers or a small flathead screwdriver to press the locking tab on any electrical connector, then unplug it.
- If the inside handle cable is attached to the trim panel, use needle-nose pliers to rotate the cable end out of the handle lever.
- A cable is a flexible pull wire that moves the latch when you pull the handle.
- Set the trim panel somewhere safe with the finished side facing up.
Step 5: Peel Back the Water Shield
- Use a small flathead screwdriver or your fingers to gently peel the plastic water shield away from the door.
- Do not tear the shield. It keeps rainwater away from the trim panel and wiring.
- If the seal stretches or loses stickiness, use butyl sealing tape during reassembly.
Step 6: Locate the Rear Door Lock Actuator/Latch Assembly
- Use a work light to look inside the rear edge of the door.
- The actuator/latch assembly is mounted where the door latches to the body striker.
- Find the electrical connector going to the latch and the rods or cables attached to the lock and handle levers.
Step 7: Disconnect the Lock Rods or Cables
- Use needle-nose pliers or a pick tool to open the plastic retaining clips on the rods.
- Rotate each plastic clip away from the rod, then lift the rod out of the latch lever.
- If your latch uses cables, use needle-nose pliers to unhook the cable end from the latch lever.
- Label each rod or cable position with painter’s tape if needed.
- Do not bend the rods.
Step 8: Unplug the Actuator Connector
- Press the connector lock tab with your finger or a small flathead screwdriver.
- Pull the connector straight off the actuator/latch assembly.
- Inspect the connector for corrosion, loose pins, or broken locking tabs.
Step 9: Remove the Actuator/Latch Mounting Bolts
- At the rear edge of the door, use a Torx T30 socket with a ratchet handle to remove the latch mounting bolts.
- Hold the latch with your free hand while removing the final bolt so it does not drop inside the door.
- Carefully guide the actuator/latch assembly out through the access opening in the door.
Step 10: Compare the New and Old Parts
- Place the old and new rear door lock actuator/latch assembly side by side.
- Make sure the electrical connector, latch shape, rod/cable levers, and mounting holes match.
- Transfer any rubber isolators, clips, or brackets from the old assembly if the new part does not include them.
Step 11: Install the New Actuator/Latch Assembly
- Guide the new assembly into the rear door using your hand and work light.
- Start all mounting bolts by hand first to avoid cross-threading.
- Use a Torx T30 socket and torque wrench inch-pound range to tighten the latch bolts.
- Torque to 10 Nm (89 in-lbs).
Step 12: Reconnect the Rods, Cables, and Electrical Connector
- Use needle-nose pliers to place each rod or cable back into its original lever.
- Snap each plastic retaining clip fully closed by hand.
- Plug the electrical connector into the actuator until the lock tab clicks.
- Use a work light to verify nothing is rubbing or twisted.
Step 13: Test Before Reinstalling the Trim Panel
- Use a 10mm socket to temporarily reconnect the negative battery cable.
- Operate the power lock switch and key fob to confirm the rear door locks and unlocks.
- Pull the inside and outside handles to verify the latch releases correctly.
- Close the latch manually with a screwdriver handle only if needed, then release it with the handle.
- If anything binds, disconnect the battery again with a 10mm socket and recheck the rod or cable routing.
- Test before closing the door.
Step 14: Reinstall the Water Shield
- Use your hands to press the plastic water shield back into place.
- Use butyl sealing tape anywhere the original seal no longer sticks.
- Make sure the shield seals around the lower edge so water cannot reach the trim panel.
Step 15: Reinstall the Door Trim Panel
- Reconnect any trim panel electrical connectors by hand until they click.
- Reconnect the inside handle cable using needle-nose pliers if it was removed.
- Line up the trim panel clips with the holes in the door.
- Press around the panel by hand until each clip snaps in.
- Use a 7mm socket with a ratchet handle to reinstall the trim screws.
- Torque to 2 Nm (18 in-lbs).
Step 16: Final Battery Connection
- Use a 10mm socket to tighten the negative battery cable.
- Torque to 5 Nm (44 in-lbs).
- Remove the painter’s tape from the trim and handle area.
✅ After Repair
- ✅ Lock and unlock your Colorado several times using the door switch and key fob.
- ✅ Open and close the rear access door several times to confirm smooth latch operation.
- ✅ Check that the door ajar warning turns off when the door is fully closed.
- ✅ Listen for rattles inside the door. A rattle usually means a rod clip or trim clip is not fully seated.
- ✅ If the battery was disconnected, reset the clock and any saved radio settings if needed.
💰 DIY vs Shop Cost
Shop Cost: $350-$650 (parts + labor)
DIY Cost: $90-$250 (parts only)
You Save: $260-$400 by doing it yourself!
Shop labor rates vary but typically run $100-$150/hour. This repair takes a shop approximately 1.0-2.0 hours.
🎯 Ready to get started?
HowToo makes it easy: same-day/2-day shipping on every part, plus all the tools and specialty tools you need! Check out the parts and tools sections below to add everything to your cart.