


How to Replace the Radiator Hose on a 2018 Ford Mustang
Step-by-step coolant hose repair guide with tools, parts, safety tips, and leak checks
How to Replace the Radiator Hose on a 2018 Ford Mustang
Step-by-step coolant hose repair guide with tools, parts, safety tips, and leak checks
🔧 Mustang - Radiator Hose Replacement
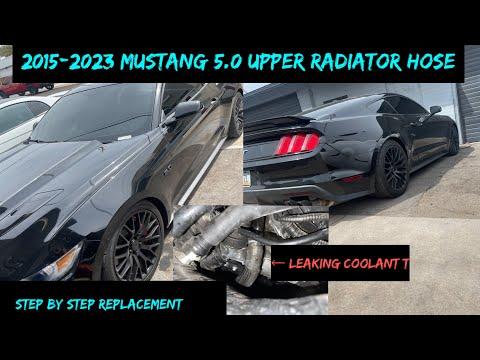
This repair replaces a leaking, swollen, cracked, or soft radiator hose on your Mustang. The upper and lower radiator hoses carry hot coolant between the engine and radiator, so the system must be cool before you open it.
Difficulty Level: Beginner | Estimated Time: 1-2 hours
⚠️ Safety & Precautions
- ⚠️ Never open the coolant reservoir cap when the engine is hot. Hot coolant can spray out and cause severe burns.
- 🧤 Wear safety glasses and gloves. Coolant is slippery and toxic.
- 🐾 Keep drained coolant away from children and animals. It has a sweet smell but is poisonous.
- 🔋 Battery disconnect is not normally required for radiator hose replacement on your Mustang.
- 🌡️ Let the engine cool completely before starting, ideally 2-3 hours after driving.
🔧 Required Tools
You'll need the following tools for this repair:
- Safety glasses
- Nitrile gloves
- Drain pan 2-gallon minimum
- Flat-blade screwdriver 6-inch
- Hose clamp pliers (specialty)
- Slip-joint pliers 10-inch
- Pick tool 90-degree
- Plastic trim tool
- Funnel long-neck
- Clean shop towels
- Torque wrench inch-pound 1/4-inch drive
- 8mm socket 1/4-inch drive
- 1/4-inch drive ratchet
- Cooling system pressure tester (specialty)
🔩 Required Parts
HowToo sells all the parts you need for this repair:
- Radiator hose - Qty: 1
- Radiator hose clamps - Qty: 2
- Motorcraft Yellow coolant, premixed 50/50 - Qty: 1-2 gallons
- Distilled water - Qty: 1 gallon
📋 Before You Begin
- 🅿️ Park your Mustang on level ground and set the parking brake.
- ❄️ Make sure the engine is completely cool before touching any coolant parts.
- 🧼 Place cardboard or towels under the front of the car to catch small spills.
- 🧪 A hose clamp holds the hose tight to the radiator or engine fitting. Some clamps are spring clamps, and some are worm-gear screw clamps.
- 🔎 This guide covers either the upper or lower radiator hose. The steps are the same, but the lower hose will drain more coolant.
🔨 Step-by-Step Instructions
Follow these steps in order:
Step 1: Let the Engine Cool
- Use your gloved hand to carefully check that the upper radiator hose is cool to the touch.
- Do not remove the coolant reservoir cap yet if anything feels warm or pressurized.
- Cool engine equals safe engine.
Step 2: Remove the Coolant Reservoir Cap
- Use your hand with nitrile gloves to slowly turn the coolant reservoir cap counterclockwise.
- If you hear pressure escaping, stop and wait until the sound ends before removing the cap fully.
- Set the cap somewhere clean.
Step 3: Position the Drain Pan
- Use a drain pan 2-gallon minimum and place it under the radiator hose area you are replacing.
- For the lower radiator hose, place the pan under the lower radiator outlet because more coolant will drain.
- For the upper radiator hose, place the pan under both hose ends to catch spills.
Step 4: Drain Enough Coolant
- Use the drain pan 2-gallon minimum to catch coolant when the hose is loosened.
- If replacing the upper radiator hose, you usually only need to catch the coolant trapped in the hose.
- If replacing the lower radiator hose, expect a larger coolant drain from the radiator and engine side.
- Use clean shop towels to wipe up any coolant that lands on painted or rubber surfaces.
Step 5: Loosen the First Hose Clamp
- If your hose uses spring clamps, use hose clamp pliers to squeeze the clamp tabs together.
- A spring clamp is a self-tightening clamp with two small ears that you squeeze to open it.
- Slide the clamp back several inches on the hose using hose clamp pliers.
- If your hose uses screw-style clamps, use an 8mm socket and 1/4-inch drive ratchet to loosen the clamp.
- Do not remove the clamp completely unless you are replacing it.
Step 6: Loosen the Second Hose Clamp
- Use hose clamp pliers on spring clamps or an 8mm socket and 1/4-inch drive ratchet on screw-style clamps.
- Slide or loosen the clamp away from the radiator or engine fitting.
- Make sure both clamps are moved far enough that they are no longer over the metal or plastic hose nipples.
Step 7: Break the Hose Free
- Use your hand to twist the radiator hose gently left and right.
- If the hose is stuck, use a plastic trim tool to carefully work around the hose end.
- Use a 90-degree pick tool only if needed, and be very gentle so you do not scratch the radiator neck or engine fitting.
- Do not pry hard on plastic radiator fittings. They can crack.
- Twist first, pull second.
Step 8: Remove the Old Hose
- Use your hands to pull the old hose off one end, then the other.
- A small rush of coolant may come out, so keep the drain pan under the hose.
- Use clean shop towels to clean the hose sealing areas.
Step 9: Inspect the Hose Connections
- Use safety glasses and a flashlight if needed to inspect the radiator neck and engine-side fitting.
- Look for cracks, corrosion, dried coolant crust, or broken plastic.
- Use clean shop towels and distilled water to wipe away residue.
- Do not sand or file plastic fittings.
Step 10: Install the New Hose
- Use your hands to slide the new radiator hose onto the radiator fitting and engine fitting.
- Make sure the hose seats fully against the raised stop or bead on each fitting.
- Align the hose so it is not twisted and does not rub against the belt, fan area, pulleys, or sharp brackets.
Step 11: Position and Tighten the Clamps
- Use hose clamp pliers to move spring clamps back into their original positions behind the raised bead on each fitting.
- If using screw-style clamps, use an 8mm socket with a torque wrench inch-pound 1/4-inch drive.
- Torque to 3-4 Nm (27-35 in-lbs) for typical worm-gear hose clamps.
- Do not overtighten. Overtightening can damage the hose or crack a plastic radiator fitting.
Step 12: Refill the Cooling System
- Use a long-neck funnel at the coolant reservoir.
- Add Motorcraft Yellow coolant, premixed 50/50, until the level reaches the MAX line on the reservoir.
- If you spilled coolant on nearby parts, use distilled water and clean shop towels to rinse and wipe the area.
Step 13: Bleed Air from the Cooling System
- Use your hand to reinstall the coolant reservoir cap loosely at first, then snug it fully once the level is correct.
- Start the engine and let it idle with the heater set to full hot.
- Watch the temperature gauge. Do not leave the car unattended.
- Let the engine reach normal operating temperature, then shut it off.
- Allow the engine to cool completely, then use your gloved hand to remove the reservoir cap slowly and top off coolant to the MAX line if needed.
Step 14: Pressure Check for Leaks
- Use a cooling system pressure tester to pressurize the system to the cap rating shown on the coolant reservoir cap.
- A pressure tester is a hand pump that checks the cooling system for leaks without running the engine.
- Inspect both hose ends for drips or wetness.
- If a clamp leaks, use hose clamp pliers or an 8mm socket to reposition or lightly tighten the clamp.
✅ After Repair
- ✅ Take a short 10-15 minute drive while watching the temperature gauge.
- 🔎 Park, shut the engine off, and inspect the hose ends for leaks.
- ❄️ After the engine cools fully, recheck the coolant reservoir level and top off to the MAX line if needed.
- ♻️ Take old coolant to a proper recycling center or auto parts store that accepts used coolant.
- 🧼 Rinse away any coolant residue from the engine bay using distilled water and clean shop towels.
💰 DIY vs Shop Cost
Shop Cost: $180-$350 (parts + labor)
DIY Cost: $35-$110 (parts only)
You Save: $145-$240 by doing it yourself!
Shop labor rates vary but typically run $100-$150/hour. This repair takes a shop approximately 0.8-1.5 hours.
🎯 Ready to get started?
HowToo makes it easy: same-day/2-day shipping on every part, plus all the tools and specialty tools you need! Check out the parts and tools sections below to add everything to your cart.
