







How to Replace the Oxygen Sensor on a 2018-2021 Hyundai Tucson
Step-by-step DIY guide with tools, parts, torque specs, safety tips, and code clearing for 2018, 2019, 2020, 2021
How to Replace the Oxygen Sensor on a 2018-2021 Hyundai Tucson
Step-by-step DIY guide with tools, parts, torque specs, safety tips, and code clearing for 2018, 2019, 2020, 2021


🔧 Tucson - Oxygen Sensor Replacement
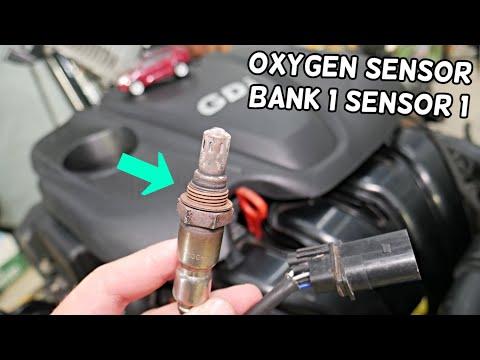
This repair replaces a faulty oxygen sensor, which helps the engine computer adjust fuel mixture for proper performance and emissions. Your Tucson can have more than one oxygen sensor, so this procedure covers the common replacement method for either upstream or downstream sensors on the 2.4L engine.
Difficulty Level: Beginner to Intermediate | Estimated Time: 1-2 hours
Assumption: Replace the sensor identified by your diagnostic trouble code, such as Bank 1 Sensor 1 or Bank 1 Sensor 2.
⚠️ Safety & Precautions
- ⚠️ Let the exhaust cool fully before starting. Oxygen sensors thread into the exhaust and can cause serious burns.
- ⚠️ Work on level ground and use jack stands if lifting the Tucson. Never rely on a jack alone.
- ⚠️ Disconnect the negative battery cable before unplugging the sensor to reduce the chance of electrical shorts.
- ⚠️ Do not twist or pull on the wiring harness. The harness is the group of wires and connector that powers the sensor.
- ⚠️ Avoid getting anti-seize compound on the sensor tip. The tip is the small sensing end that sits inside the exhaust stream.
🔧 Required Tools
You'll need the following tools for this repair:
- 3/8-inch drive ratchet
- 3/8-inch drive extension 6-inch
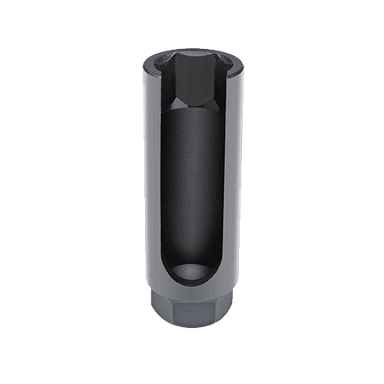
- 22mm oxygen sensor socket (specialty)
- 22mm open-end wrench
- 10mm socket
- Torque wrench 10-80 Nm range
- Flat-blade screwdriver
- Trim clip removal tool
- Penetrating oil
- Floor jack rated 2-ton minimum
- Jack stands rated 2-ton minimum
- Wheel chocks
- Nitrile gloves
- Safety glasses
- OBD-II scan tool
🔩 Required Parts
HowToo sells all the parts you need for this repair:
- Direct-fit oxygen sensor - Qty: 1
- High-temperature nickel anti-seize compound - Qty: 1
- Replacement splash shield clips - Qty: As needed
📋 Before You Begin
- Park your Tucson on level ground, shift to Park, and set the parking brake.
- Place wheel chocks behind the rear wheels if lifting the front of the vehicle.
- Use an OBD-II scan tool to confirm which sensor is faulty before removing anything. OBD-II means the standard diagnostic plug under the dash.
- Common locations on your Tucson are:
- Bank 1 Sensor 1: Upstream sensor before the catalytic converter, closer to the engine.
- Bank 1 Sensor 2: Downstream sensor after the catalytic converter, farther under the vehicle.
- Let the exhaust cool for at least 45-60 minutes if the engine was recently running.
- Use a 10mm socket to disconnect the negative battery cable.
🔨 Step-by-Step Instructions
Follow these steps in order:
Step 1: Confirm the Failed Sensor
- Plug the OBD-II scan tool into the diagnostic port under the driver side dash.
- Read the stored trouble code and note whether it says Bank 1 Sensor 1 or Bank 1 Sensor 2.
- Turn the ignition off and remove the OBD-II scan tool.
- Match the sensor before buying parts.
Step 2: Disconnect the Battery
- Open the hood.
- Use a 10mm socket to loosen the negative battery terminal clamp.
- Lift the cable off the battery post and place it aside so it cannot spring back.
Step 3: Raise the Tucson if Needed
- If replacing the downstream sensor, place wheel chocks behind the rear wheels.
- Use a floor jack rated 2-ton minimum at the front center jacking point.
- Support the Tucson with jack stands rated 2-ton minimum under the proper front support points.
- Gently shake the vehicle by hand to confirm it is stable before going underneath.
Step 4: Remove Access Covers if Installed
- Use a trim clip removal tool to remove plastic push clips from the lower splash shield if it blocks access.
- Use a 10mm socket to remove any splash shield bolts.
- Use a flat-blade screwdriver only to gently help release stubborn clips.
- Set the clips and bolts in a cup so they do not get lost.
Step 5: Locate the Oxygen Sensor Connector
- Follow the oxygen sensor wire from the exhaust pipe to its electrical connector.
- Use your fingers or a flat-blade screwdriver to gently lift the connector lock tab.
- Unplug the connector by pulling on the connector body, not the wires.
- If the harness is clipped to a bracket, release it with the trim clip removal tool.
Step 6: Loosen the Old Sensor
- Spray penetrating oil where the oxygen sensor threads into the exhaust.
- Wait 5-10 minutes so the oil can work into the threads.
- Slide the wire through the slot in the 22mm oxygen sensor socket.
- Use the 3/8-inch drive ratchet and 3/8-inch drive extension 6-inch to turn the sensor counterclockwise.
- If space is tight, use a 22mm open-end wrench instead.
- Slow pressure works better than jerking.
Step 7: Remove the Old Sensor
- Once loose, unscrew the oxygen sensor by hand while keeping the wire from twisting.
- Compare the old sensor to the new direct-fit oxygen sensor. The connector, wire length, and threads should match.
- Do not install a universal splice-in sensor unless no direct-fit option is available.
Step 8: Prepare the New Sensor
- If the new sensor threads already have anti-seize applied, do not add more.
- If the threads are bare, apply a tiny amount of high-temperature nickel anti-seize compound only to the threads.
- Keep anti-seize away from the sensor tip and vents.
Step 9: Install the New Sensor
- Start the new direct-fit oxygen sensor by hand to avoid cross-threading. Cross-threading means the threads are started crooked and can damage the exhaust bung.
- Use the 22mm oxygen sensor socket, 3/8-inch drive ratchet, and torque wrench 10-80 Nm range to tighten it.
- Torque to 40-50 Nm (30-37 ft-lbs).
- If you cannot fit the torque wrench, snug it with the 22mm open-end wrench without over-tightening.
Step 10: Reconnect the Wiring
- Route the sensor wire the same way as the original.
- Keep the wire away from the exhaust pipe, sharp brackets, and moving parts.
- Plug the connector in until it clicks.
- Use the trim clip removal tool to reinstall any harness clips into their brackets.
Step 11: Reinstall Covers and Lower the Vehicle
- Reinstall the lower splash shield if removed.
- Use the 10mm socket to reinstall splash shield bolts.
- Torque small splash shield bolts to 7-10 Nm (62-89 in-lbs).
- Push plastic clips in by hand or use the trim clip removal tool to seat them gently.
- Use the floor jack rated 2-ton minimum to lift the Tucson slightly, remove the jack stands rated 2-ton minimum, and lower it fully.
Step 12: Reconnect the Battery
- Place the negative battery cable back on the battery post.
- Use the 10mm socket to tighten the terminal clamp.
- Torque to 4-6 Nm (35-53 in-lbs).
Step 13: Clear the Code and Test
- Use the OBD-II scan tool to clear the oxygen sensor fault code.
- Start the engine and let it idle for 2-3 minutes.
- Listen for exhaust leaks near the sensor. A leak may sound like ticking or puffing.
- Take a short drive and recheck for warning lights with the OBD-II scan tool.
✅ After Repair
- ✅ The check engine light should stay off after the code is cleared and the drive cycle completes.
- ✅ If the same code returns, inspect for exhaust leaks, wiring damage, poor connector fit, or a catalyst-related issue.
- ✅ Readiness monitors may show “not ready” for a while. This is normal after clearing codes.
- ✅ Drive normally for a few trips so the engine computer can relearn sensor readings.
💰 DIY vs Shop Cost
Shop Cost: $250-$550 (parts + labor)
DIY Cost: $60-$220 (parts only)
You Save: $190-$330 by doing it yourself!
Shop labor rates vary but typically run $100-$150/hour. This repair takes a shop approximately 0.8-1.5 hours.
🎯 Ready to get started?
HowToo makes it easy: same-day/2-day shipping on every part, plus all the tools and specialty tools you need! Check out the parts and tools sections below to add everything to your cart.