

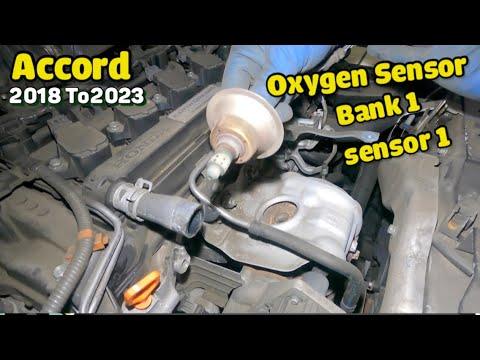






How to Replace the Oxygen Sensor on a 2018-2020 Honda Accord (Engine: Inline 4 2.0L)
Step-by-step O2 sensor guide with tools, parts, torque specs, and safety tips for 2018, 2019, 2020
How to Replace the Oxygen Sensor on a 2018-2020 Honda Accord (Engine: Inline 4 2.0L)
Step-by-step O2 sensor guide with tools, parts, torque specs, and safety tips for 2018, 2019, 2020


🔧 Accord - Oxygen Sensor Replacement
This repair replaces a faulty oxygen sensor, also called an air/fuel ratio or O2 sensor. On your Accord Hybrid, oxygen sensor data helps the engine computer adjust fuel mixture and emissions performance.
Difficulty Level: Intermediate | Estimated Time: 1-2 hours
Assumption: This guide covers the common upstream/front air-fuel ratio sensor and downstream/rear oxygen sensor procedure; replace only the sensor identified by your diagnostic trouble code.
⚠️ Safety & Precautions
- ⚠️ Let the exhaust cool completely before touching it; oxygen sensors thread into very hot exhaust parts.
- ⚠️ Your Accord is a hybrid. Do not touch orange high-voltage cables or hybrid battery components.
- ⚠️ Disconnect the 12V battery negative terminal before unplugging engine sensors to reduce the chance of short circuits.
- ⚠️ Support the vehicle only with jack stands if lifting it. Never work under a vehicle supported only by a jack.
- ⚠️ Wear safety glasses and gloves because rust flakes and debris can fall while working under the car.
🔧 Required Tools
You'll need the following tools for this repair:
- 10mm socket
- 3/8-inch ratchet
- 3/8-inch extension, 6-inch
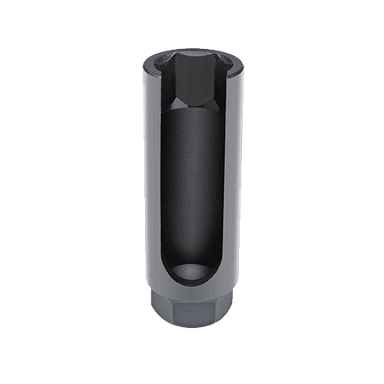
- 22mm oxygen sensor socket (specialty)
- 22mm wrench
- Torque wrench, 3/8-inch drive
- Flat-blade screwdriver
- Trim clip removal tool
- Floor jack, rated 2-ton minimum
- Jack stands, rated 2-ton minimum
- Wheel chocks
- Mechanic gloves
- Safety glasses
- OBD-II scan tool
🔩 Required Parts
HowToo sells all the parts you need for this repair:
- Upstream air-fuel ratio sensor - Qty: 1, if Bank 1 Sensor 1 is faulty
- Downstream oxygen sensor - Qty: 1, if Bank 1 Sensor 2 is faulty
- Anti-seize compound, sensor-safe - Qty: 1 small packet, only if not pre-applied
- Exhaust heat shield clips - Qty: As needed, if damaged during removal
📋 Before You Begin
- Park your Accord on level ground and set the parking brake.
- Place wheel chocks behind the rear wheels before lifting the front.
- Let the exhaust cool for at least 1 hour if the engine was recently running.
- Use an OBD-II scan tool, which is a small diagnostic reader that plugs into the car, to confirm the failed sensor location before removal.
- Bank 1 Sensor 1 means the upstream sensor before the catalytic converter.
- Bank 1 Sensor 2 means the downstream sensor after the catalytic converter.
- Disconnect the 12V battery negative terminal using a 10mm socket before unplugging the sensor connector.
🔨 Step-by-Step Instructions
Follow these steps in order:
Step 1: Identify the Correct Sensor
- Use the OBD-II scan tool to read the stored trouble code.
- If the code points to Bank 1 Sensor 1, replace the upstream air-fuel ratio sensor near the exhaust manifold/front pipe area.
- If the code points to Bank 1 Sensor 2, replace the downstream oxygen sensor after the catalytic converter under the vehicle.
- Match the code before buying parts.
Step 2: Disconnect the 12V Battery
- Open the hood and locate the 12V battery.
- Use a 10mm socket and 3/8-inch ratchet to loosen the negative battery terminal clamp.
- Move the negative cable aside so it cannot spring back onto the battery post.
- No torque is needed for removal. During installation, tighten the terminal snugly to Torque to 5 Nm (44 in-lbs).
Step 3: Lift and Support the Front of the Vehicle
- Place wheel chocks behind the rear wheels.
- Use the floor jack, rated 2-ton minimum, at the front center jacking point.
- Set jack stands, rated 2-ton minimum, under the proper front support points.
- Gently lower the vehicle onto the jack stands and shake the car lightly to confirm it is stable.
- Never trust the jack alone.
Step 4: Remove the Lower Engine Cover if Needed
- Put on safety glasses and mechanic gloves.
- Use a flat-blade screwdriver or trim clip removal tool to release any plastic clips.
- Use a 10mm socket and 3/8-inch ratchet to remove lower cover bolts if equipped.
- Set the cover and clips aside in order so they go back in the same spots.
- Reinstall cover bolts later to Torque to 9 Nm (80 in-lbs).
Step 5: Unplug the Oxygen Sensor Connector
- Follow the sensor wire from the exhaust sensor body to its electrical connector.
- Use your fingers to press the connector lock tab and separate the connector.
- If the connector is stuck, use a flat-blade screwdriver gently on the lock tab only.
- Do not pull on the wires. Pull on the plastic connector body.
Step 6: Remove the Old Sensor
- Slide the 22mm oxygen sensor socket over the wire and onto the sensor hex.
- An oxygen sensor socket has a slot down the side so it can fit over the sensor wire.
- Use the 3/8-inch ratchet and 3/8-inch extension, 6-inch, to turn the sensor counterclockwise.
- If access is tight, use a 22mm wrench instead.
- Once loose, spin the sensor out by hand while keeping the wire from twisting too much.
- Work slowly to protect threads.
Step 7: Prepare the New Sensor
- Compare the new sensor to the old one. The connector, wire length, and threaded tip should match.
- If the new sensor threads already have anti-seize compound on them, do not add more.
- If the threads are dry, apply a very small amount of sensor-safe anti-seize compound to the threads only.
- Keep anti-seize off the sensor tip. The tip is the small end that sits inside the exhaust stream.
Step 8: Install the New Sensor
- Thread the new sensor into the exhaust by hand first.
- If it does not turn easily by hand, stop and realign it to avoid cross-threading.
- Use the 22mm oxygen sensor socket and torque wrench to tighten the sensor.
- Tighten to Torque to 44 Nm (33 ft-lbs).
- Hand-start every threaded part.
Step 9: Route and Connect the Sensor Wire
- Route the sensor wire the same way the old one was routed.
- Keep the wire away from the exhaust pipe, steering parts, and moving suspension parts.
- Use your hands to snap the connector together until it clicks.
- Use the flat-blade screwdriver only if needed to help seat a retaining clip.
Step 10: Reinstall the Lower Cover
- Position the lower engine cover back into place.
- Use the trim clip removal tool or your fingers to reinstall the plastic clips.
- Use the 10mm socket and 3/8-inch ratchet to install cover bolts.
- Tighten cover bolts to Torque to 9 Nm (80 in-lbs).
Step 11: Lower the Vehicle and Reconnect the Battery
- Use the floor jack to raise the front slightly off the jack stands.
- Remove the jack stands, then lower the vehicle carefully.
- Use the 10mm socket and 3/8-inch ratchet to reconnect the negative battery terminal.
- Tighten the terminal to Torque to 5 Nm (44 in-lbs).
Step 12: Clear Codes and Verify Repair
- Plug in the OBD-II scan tool.
- Use the scan tool to clear diagnostic trouble codes.
- Start your Accord and let it idle.
- Check that no exhaust leak noise is coming from the sensor area.
- Take a short drive and recheck for pending codes with the OBD-II scan tool.
✅ After Repair
- ✅ Confirm the check engine light stays off after a full warm-up drive.
- ✅ Recheck the sensor wire routing after the first drive to make sure it did not move near the exhaust.
- ✅ If the same code returns, inspect wiring, connector pins, exhaust leaks, and related fuel-trim data before replacing more parts.
- ✅ Some emissions monitors need several drive cycles before showing “ready” on the scan tool.
💰 DIY vs Shop Cost
Shop Cost: $250-$650 per sensor, parts + labor
DIY Cost: $80-$280 per sensor, parts only
You Save: $170-$370 by doing it yourself!
Shop labor rates vary but typically run $100-$150/hour. This repair takes a shop approximately 0.8-1.5 hours.
🎯 Ready to get started?
HowToo makes it easy: same-day/2-day shipping on every part, plus all the tools and specialty tools you need! Check out the parts and tools sections below to add everything to your cart.