







How to Replace the Oxygen Sensor on a 2018-2020 Ford F-150 5.0L V8
Step-by-step O2 sensor replacement guide with tools, parts, torque specs, and safety tips for 2018, 2019, 2020
How to Replace the Oxygen Sensor on a 2018-2020 Ford F-150 5.0L V8
Step-by-step O2 sensor replacement guide with tools, parts, torque specs, and safety tips for 2018, 2019, 2020


🔧 F-150 - Oxygen Sensor Replacement
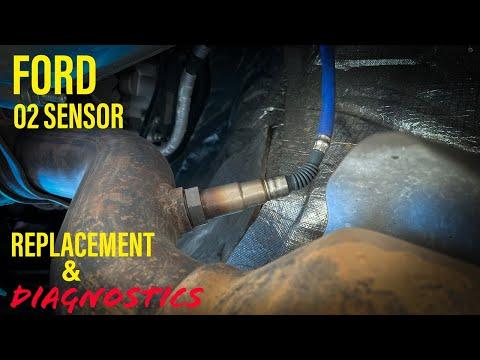
Replacing an oxygen sensor on your F-150 means unplugging the old exhaust sensor, removing it from the exhaust pipe, and installing a new one. Oxygen sensors help the engine computer adjust fuel mixture, so a bad sensor can cause a check engine light, poor fuel economy, rough running, or failed emissions testing.
Difficulty Level: Beginner to Intermediate | Estimated Time: 1-2 hours
Assumption: This guide covers replacement of an accessible upstream or downstream oxygen sensor on your F-150 5.0L V8; exact sensor location depends on the diagnostic trouble code.
⚠️ Safety & Precautions
- ⚠️ Let the exhaust cool completely before touching it. Exhaust parts can stay hot long after driving.
- ⚠️ Work on level ground and support the truck with jack stands if lifting it. Never rely on a jack alone.
- ⚠️ Disconnect the negative battery cable before unplugging oxygen sensor wiring.
- ⚠️ Do not twist or pull hard on the wiring harness. The connector and wires can break easily.
- ⚠️ Use eye protection because dirt and rust can fall from under the truck.
🔧 Required Tools
You'll need the following tools for this repair:
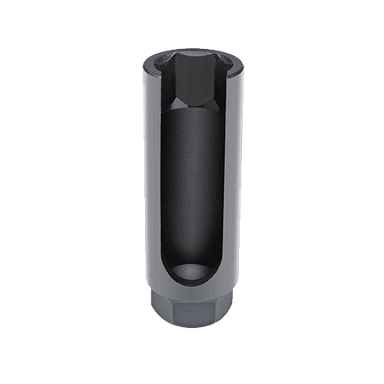
- 7/8-inch oxygen sensor socket (specialty)
- 3/8-inch drive ratchet
- 3/8-inch drive 6-inch extension
- 10mm socket
- Torque wrench rated 10-80 ft-lbs
- Trim clip removal tool
- Needle-nose pliers
- Floor jack rated 3-ton minimum
- Jack stands rated 3-ton minimum
- Wheel chocks
- Safety glasses
- Nitrile gloves
- Shop light
An oxygen sensor socket is a slotted socket that fits over the sensor while allowing the wire to pass through the side.
🔩 Required Parts
HowToo sells all the parts you need for this repair:
- Oxygen sensor - Qty: 1
- Anti-seize compound rated for oxygen sensors - Qty: 1 small packet
- Dielectric grease - Qty: 1 small packet
Important: Your F-150 has multiple oxygen sensors. Replace the sensor identified by the fault code: Bank 1 Sensor 1, Bank 2 Sensor 1, Bank 1 Sensor 2, or Bank 2 Sensor 2.
📋 Before You Begin
- 🚗 Park your F-150 on level ground, shift to Park, and apply the parking brake.
- 🧱 Place wheel chocks behind the rear wheels if lifting the front of the truck.
- 🔋 Open the hood and use a 10mm socket to disconnect the negative battery cable.
- 🔎 Identify the correct oxygen sensor location before removal:
- Bank 1 is the passenger-side cylinder bank on the 5.0L V8.
- Bank 2 is the driver-side cylinder bank on the 5.0L V8.
- Sensor 1 is before the catalytic converter.
- Sensor 2 is after the catalytic converter.
- 💡 A catalytic converter is the larger exhaust canister that reduces emissions.
🔨 Step-by-Step Instructions
Follow these steps in order:
Step 1: Raise and Support the Truck
- Use a floor jack rated 3-ton minimum to lift the front of your F-150 if you need more room under the truck.
- Place jack stands rated 3-ton minimum under solid frame points.
- Lower the truck gently onto the jack stands.
- Use safety glasses before going underneath.
- Shake truck gently to confirm stability.
Step 2: Locate the Correct Oxygen Sensor
- Use a shop light to find the oxygen sensor threaded into the exhaust pipe.
- Match the sensor position to the code:
- Bank 1 Sensor 1: passenger side, before catalytic converter.
- Bank 2 Sensor 1: driver side, before catalytic converter.
- Bank 1 Sensor 2: passenger side, after catalytic converter.
- Bank 2 Sensor 2: driver side, after catalytic converter.
- Use a trim clip removal tool or needle-nose pliers to release any wiring retainers holding the sensor harness.
Step 3: Disconnect the Sensor Electrical Connector
- Use your fingers to press the connector lock tab and separate the oxygen sensor connector.
- If the connector is tight, use needle-nose pliers gently on the lock tab only.
- Do not pull on the wires.
- Use a trim clip removal tool to remove the connector from its bracket if needed.
- Take a photo before unplugging.
Step 4: Remove the Old Oxygen Sensor
- Slide the 7/8-inch oxygen sensor socket over the sensor wiring and onto the sensor hex.
- Attach a 3/8-inch drive ratchet and 3/8-inch drive 6-inch extension if more reach is needed.
- Turn counterclockwise to loosen the sensor.
- Once loose, spin the sensor out by hand while keeping the wire from twisting around nearby parts.
- If it is stuck, apply steady pressure with the ratchet. Do not jerk hard and damage the exhaust bung.
Step 5: Prepare the New Oxygen Sensor
- Compare the new oxygen sensor to the old one. The connector shape and wire length should match.
- If the new sensor threads do not already have anti-seize, apply a very small amount of oxygen-sensor-safe anti-seize compound to the threads only.
- Keep anti-seize away from the sensor tip.
- Apply a tiny amount of dielectric grease inside the connector seal only, not on the sensor tip.
Step 6: Install the New Oxygen Sensor
- Thread the new oxygen sensor into the exhaust by hand first.
- Turn it clockwise several turns by hand to avoid cross-threading.
- Use the 7/8-inch oxygen sensor socket and torque wrench rated 10-80 ft-lbs to tighten it.
- Torque to 48 Nm (35 ft-lbs).
- Hand-starting prevents expensive thread damage.
Step 7: Reconnect the Wiring
- Route the sensor wiring exactly like the original wiring.
- Use your hands to snap the connector together until it clicks.
- Use needle-nose pliers or a trim clip removal tool to reinstall any wiring retainers.
- Make sure the wiring is away from the exhaust pipe, driveshaft, and sharp edges.
Step 8: Reconnect the Battery
- Use a 10mm socket to reconnect the negative battery cable.
- Tighten the battery terminal snugly.
- Torque to 7 Nm (62 in-lbs).
Step 9: Lower the Truck
- Use the floor jack rated 3-ton minimum to lift the truck slightly off the jack stands.
- Remove the jack stands rated 3-ton minimum.
- Lower the truck slowly to the ground with the floor jack.
- Remove the wheel chocks.
✅ After Repair
- ✅ Start your F-150 and let it idle for a few minutes.
- 👂 Listen for exhaust leaks near the sensor. A ticking sound can mean the sensor is loose.
- 👃 A slight smell from anti-seize or fingerprints burning off may happen briefly.
- 🔎 Check that the oxygen sensor wire is not touching hot exhaust parts.
- 🧰 Clear the check engine light with a scan tool if available. If not cleared, the light may turn off after several drive cycles if the repair fixed the fault.
- 🚗 Drive normally for 10-15 minutes and confirm the engine runs smoothly.
💰 DIY vs Shop Cost
Shop Cost: $220-$450 per sensor (parts + labor)
DIY Cost: $60-$180 per sensor (parts only)
You Save: $140-$270 by doing it yourself!
Shop labor rates vary but typically run $100-$150/hour. This repair takes a shop approximately 0.7-1.2 hours.
🎯 Ready to get started?
HowToo makes it easy: same-day/2-day shipping on every part, plus all the tools and specialty tools you need! Check out the parts and tools sections below to add everything to your cart.