








How to Replace the Oxygen Sensor on a 2017-2023 Honda CR-V (Engine: Inline 4 1.5L)
Step-by-step DIY guide with tools, parts, torque specs, safety tips, and OBD2 testing for 2017, 2018, 2019, 2020, 2021, 2022, 2023
How to Replace the Oxygen Sensor on a 2017-2023 Honda CR-V (Engine: Inline 4 1.5L)
Step-by-step DIY guide with tools, parts, torque specs, safety tips, and OBD2 testing for 2017, 2018, 2019, 2020, 2021, 2022, 2023


🔧 CR-V - Oxygen Sensor Replacement
This repair covers replacing an oxygen sensor on your CR-V. Your CR-V uses exhaust-mounted sensors to help the engine computer control fuel mixture and monitor catalytic converter performance.
Difficulty Level: Beginner to Intermediate | Estimated Time: 1-2 hours
Assumption: This procedure applies to either the upstream air/fuel ratio sensor or downstream oxygen sensor; replace the sensor identified by your trouble code or diagnosis.
⚠️ Safety & Precautions
- ⚠️ Exhaust parts get extremely hot. Let your CR-V cool for at least 1 hour before touching the sensor or exhaust.
- 🧤 Wear gloves and safety glasses. Rust, road grit, and sharp heat shields can injure your hands or eyes.
- 🔋 Disconnect the negative battery cable before unplugging the sensor connector.
- 🚗 If lifting the vehicle, support it with jack stands. Never work under a vehicle supported only by a jack.
- 🧯 Keep penetrating oil away from open flames and hot exhaust parts.
🔧 Required Tools
You'll need the following tools for this repair:
- 3/8-inch drive ratchet
- 3/8-inch drive extension, 6-inch
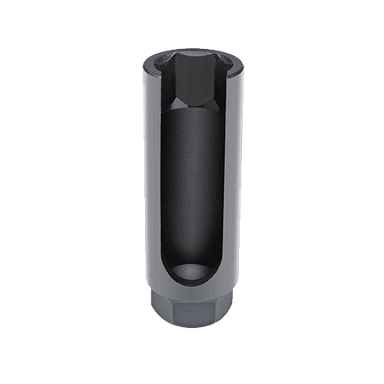
- 22mm oxygen sensor socket (specialty)
- 10mm socket
- Torque wrench, 3/8-inch drive
- Flat-blade screwdriver
- Trim clip removal tool
- Floor jack, 2-ton minimum
- Jack stands, 2-ton minimum
- Wheel chocks
- Penetrating oil
- Shop rags
- Nitrile gloves
- Safety glasses
- OBD2 scan tool
An oxygen sensor socket is a deep 22mm socket with a slot cut in the side so the sensor wire can pass through it.
🔩 Required Parts
HowToo sells all the parts you need for this repair:
- Upstream air/fuel ratio sensor - Qty: 1 if replacing sensor 1
- Downstream oxygen sensor - Qty: 1 if replacing sensor 2
- Anti-seize compound, sensor-safe - Qty: 1 small packet if not pre-applied
📋 Before You Begin
- 🚗 Park your CR-V on level ground and set the parking brake.
- 🧱 Place wheel chocks behind the rear wheels before lifting the front.
- 🔎 Use an OBD2 scan tool to confirm which sensor needs replacement.
- 📍 Sensor 1 is the upstream air/fuel ratio sensor before the catalytic converter.
- 📍 Sensor 2 is the downstream oxygen sensor after the catalytic converter.
- 🔋 Use a 10mm socket to disconnect the negative battery cable.
- ⏳ Spray penetrating oil on the sensor threads and let it soak for 10-15 minutes.
🔨 Step-by-Step Instructions
Follow these steps in order:
Step 1: Cool the Exhaust
- Let your CR-V sit until the exhaust is fully cool to the touch.
- Use safety glasses and nitrile gloves before working near the exhaust.
- Cool metal prevents burns.
Step 2: Disconnect the Battery
- Open the hood and locate the battery.
- Use a 10mm socket to loosen the negative battery terminal clamp.
- Lift the negative cable off the battery and move it aside so it cannot spring back.
Step 3: Raise the Front of the Vehicle
- Place wheel chocks behind the rear wheels.
- Use a floor jack, 2-ton minimum, at the front center jacking point.
- Place jack stands, 2-ton minimum, under the proper front support points.
- Lower your CR-V gently onto the jack stands.
- Shake the vehicle lightly by hand to confirm it is stable.
Step 4: Remove the Lower Engine Cover if Needed
- Use a trim clip removal tool to remove plastic push clips from the lower splash shield.
- Use a 10mm socket to remove any 10mm bolts securing the shield.
- Set the shield and fasteners aside in order.
- Take a phone photo first.
Step 5: Locate the Correct Sensor
- Use a flashlight and follow the exhaust pipe from the turbocharger area toward the catalytic converter.
- For sensor 1, locate the sensor mounted before the catalytic converter.
- For sensor 2, locate the sensor mounted after the catalytic converter.
- Follow the sensor wire to its electrical connector before loosening the sensor.
Step 6: Unplug the Sensor Connector
- Use a flat-blade screwdriver to gently release the connector lock tab if needed.
- Pull the connector halves apart by the plastic connector body, not by the wires.
- Use a trim clip removal tool to release any wire harness clips from brackets.
Step 7: Remove the Old Sensor
- Route the wire through the slot in the 22mm oxygen sensor socket.
- Use a 3/8-inch drive ratchet and 6-inch extension with the 22mm oxygen sensor socket.
- Turn the sensor counterclockwise to loosen it.
- If the sensor is stuck, add penetrating oil and wait another 10 minutes.
- Remove the sensor by hand once it is loose.
- Slow pressure beats sudden force.
Step 8: Prepare the New Sensor
- Compare the new sensor to the old sensor to confirm the connector and wire length match.
- If the new sensor threads are already coated, do not add more anti-seize.
- If the threads are bare, apply a tiny amount of sensor-safe anti-seize compound only to the threads.
- Keep anti-seize away from the sensor tip.
Step 9: Install the New Sensor
- Thread the new sensor into the exhaust bung by hand first. The bung is the threaded hole in the exhaust pipe.
- Use the 22mm oxygen sensor socket with a torque wrench to tighten the sensor.
- Torque to 44 Nm (33 ft-lbs)
- Do not twist, stretch, or route the wire against hot exhaust parts.
Step 10: Reconnect the Sensor Wiring
- Push the electrical connector together until it clicks.
- Use your fingers to reinstall the wire harness clips into their brackets.
- Use a flat-blade screwdriver only if a clip needs gentle guidance.
- Make sure the wire is clipped away from the exhaust and moving parts.
Step 11: Reinstall the Lower Engine Cover
- Lift the splash shield back into place by hand.
- Use a trim clip removal tool or your fingers to reinstall the plastic push clips.
- Use a 10mm socket to reinstall the 10mm bolts.
- Torque small splash shield bolts snug only, about 5 Nm (44 in-lbs)
Step 12: Lower the Vehicle and Reconnect the Battery
- Use the floor jack to lift your CR-V slightly off the jack stands.
- Remove the jack stands.
- Lower the vehicle slowly to the ground with the floor jack.
- Use a 10mm socket to reconnect the negative battery cable.
- Torque to 5 Nm (44 in-lbs)
Step 13: Clear Codes and Test
- Connect an OBD2 scan tool to the diagnostic port under the driver side dash.
- Use the OBD2 scan tool to clear the stored oxygen sensor-related trouble code.
- Start the engine and let it idle.
- Check that there are no exhaust leaks or warning lights.
✅ After Repair
- ✅ Drive your CR-V through a normal warm-up cycle so the engine computer can relearn sensor readings.
- 🔎 Recheck for pending codes with the OBD2 scan tool after the test drive.
- 👂 Listen for ticking near the sensor area, which can indicate an exhaust leak.
- ⚠️ If the check engine light returns, the issue may be wiring, an exhaust leak, fuel control, or catalyst-related instead of the sensor itself.
💰 DIY vs Shop Cost
Shop Cost: $250-$650 (parts + labor)
DIY Cost: $80-$280 (parts only)
You Save: $170-$370 by doing it yourself!
Shop labor rates vary but typically run $100-$150/hour. This repair takes a shop approximately 0.8-1.5 hours.
🎯 Ready to get started?
HowToo makes it easy: same-day/2-day shipping on every part, plus all the tools and specialty tools you need! Check out the parts and tools sections below to add everything to your cart.