







How to Replace the Oxygen Sensor on a 2017-2020 Ford Fusion (Engine: Inline 4 2.0L)
Step-by-step O2 sensor guide with tools, parts, torque specs, and safety tips for 2017, 2018, 2019, 2020
How to Replace the Oxygen Sensor on a 2017-2020 Ford Fusion (Engine: Inline 4 2.0L)
Step-by-step O2 sensor guide with tools, parts, torque specs, and safety tips for 2017, 2018, 2019, 2020


🔧 Oxygen Sensor - Replacement
Assumption: this guide covers replacing either oxygen sensor on your Fusion: the upstream sensor before the catalytic converter or the downstream sensor after the catalytic converter. The upstream sensor helps control fuel mixture, while the downstream sensor checks catalytic converter performance.
Difficulty Level: Beginner | Estimated Time: 1-2 hours
⚠️ Safety & Precautions
- ⚠️ Let the exhaust cool completely before touching anything; oxygen sensors thread into very hot exhaust parts.
- ⚠️ Work on level ground and support your Fusion with jack stands if you need access underneath.
- ⚠️ Never rely on a floor jack alone. A floor jack lifts the car; jack stands safely hold it up.
- ⚠️ Disconnect the negative battery cable if your hands will be near the starter, alternator wiring, or tight engine-bay wiring.
- ⚠️ Do not use anti-seize on the sensor tip. Most new sensors already have coating on the threads only.
🔧 Required Tools
You'll need the following tools for this repair:
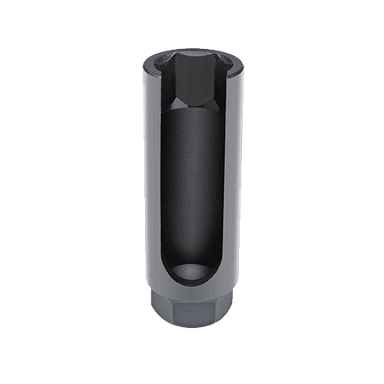
- 7/8-inch oxygen sensor socket
- 3/8-inch drive ratchet
- 3/8-inch drive 6-inch extension
- 10mm socket
- 8mm socket
- Flat-head screwdriver
- Trim clip removal tool
- Torque wrench 3/8-inch drive
- OBD-II scan tool
- Penetrating oil
- Floor jack rated 2-ton minimum
- Jack stands rated 2-ton minimum
- Wheel chocks
- Nitrile gloves
- Safety glasses
🔩 Required Parts
HowToo sells all the parts you need for this repair:
- Upstream oxygen sensor / air-fuel ratio sensor - Qty: 1 if replacing Sensor 1
- Downstream oxygen sensor - Qty: 1 if replacing Sensor 2
- Exhaust heat shield fasteners - Qty: as needed
- Underbody splash shield clips - Qty: as needed
📋 Before You Begin
- Park your Fusion on level ground, shift to Park, and set the parking brake.
- Use wheel chocks behind the rear wheels before lifting the front of the car.
- Let the exhaust cool for at least 1 hour if the engine was recently running.
- Use an OBD-II scan tool to read the trouble code before replacing the sensor. Sensor 1 means upstream; Sensor 2 means downstream.
- Spray penetrating oil on the oxygen sensor threads and let it soak for 10-15 minutes.
🔨 Step-by-Step Instructions
Follow these steps in order:
Step 1: Identify Which Sensor You Are Replacing
- Use an OBD-II scan tool to read the stored diagnostic code.
- Bank 1 Sensor 1 is the upstream sensor, mounted before the catalytic converter near the turbo/exhaust outlet area.
- Bank 1 Sensor 2 is the downstream sensor, mounted after the catalytic converter underneath the vehicle.
- An OBD-II scan tool plugs into the diagnostic port under the dash and reads fault codes from the car’s computers.
- Match the code before buying parts.
Step 2: Raise and Secure the Vehicle if Needed
- Use wheel chocks behind the rear wheels.
- Use a floor jack rated 2-ton minimum to lift the front of your Fusion at the front jacking point.
- Place jack stands rated 2-ton minimum under the approved front support points.
- Gently lower the vehicle onto the jack stands.
- Keep the floor jack lightly touching the jacking point as backup.
Step 3: Remove the Lower Splash Shield if Blocking Access
- Use an 8mm socket to remove the lower splash shield screws.
- Use a trim clip removal tool or flat-head screwdriver to remove plastic clips.
- Set the shield and fasteners aside in order.
- A trim clip tool is a small fork-shaped tool that removes plastic clips without breaking them.
Step 4: Disconnect the Oxygen Sensor Electrical Connector
- Put on safety glasses and nitrile gloves.
- Follow the oxygen sensor wire from the sensor body to its connector.
- Use your fingers to press the connector lock tab and unplug it.
- If the lock is stuck, use a flat-head screwdriver gently to release the tab.
- Do not pull on the wires.
- Pull the connector, not the wire.
Step 5: Remove Any Heat Shield if Needed
- If a heat shield blocks access, use a 10mm socket to remove the shield fasteners.
- Move the heat shield just enough to access the sensor.
- Do not bend the shield into the exhaust or wiring.
Step 6: Remove the Old Oxygen Sensor
- Place the 7/8-inch oxygen sensor socket over the sensor wire and onto the sensor hex.
- Attach a 3/8-inch drive ratchet and 3/8-inch drive 6-inch extension if more reach is needed.
- Turn counterclockwise to loosen the sensor.
- If it is tight, apply more penetrating oil and wait a few minutes.
- Remove the sensor by hand after it breaks loose.
- An oxygen sensor socket has a slot in the side so the sensor wire can pass through it.
Step 7: Compare the New Sensor
- Compare the old and new sensors side by side.
- Make sure the connector shape, wire length, and sensor style match.
- Do not touch the tip of the new sensor with oily fingers.
- If the new sensor has thread coating already applied, do not add extra anti-seize.
Step 8: Install the New Oxygen Sensor
- Start the new sensor by hand to avoid cross-threading.
- Use the 7/8-inch oxygen sensor socket and torque wrench 3/8-inch drive to tighten it.
- Torque to 48 Nm (35 ft-lbs).
- If access prevents using a torque wrench, tighten until fully seated and snug, but do not over-tighten.
- Hand-start threads every time.
Step 9: Reconnect the Electrical Connector
- Route the sensor wire the same way the original was routed.
- Keep the wire away from the exhaust pipe, catalytic converter, axle, and steering components.
- Push the connector together until it clicks.
- Use the original wire clips or holders to secure the harness.
Step 10: Reinstall Shields and Lower the Vehicle
- Use a 10mm socket to reinstall any heat shield fasteners.
- Use an 8mm socket to reinstall the lower splash shield screws.
- Use a trim clip removal tool or your fingers to reinstall plastic clips.
- Use the floor jack rated 2-ton minimum to lift slightly off the jack stands.
- Remove the jack stands rated 2-ton minimum.
- Lower your Fusion slowly to the ground.
Step 11: Clear Codes and Check Operation
- Use the OBD-II scan tool to clear the oxygen sensor fault code.
- Start the engine and let it idle.
- Listen for exhaust leaks near the sensor area.
- Confirm the check engine light stays off after a short drive.
✅ After Repair
- Drive your Fusion for 10-20 minutes with mixed city and steady-speed driving.
- Use the OBD-II scan tool to check that no oxygen sensor codes return.
- If a code returns immediately, inspect the connector, wire routing, and fuse condition before replacing more parts.
- If the old sensor was stuck badly, recheck for exhaust leaks after the first full heat cycle.
💰 DIY vs Shop Cost
Shop Cost: $250-$550 per sensor, depending on sensor location and labor time
DIY Cost: $60-$220 per sensor, parts only
You Save: $150-$330 by doing it yourself!
Shop labor rates vary but typically run $100-$150/hour. This repair takes a shop approximately 0.8-1.5 hours.
🎯 Ready to get started?
HowToo makes it easy: same-day/2-day shipping on every part, plus all the tools and specialty tools you need! Check out the parts and tools sections below to add everything to your cart.