








How to Replace the Mass Air Flow (MAF) Sensor on a 2018 Honda Odyssey
Step-by-step instructions with required tools, parts, safety tips, and MAF sensor torque spec (31 in-lb) for 2007, 2008, 2009, 2010, 2011, 2012, 2013, 2014, 2015, 2016, 2017, 2018, 2019, 2020, 2021, 2022, 2023
How to Replace the Mass Air Flow (MAF) Sensor on a 2018 Honda Odyssey
Step-by-step instructions with required tools, parts, safety tips, and MAF sensor torque spec (31 in-lb) for 2007, 2008, 2009, 2010, 2011, 2012, 2013, 2014, 2015, 2016, 2017, 2018, 2019, 2020, 2021, 2022, 2023


🔧 Odyssey - Mass Air Flow (MAF) Sensor Replacement
The MAF sensor measures how much air your engine is breathing so the computer can set the right fuel mixture. If it’s faulty or contaminated, your Odyssey can run rough, hesitate, or set a check-engine light.
Difficulty Level: Beginner | Estimated Time: 0.3-0.7 hours
⚠️ Safety & Precautions
- ⚠️ Let the engine cool so you don’t burn yourself on hot parts.
- ⚠️ Turn ignition OFF and keep the key/fob away from the van while unplugging sensors.
- ⚠️ If you disconnect the battery, you may reset radio/learned settings.
- ⚠️ Don’t touch the sensing element inside the MAF; it’s fragile.
🔧 Required Tools
You'll need the following tools for this repair:
- 10mm socket
- 1/4" drive ratchet
- 3" extension (1/4" drive)
- Phillips screwdriver
- Trim clip removal tool
- Torque wrench (inch-pound, 20-200 in-lb)
- Nitrile gloves
- Safety glasses
- Flashlight
🔩 Required Parts
HowToo sells all the parts you need for this repair:
- Mass Air Flow (MAF) sensor - Qty: 1
- MAF sensor O-ring seal (if not included) - Qty: 1
- Dielectric grease - Qty: 1
📋 Before You Begin
- Park on a level surface, shift to Park, and set the parking brake.
- Open the hood and remove any loose items from the engine bay.
- If you choose to disconnect the battery: use a 10mm socket to remove the negative terminal and tuck it aside so it can’t spring back.
🔨 Step-by-Step Instructions
Follow these steps in order:
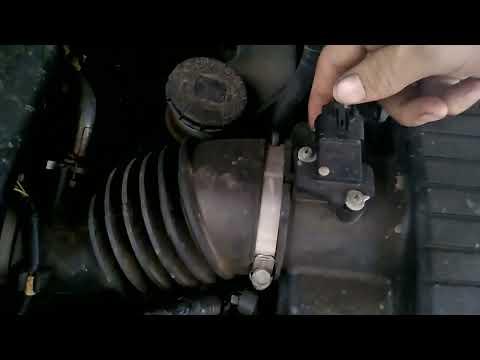
Step 1: Locate the MAF sensor
- Use a flashlight and find the air intake tube coming from the air filter box.
- The MAF sensor is mounted in that intake tube/air box area and has an electrical connector plugged into it.
Step 2: Unplug the MAF electrical connector
- Press the lock tab and pull the connector straight off.
- If it’s stuck, use a trim clip removal tool to gently help the tab while pulling—don’t yank the wires.
- Tip: Wiggle while pulling straight back.
Step 3: Remove the MAF sensor fasteners
- Use a Phillips screwdriver or a 10mm socket with a 1/4" drive ratchet and 3" extension (fastener type varies by housing).
- Place the screws/bolts somewhere safe so they don’t fall into the engine bay.
Step 4: Remove the MAF sensor from the housing
- Wear nitrile gloves and use safety glasses.
- Pull the sensor straight out. If it resists, gently wiggle it—don’t pry on the plastic body.
- Check whether an O-ring seal stayed on the sensor or stayed in the housing.
Step 5: Install the new MAF sensor
- Compare old vs new sensor to confirm same shape and connector.
- Install a new MAF sensor O-ring seal if your replacement didn’t include one.
- Push the sensor in straight and fully seated (it should sit flush).
- Reinstall the screws/bolts using a Phillips screwdriver or 10mm socket.
- Tighten evenly and snug. If using a torque wrench (inch-pound): Torque to 3.5 Nm (31 in-lb).
Step 6: Reconnect the electrical connector
- Add a tiny amount of dielectric grease to the connector seal (not filling the pins).
- Push the connector on until it clicks.
Step 7: Reconnect the battery (if disconnected)
- Use a 10mm socket to reinstall the negative battery terminal.
- Tighten securely (snug, not over-tight).
✅ After Repair
- Start the engine and let it idle for 2-3 minutes. It may idle slightly different at first.
- If you had a check-engine light, it may take a few drive cycles to clear unless cleared with a scan tool.
- Take a short test drive and confirm no hesitation, stalling, or warning lights.
- If the light returns, the intake duct may be loose or there may be an air leak after the MAF.
💰 DIY vs Shop Cost
Shop Cost: $180-$450 (parts + labor)
DIY Cost: $90-$280 (parts only)
You Save: $90-$170 by doing it yourself!
Shop labor rates vary but typically run $100-$150/hour. This repair takes a shop approximately 0.5-1.0 hours.
🎯 Ready to get started?
HowToo makes it easy: same-day/2-day shipping on every part, plus all the tools and specialty tools you need! Check out the parts and tools sections below to add everything to your cart.