

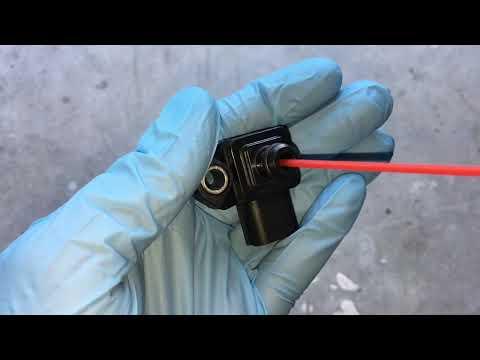







How to Replace the MAP Sensor on a 2016-2021 Honda HR-V (Trim: EX-L | Engine: Inline 4 1.8L)
Step-by-step guide for the MAF-mistaken intake sensor with tools, parts, and torque specs for 2016, 2017, 2018, 2019, 2020, 2021
How to Replace the MAP Sensor on a 2016-2021 Honda HR-V (Trim: EX-L | Engine: Inline 4 1.8L)
Step-by-step guide for the MAF-mistaken intake sensor with tools, parts, and torque specs for 2016, 2017, 2018, 2019, 2020, 2021


🔧 HR-V - Air Intake Sensor Replacement
Your HR-V does not use a traditional mass air flow sensor in the intake tube. It uses a MAP sensor, which means manifold absolute pressure sensor; it measures intake manifold pressure so the engine computer can calculate airflow.
This procedure covers replacing the MAP sensor, which is the part commonly mistaken for a MAF sensor on your HR-V.
Difficulty Level: Beginner | Estimated Time: 15-30 minutes
⚠️ Safety & Precautions
- ⚠️ Turn the ignition fully off before unplugging the sensor.
- ⚠️ Disconnect the negative battery cable to prevent accidental short circuits.
- ⚠️ Do not force the sensor connector. The plastic lock tab can break if pried too hard.
- ⚠️ Keep dirt and debris out of the intake opening when the sensor is removed.
- ⚠️ Work only on a cool engine to avoid burns from nearby engine parts.
🔧 Required Tools
You'll need the following tools for this repair:
- 10mm socket
- 1/4-inch drive ratchet
- 1/4-inch drive extension, 3-inch
- 10mm wrench
- Small flathead screwdriver
- Torque wrench, 2-20 Nm range
- Clean shop towel
- Nitrile gloves
- Safety glasses
🔩 Required Parts
HowToo sells all the parts you need for this repair:
- MAP sensor - Qty: 1
- MAP sensor O-ring seal - Qty: 1, if not included with sensor
📋 Before You Begin
- Park your HR-V on level ground and set the parking brake.
- Turn the ignition off and remove the key or keep the key fob away from the vehicle.
- Open the hood and let the engine cool.
- Use the 10mm wrench to disconnect the negative battery cable.
- The MAP sensor is mounted on the intake manifold area, not in the air filter tube like a traditional MAF sensor.
🔨 Step-by-Step Instructions
Follow these steps in order:
Step 1: Open the Hood and Locate the Sensor
- Put on safety glasses and nitrile gloves.
- Use the hood prop rod to secure the hood open.
- Look at the top/rear area of the intake manifold for a small sensor with an electrical connector.
- The MAP sensor is a small plastic sensor held in place by one bolt and sealed by an O-ring.
- Take a photo before removing anything.
Step 2: Disconnect the Negative Battery Cable
- Use the 10mm wrench to loosen the negative battery terminal nut.
- Lift the negative cable off the battery post and move it aside.
- Do not let the cable spring back and touch the battery post.
Step 3: Unplug the MAP Sensor Connector
- Press the connector lock tab with your thumb.
- If the lock tab is stiff, use the small flathead screwdriver gently to help release it.
- Pull the connector straight off by the plastic body.
- Do not pull on the wires.
Step 4: Remove the Sensor Retaining Bolt
- Use the 10mm socket, 1/4-inch drive ratchet, and 3-inch extension to remove the sensor retaining bolt.
- Keep the bolt in a safe place so it does not fall into the engine bay.
- If the bolt feels tight at first, apply steady pressure instead of snapping the ratchet quickly.
Step 5: Remove the Old MAP Sensor
- Hold the sensor body by hand and gently twist it side to side.
- Pull the sensor straight out of the intake manifold.
- A small O-ring may make it feel stuck. The O-ring is the rubber seal around the sensor tip.
- Use a clean shop towel to cover the opening briefly if you need to pause.
- Do not drop dirt, bolts, or tools into the opening.
Step 6: Compare the Old and New Sensors
- Compare the connector shape, mounting hole, sensor tip, and O-ring location.
- Make sure the new MAP sensor has a clean O-ring installed.
- If the O-ring is separate, install it onto the sensor by hand.
- Do not use oil, grease, or sealant unless the new part instructions specifically say to.
Step 7: Install the New MAP Sensor
- Remove the clean shop towel from the intake opening if used.
- Push the new MAP sensor straight into the intake manifold by hand.
- Make sure the sensor sits flat against the mounting surface.
- Start the retaining bolt by hand to avoid cross-threading.
- Use the 10mm socket, 1/4-inch drive ratchet, and 3-inch extension to snug the bolt.
- Use the torque wrench and 10mm socket to tighten the bolt.
- Torque to 12 Nm (9 ft-lbs).
Step 8: Reconnect the Electrical Connector
- Push the connector onto the new MAP sensor until it clicks.
- Lightly tug on the connector body to confirm it is locked in place.
- Check that the wiring is not stretched, pinched, or resting against hot parts.
Step 9: Reconnect the Battery
- Place the negative battery cable back onto the battery post.
- Use the 10mm wrench to tighten the terminal nut.
- Torque to 5 Nm (44 in-lbs).
- Make sure the terminal does not rotate by hand after tightening.
Step 10: Start the Engine
- Start your HR-V and let it idle.
- The idle may fluctuate briefly while the engine computer relearns sensor readings.
- Check that the engine runs smoothly and no warning lights immediately return.
- If you have a scan tool, clear any stored MAP sensor or airflow-related trouble codes.
✅ After Repair
- Let the engine idle for 2-3 minutes.
- Take a short 10-15 minute drive with light acceleration.
- Confirm there is no hesitation, rough idle, stalling, or check engine light.
- If a code returns immediately, recheck the connector and make sure the sensor is fully seated.
- If the battery was disconnected, the clock, radio presets, and auto window function may need to relearn.
- To relearn the driver window auto function, fully lower and fully raise the window using the switch, then hold the switch up for about 2 seconds.
💰 DIY vs Shop Cost
Shop Cost: $180-$350 USD equivalent, parts + labor
DIY Cost: $40-$150 USD equivalent, parts only
You Save: $140-$200 by doing it yourself!
Shop labor rates vary but typically run $100-$150/hour. This repair takes a shop approximately 0.5-1.0 hours.
🎯 Ready to get started?
HowToo makes it easy: same-day/2-day shipping on every part, plus all the tools and specialty tools you need! Check out the parts and tools sections below to add everything to your cart.