

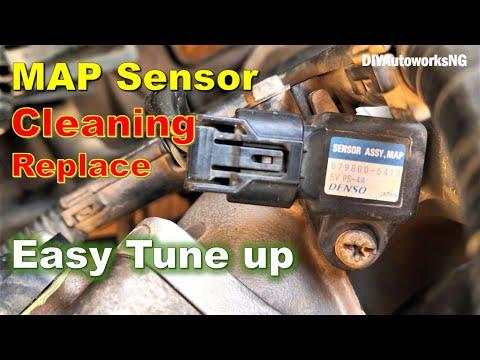







How to Replace the MAP Sensor on a 2010-2019 Honda CR-V 2.4L (Engine: Inline 4 2.4L)
Step-by-step instructions, required tools, safety tips, and torque specs—plus why this engine has no MAF sensor for 2010, 2011, 2012, 2013, 2014, 2015, 2016, 2017, 2018, 2019
How to Replace the MAP Sensor on a 2010-2019 Honda CR-V 2.4L (Engine: Inline 4 2.4L)
Step-by-step instructions, required tools, safety tips, and torque specs—plus why this engine has no MAF sensor for 2010, 2011, 2012, 2013, 2014, 2015, 2016, 2017, 2018, 2019


🔧 CR-V - MAP Sensor Replacement
Your CR-V’s 2.4L engine does not use a mass air flow (MAF) sensor. It calculates airflow with a manifold absolute pressure (MAP) sensor mounted on the intake manifold. The procedure below covers replacing that sensor, which is commonly misidentified as the MAF sensor.
Difficulty Level: Beginner | Estimated Time: 20-30 minutes
Assumption: The intended part is the intake-manifold MAP sensor.
⚠️ Safety & Precautions
- ⚠️ Let the engine cool completely before working near the intake manifold.
- 🔑 Keep the ignition switched off and the key away from the vehicle.
- 🔋 Disconnect the negative battery terminal before unplugging the sensor.
- 🧼 Do not allow dirt, cleaner, or tools to enter the sensor opening.
- 🚫 Do not spray cleaner into the replacement MAP sensor.
🔧 Required Tools
You'll need the following tools for this repair:
- 10mm socket
- 1/4-inch-drive ratchet
- 1/4-inch-drive torque wrench rated 2-20 Nm
- 3-inch 1/4-inch-drive extension
- Plastic trim tool
- Clean microfiber cloth
- Nitrile gloves
- Safety glasses
🔩 Required Parts
HowToo sells all the parts you need for this repair:
- Manifold absolute pressure sensor - Qty: 1
- MAP sensor O-ring - Qty: 1
📋 Before You Begin
- 🅿️ Park your CR-V on level ground, select Park, and engage the parking brake.
- 🌡️ Open the hood and wait until the engine is cool.
- 📱 No infotainment service mode or scan-tool command is required.
- 🔍 Verify that the replacement sensor matches the original connector and mounting shape before removal.
- 🧽 Wipe loose dirt away from the sensor area with a clean microfiber cloth.
🔨 Step-by-Step Instructions
Follow these steps in order:
Step 1: Disconnect the Battery
- Use a 10mm socket and 1/4-inch-drive ratchet to loosen the negative battery-terminal nut.
- Lift the negative cable from the battery post and position it where it cannot spring back.
- Disconnect only the negative terminal.
Step 2: Locate the MAP Sensor
- Stand at the front of your CR-V and locate the intake manifold behind the throttle-body area.
- Identify the small electrical sensor inserted directly into the intake manifold and retained by one bolt.
- Do not confuse it with a sensor or connector attached to the air-cleaner housing or intake tube.
Step 3: Disconnect the Electrical Connector
- Press the connector’s locking tab with your finger and pull the connector straight away from the sensor.
- If the tab is difficult to press, gently depress it with a plastic trim tool.
- Do not pull on the wires or use a metal screwdriver on the connector.
Step 4: Remove the Original Sensor
- Use a 10mm socket, 3-inch extension, and 1/4-inch-drive ratchet to remove the sensor retaining bolt.
- Grip the sensor body and gently twist it while pulling straight outward.
- The O-ring is the small rubber seal around the sensor tip. Make sure it comes out with the sensor.
- Cover the opening temporarily with a clean microfiber cloth.
Step 5: Inspect the Sensor Opening
- Use a clean microfiber cloth to wipe only the outside edge of the opening.
- Do not push the cloth, dirt, or any tool into the intake manifold.
- Check that the old O-ring is not stuck inside the opening.
Step 6: Install the Replacement Sensor
- Confirm the new O-ring is seated flat on the replacement MAP sensor.
- Align the sensor with the opening and press it straight in by hand until fully seated.
- Start the retaining bolt by hand to prevent cross-threading.
- Use a 10mm socket, 3-inch extension, and 1/4-inch-drive torque wrench to tighten the bolt to 4.4 Nm (39 in-lbs).
- The small bolt is easy to overtighten.
Step 7: Reconnect the Sensor and Battery
- Push the electrical connector onto the sensor until the lock clicks.
- Gently tug the connector body to confirm it is secure.
- Place the negative battery cable onto the battery post.
- Use a 10mm socket and 1/4-inch-drive torque wrench to tighten the terminal nut to 5.4 Nm (48 in-lbs).
✅ After Repair
- ✅ Start the engine and let it idle for several minutes without pressing the accelerator.
- 👂 Confirm the engine idles smoothly and that no hissing sound is present near the sensor.
- 🚨 Check that the malfunction indicator lamp does not return after the engine is restarted.
- 🛣️ Take a gentle 10-minute test drive, then recheck the connector and sensor area.
- 🧠 The idle may briefly fluctuate while the engine computer relearns after battery disconnection.
- 🔎 If an airflow-related fault remains, diagnose the stored trouble code before replacing the intake-air-temperature sensor or other parts.
💰 DIY vs Shop Cost
Shop Cost: ₹9,000-₹18,000 (parts + labor)
DIY Cost: ₹5,000-₹12,000 (parts only)
You Save: ₹4,000-₹6,000 by doing it yourself!
Local labor and imported U.S.-spec parts pricing can vary. This repair takes a shop approximately 0.3-0.5 hours.
🎯 Ready to get started?
HowToo makes it easy: same-day/2-day shipping on every part, plus all the tools and specialty tools you need! Check out the parts and tools sections below to add everything to your cart.