

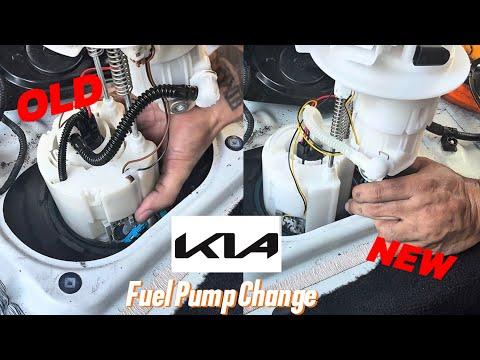






How to Replace the In-Tank Fuel Pump on a 2016-2020 Kia Optima (Engine: Inline 4 2.4L)
Step-by-step DIY instructions with required tools, parts, safety tips, and leak checks for 2016, 2017, 2018, 2019, 2020
How to Replace the In-Tank Fuel Pump on a 2016-2020 Kia Optima (Engine: Inline 4 2.4L)
Step-by-step DIY instructions with required tools, parts, safety tips, and leak checks for 2016, 2017, 2018, 2019, 2020


Assumption: This procedure covers the in-tank low-pressure fuel pump module, not the engine-mounted high-pressure pump.
🔧 Optima - In-Tank Fuel Pump Replacement
The fuel pump module is inside the fuel tank and is reached through an access opening beneath the rear seat cushion. You will relieve fuel pressure, remove the module, transfer any reusable parts required by the replacement module, and check carefully for leaks.
Difficulty Level: Intermediate | Estimated Time: 2-3 hours
⚠️ Safety & Precautions
- 🔥 Work outdoors or in a very well-ventilated area. Gasoline vapor is highly flammable.
- 🚭 Keep cigarettes, flames, heaters, sparks, and incandescent work lights away from the vehicle.
- 🧯 Keep a Class B fire extinguisher within reach.
- 🔋 Disconnect the negative battery terminal after relieving fuel pressure.
- 👓 Wear safety glasses and fuel-resistant nitrile gloves.
- ⚡ Do not use an electric vacuum around spilled gasoline or an open fuel tank.
- ⛽ Perform the repair with the tank below one-quarter full to reduce spills.
- 🧼 Clean around the module before opening the tank. Dirt inside the tank can damage the new pump.
- 🚗 Do not drive your Optima if fuel odor or leakage remains after installation.
🔧 Required Tools
You'll need the following tools for this repair:
- 10mm socket
- 12mm socket
- 3/8-inch-drive ratchet
- 3/8-inch-drive torque wrench rated 5-80 Nm
- 150mm socket extension
- Phillips No. 2 screwdriver
- Nylon trim-removal tool set
- Fuel-line disconnect pliers (specialty)
- Adjustable fuel-pump lock-ring tool (specialty)
- Non-sparking brass drift (specialty)
- 16-ounce rubber mallet
- Compressed-air blow gun rated 30 psi maximum
- Digital multimeter rated CAT III
- Fuel-pressure gauge kit rated 100 psi (specialty)
- 5-liter gasoline-approved drain container
- Class B fire extinguisher
- Fuel-resistant nitrile gloves
- ANSI Z87.1 safety glasses
- Absorbent shop towels
🔩 Required Parts
HowToo sells all the parts you need for this repair:
- Complete in-tank fuel pump module - Qty: 1
- Fuel pump module sealing O-ring - Qty: 1
- Fuel pump module locking ring - Qty: 1 if damaged or corroded
- Fuel-line retaining clip - Qty: 1 if damaged
- Fuel pump access-cover butyl sealer - Qty: 1 roll if original sealer will not reseal
📋 Before You Begin
- 🅿️ Park your Optima outdoors on firm, level ground. Select Park and apply the parking brake.
- ⛽ Reduce the fuel level below one-quarter tank before beginning.
- 🪟 Open the doors for ventilation and switch off all electrical accessories.
- 🧯 Place the Class B fire extinguisher nearby before opening the fuel system.
- 📱 Record radio presets if desired. No battery registration or coding is required afterward.
- 🧰 A fuel-pump lock-ring tool grips the large retaining ring without producing damaging steel-on-steel sparks.
🔨 Step-by-Step Instructions
Follow these steps in order:
Step 1: Relieve Fuel-System Pressure
- Use the nylon trim-removal tool to remove the engine-compartment fuse-box cover.
- Use the fuse-box cover diagram to identify and remove the fuse or relay marked FUEL PUMP or F/PUMP. Use fuel-line disconnect pliers only if the relay is difficult to grip.
- Start the engine and let it run until it stalls. Crank it for approximately three additional seconds, then switch the ignition off.
- Use the digital multimeter only if needed to verify the removed fuse terminals are not powered with the ignition off.
- Keep the removed fuse in a safe place.
Step 2: Disconnect the Battery
- Open the hood and use a 10mm socket, 150mm extension, and 3/8-inch-drive ratchet to loosen the negative battery-terminal clamp.
- Remove the negative cable and position it where it cannot spring back onto the battery post.
- Wait at least one minute before disconnecting the fuel-pump electrical connector.
Step 3: Remove the Rear Seat Cushion
- Move both front seats forward for working room.
- Check the lower front edge of the rear cushion for retaining bolts. If fitted, use a 12mm socket, 150mm extension, and 3/8-inch-drive ratchet to remove them.
- Use both hands to lift sharply at each front attachment point and release the cushion clips.
- Guide the seat-belt buckles through the openings and remove the cushion through a rear door.
- Do not pry against seat-belt wiring.
Step 4: Open the Fuel-Pump Access Cover
- Locate the round access cover beneath the rear cushion.
- Use the Phillips No. 2 screwdriver to remove its screws if fitted. If the cover is sealed, use a nylon trim-removal tool to lift it without bending the metal.
- Use the compressed-air blow gun at no more than 30 psi to remove loose dirt around the pump module.
- Use absorbent shop towels to clean the remaining dirt. Do not blow debris into an open fuel tank.
Step 5: Disconnect the Pump Wiring and Fuel Line
- Press the locking tab by hand and unplug the fuel-pump electrical connector. Use the digital multimeter to confirm zero voltage at the harness before continuing.
- Place absorbent shop towels around the fuel connection.
- Push the fuel-line connector slightly toward the module, squeeze its release tabs with fuel-line disconnect pliers, and pull the connector straight off.
- Capture the small amount of fuel in the 5-liter gasoline-approved drain container.
- Inspect the connector and retaining clip. Replace the clip if cracked, distorted, or missing.
Step 6: Mark and Remove the Locking Ring
- Use a Phillips No. 2 screwdriver only as a marking reference and note the orientation of the pump module and locking ring before removal. Do not scratch sealing surfaces.
- Fit the adjustable fuel-pump lock-ring tool securely to the locking ring. Use the 3/8-inch-drive ratchet to turn the ring counterclockwise.
- If the specialty tool cannot seat correctly, use the non-sparking brass drift and 16-ounce rubber mallet to tap the ring counterclockwise evenly around its circumference.
- Do not use a steel punch or screwdriver on the locking ring because it can create sparks and damage the ring.
- Lift away the locking ring and inspect it for rust, cracks, or bent locking tabs.
Step 7: Remove the Fuel Pump Module
- Lift the module slowly by hand while keeping absorbent shop towels around the opening.
- Tilt the module carefully to clear the fuel-level float arm without bending it.
- Drain fuel from the module into the 5-liter gasoline-approved drain container.
- Remove the old sealing O-ring by hand. Do not let dirt or pieces of the seal enter the tank.
- Use a clean shop towel to cover the tank opening temporarily.
Step 8: Prepare the Replacement Module
- Compare the replacement module with the removed module. Verify that the electrical socket, fuel connection, reservoir, and float-arm shape match.
- If the replacement is not a complete module, stop and use the module-specific assembly instructions supplied with the pump. Internal hose and wiring placement are safety-critical.
- Use clean gasoline from the approved container to lightly wet the new sealing O-ring. Do not use petroleum grease or silicone sealant.
- Place the new O-ring flat in the tank opening groove. Make sure it is not twisted.
Step 9: Install the New Fuel Pump Module
- Use both hands to lower the module into the tank while guiding the float arm through the opening.
- Align the module’s orientation marks with the marks on the fuel tank.
- Hold the module down evenly so the spring-loaded reservoir does not displace or pinch the O-ring.
- Install the locking ring by hand, then use the adjustable fuel-pump lock-ring tool and 3/8-inch-drive ratchet to rotate it clockwise until its factory alignment marks or locking stops are fully aligned.
- This locking ring uses alignment stops rather than a conventional bolt torque. Do not continue forcing it after all retaining tabs are fully seated.
- If using the alternate method, use the non-sparking brass drift and 16-ounce rubber mallet to seat the ring evenly.
Step 10: Reconnect the Fuel Line and Wiring
- Push the fuel-line connector onto the module by hand until it clicks.
- Pull back gently on the connector to verify it is locked.
- Push the electrical connector into place by hand until its lock clicks.
- Keep the access cover off until the leak inspection is complete.
Step 11: Prime the Fuel System and Check for Leaks
- Use fuel-line disconnect pliers to reinstall the fuel-pump relay, or install the removed fuse by hand. Refit the fuse-box cover with the nylon trim-removal tool.
- Use a 10mm socket and 3/8-inch-drive torque wrench to reconnect the negative battery terminal. Torque to 5 Nm (44 in-lbs).
- Switch the ignition to ON without starting the engine for five seconds, then switch it OFF for ten seconds. Repeat this cycle three times.
- Use a flashlight only if it is sealed and battery-powered; visually inspect the module connection and seal for wetness. Do not use an incandescent work light.
- If any fuel appears or a strong odor develops, switch the ignition off immediately and disconnect the negative battery cable with the 10mm socket.
Step 12: Verify Fuel Pressure and Engine Operation
- Start the engine and allow it to idle while inspecting the module area again for leakage.
- If diagnosing a pressure problem, connect the 100 psi fuel-pressure gauge kit according to its Kia-compatible adapter instructions. Do not open a pressurized connection.
- Confirm steady engine operation and verify that the fuel gauge responds normally.
- Switch the engine off before closing the access opening.
Step 13: Reinstall the Access Cover and Rear Seat
- Reinstall the access cover. Use the Phillips No. 2 screwdriver for cover screws, or press the cover into fresh fuel pump access-cover butyl sealer by hand.
- Route the seat-belt buckles through their cushion openings.
- Set the rear cushion into position and press down firmly over each retaining clip.
- If retaining bolts were removed, start them by hand. Use a 12mm socket and 3/8-inch-drive torque wrench to tighten them to their original secured position; consult current Kia service information for the exact fastener torque because rear-cushion hardware varies by production configuration.
- Pull upward gently at both front corners to verify the cushion is secure.
✅ After Repair
- 🔍 Check beneath and inside your Optima for fuel leakage before driving.
- 👃 Stop the engine immediately if you notice raw-fuel odor.
- ⛽ Confirm that the fuel gauge moves normally after adding fuel.
- 🚗 Take a short drive, then recheck the access-cover area for leakage.
- ⚠️ If the engine still cranks without starting, diagnose pump power, ground, pressure, and control circuits instead of repeatedly cranking.
- ♻️ Take spilled fuel, contaminated towels, and the old module to an authorized hazardous-waste or automotive recycling facility.
💰 DIY vs Shop Cost
Shop Cost: ₹24,000-₹48,000 (parts + labor)
DIY Cost: ₹10,000-₹27,000 (parts only)
You Save: ₹14,000-₹21,000 by doing it yourself!
Labor rates around Sonīpat vary by workshop. This repair takes a shop approximately 1.5-2.5 hours, with imported-part availability strongly affecting the total.
🎯 Ready to get started?
HowToo makes it easy: same-day/2-day shipping on every part, plus all the tools and specialty tools you need! Check out the parts and tools sections below to add everything to your cart.