

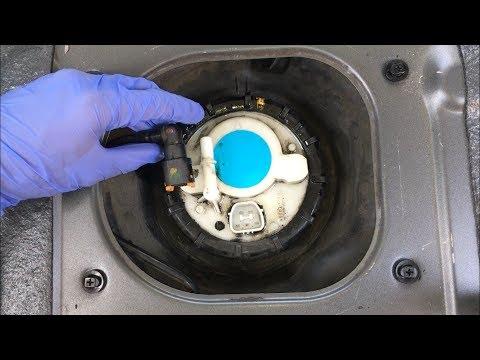






How to Replace the Fuel Pump on a 2018-2024 Honda Odyssey (Engine: V6 3.5L)
Step-by-step in-tank fuel pump module guide with tools, parts, torque specs, and safety tips for 2018, 2019, 2020, 2021, 2022, 2023, 2024
How to Replace the Fuel Pump on a 2018-2024 Honda Odyssey (Engine: V6 3.5L)
Step-by-step in-tank fuel pump module guide with tools, parts, torque specs, and safety tips for 2018, 2019, 2020, 2021, 2022, 2023, 2024


🔧 Odyssey - Fuel Pump Module Replacement
This repair replaces the in-tank fuel pump module, which supplies fuel from the tank to the engine. On your Odyssey, the pump is serviced from inside the cabin through an access cover, so the fuel tank usually does not need to be removed.
Difficulty Level: Intermediate | Estimated Time: 2-4 hours
⚠️ Safety & Precautions
- 🔥 Gasoline vapors are extremely flammable. Work outside or in a very well-ventilated area.
- 🚫 Do not smoke, use a lighter, grind metal, or create sparks near the vehicle.
- 🧯 Keep a class B fire extinguisher nearby.
- 🔋 Disconnect the negative battery cable before opening the fuel tank.
- ⛽ Relieve fuel pressure before disconnecting any fuel line.
- 🧤 Wear safety glasses and fuel-resistant gloves.
- ⚠️ Do not use a steel punch or chisel on the fuel pump lock ring. Use the correct fuel pump lock ring tool to avoid sparks and damage.
- 📉 It is safest to do this repair with the fuel tank below 1/4 full.
🔧 Required Tools
You'll need the following tools for this repair:
- 10mm socket
- 12mm socket
- 3/8-inch ratchet
- 3/8-inch extension set
- Torque wrench rated 5-100 Nm
- Fuel line disconnect tool set (specialty)
- Fuel pump lock ring tool (specialty)
- Trim removal tool set
- Flat-blade screwdriver
- Needle-nose pliers
- Shop towels
- Plastic drain pan
- Permanent marker
- Safety glasses
- Fuel-resistant gloves
- Class B fire extinguisher
🔩 Required Parts
HowToo sells all the parts you need for this repair:
- Fuel pump module assembly - Qty: 1
- Fuel pump tank seal gasket - Qty: 1
- Fuel pump lock ring - Qty: 1
- Fuel line retainer clips - Qty: 1 set
- Electrical contact cleaner - Qty: 1 can
📋 Before You Begin
- Park your Odyssey on level ground, shift to Park, and apply the parking brake.
- Open all doors or windows for ventilation.
- Make sure the fuel level is below 1/4 tank if possible.
- A fuel pump module is the complete unit inside the tank that includes the pump, fuel level sender, filter sock, and housing.
- A lock ring is the large retaining ring that clamps the fuel pump module to the fuel tank.
- A fuel line disconnect tool releases the plastic quick-connect fuel line without breaking the fitting.
- Relieve fuel pressure before disconnecting the fuel line.
🔨 Step-by-Step Instructions
Follow these steps in order:
Step 1: Relieve Fuel Pressure
- Use your hand to remove the fuel filler cap. This releases tank vapor pressure.
- Use a trim removal tool to open the under-dash fuse panel cover.
- Use needle-nose pliers to remove the fuel pump fuse or relay from the interior fuse/relay panel.
- Start the engine and let it run until it stalls.
- Use the ignition button to crank the engine for 2-3 seconds one more time.
- Turn the ignition OFF.
- Stalling means pressure is relieved.
Step 2: Disconnect the Battery
- Use a 10mm socket to loosen the negative battery terminal nut.
- Lift the negative cable off the battery post and move it aside so it cannot touch the post.
- Wait at least 3 minutes before working around interior panels.
- When reinstalling later, tighten the battery terminal to Torque to 5 Nm (44 in-lbs).
Step 3: Remove Interior Access Trim
- Use a trim removal tool set to lift the rear floor trim and carpet area over the fuel pump service cover.
- If a second-row seat or floor trim blocks access, use a 14mm socket if equipped to remove the seat mounting bolts.
- Mark each seat bolt location with a permanent marker before removal.
- Set removed trim panels aside in order.
- For second-row seat bolts, reinstall later to Torque to 49 Nm (36 ft-lbs).
Step 4: Remove the Fuel Pump Access Cover
- Use a trim removal tool or flat-blade screwdriver to carefully lift the service cover.
- If the cover uses screws, use a Phillips screwdriver or 10mm socket as fitted.
- Use shop towels to clean dirt from the top of the pump area before opening the tank.
- Dirt must not fall into the tank.
Step 5: Disconnect the Fuel Pump Electrical Connector
- Use your fingers to press the locking tab on the fuel pump electrical connector.
- Pull the connector straight off the pump module.
- Use electrical contact cleaner if the connector area is dirty.
- Do not pull on the wires.
Step 6: Disconnect the Fuel Line
- Place shop towels around the fuel line connection.
- Put a plastic drain pan nearby to catch any spilled fuel.
- Use the fuel line disconnect tool set to release the quick-connect fitting.
- Pull the fuel line straight off the pump module.
- Cover the open fuel line with a clean shop towel.
- Inspect the fuel line retainer clip. Replace it if cracked, loose, or distorted.
Step 7: Mark the Pump Position
- Use a permanent marker to draw an alignment mark from the fuel pump module to the fuel tank.
- This helps you install the new module in the same direction.
- Also mark the lock ring position before loosening it.
Step 8: Remove the Fuel Pump Lock Ring
- Install the fuel pump lock ring tool onto the lock ring.
- Use a 3/8-inch ratchet and extension to turn the lock ring counterclockwise.
- Remove the lock ring and set it aside.
- Do not use a metal hammer and punch.
- Use the proper tool only.
Step 9: Remove the Fuel Pump Module
- Lift the fuel pump module straight up slowly by hand.
- Tilt the module slightly as needed to clear the fuel level float arm.
- Keep the old module over the tank opening until fuel drains back into the tank.
- Place the old module into the plastic drain pan.
- Remove the old tank seal gasket by hand.
Step 10: Install the New Tank Seal
- Use shop towels to wipe the sealing surface on the fuel tank.
- Install the new fuel pump tank seal gasket into the tank opening groove.
- Make sure the gasket sits flat all the way around.
- Do not reuse the old gasket.
Step 11: Install the New Fuel Pump Module
- Lower the new fuel pump module into the tank by hand.
- Guide the fuel level float arm carefully so it does not bend.
- Align the new module with the mark you made earlier.
- Make sure the module sits flat on the new seal.
- Do not force the float arm.
Step 12: Tighten the Lock Ring
- Install the new fuel pump lock ring by hand first.
- Use the fuel pump lock ring tool with the torque wrench to tighten it clockwise.
- Tighten the lock ring to Torque to 93 Nm (69 ft-lbs).
- Confirm the lock ring is fully seated and evenly clamping the pump module.
Step 13: Reconnect the Fuel Line and Connector
- Push the fuel line quick-connect fitting straight onto the pump outlet by hand.
- Listen and feel for a click.
- Pull back lightly by hand to confirm it is locked.
- Plug in the electrical connector until the lock tab clicks.
Step 14: Reconnect the Battery and Prime the System
- Use a 10mm socket to reconnect the negative battery cable.
- Tighten the terminal to Torque to 5 Nm (44 in-lbs).
- Reinstall the fuel pump fuse or relay using needle-nose pliers.
- Press the ignition button to ON without starting the engine for 2 seconds.
- Turn it OFF for 10 seconds.
- Repeat this ON/OFF cycle 3 times to prime the fuel system.
Step 15: Check for Leaks Before Reassembly
- Use safety glasses and inspect the pump top area with a flashlight.
- Look closely around the fuel line and lock ring.
- If you smell strong fuel or see wet fuel, turn ignition OFF immediately.
- Fix the leak before reinstalling the access cover.
Step 16: Reinstall the Access Cover and Interior Trim
- Use a trim removal tool to position the access cover and carpet correctly.
- If screws were removed, use the correct screwdriver or 10mm socket to reinstall them snugly.
- Reinstall any removed seat bolts using the 14mm socket.
- Tighten second-row seat bolts to Torque to 49 Nm (36 ft-lbs).
- Snap all trim panels back into place by hand.
✅ After Repair
- Start your Odyssey and let it idle for 2-3 minutes.
- Check again for fuel smell or visible leaks near the service cover area.
- Drive gently for 5-10 minutes, then recheck for fuel odor.
- If the engine cranks but does not start, cycle the ignition ON/OFF 3 more times to prime the system again.
- If the fuel gauge reads incorrectly, recheck that the float arm was not bent or stuck during installation.
- If warning lights appear after the battery disconnect, drive normally for a short trip so systems can relearn.
💰 DIY vs Shop Cost
Shop Cost: $750-$1,250 (parts + labor)
DIY Cost: $250-$550 (parts only)
You Save: $500-$700 by doing it yourself!
Shop labor rates vary but typically run $100-$150/hour. This repair takes a shop approximately 2-3 hours.
🎯 Ready to get started?
HowToo makes it easy: same-day/2-day shipping on every part, plus all the tools and specialty tools you need! Check out the parts and tools sections below to add everything to your cart.