

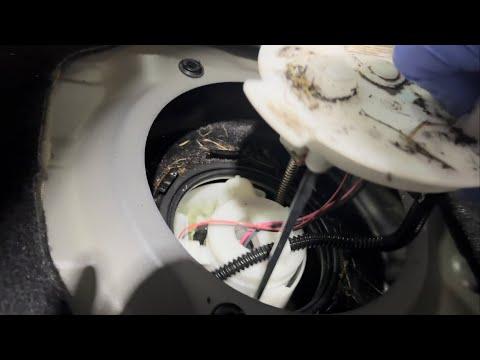





How to Replace the Fuel Pump on a 2017-2025 Honda CR-V (Engine: Inline 4 1.5L)
Step-by-step fuel tank removal guide with tools, parts, torque specs, and safety tips for 2017, 2018, 2019, 2020, 2021, 2022, 2023, 2024, 2025
How to Replace the Fuel Pump on a 2017-2025 Honda CR-V (Engine: Inline 4 1.5L)
Step-by-step fuel tank removal guide with tools, parts, torque specs, and safety tips for 2017, 2018, 2019, 2020, 2021, 2022, 2023, 2024, 2025


🔧 CR-V - Fuel Pump Module Replacement
Replacing the fuel pump module on your CR-V requires removing the fuel tank because the pump is serviced from the top of the tank, not through an interior access panel. This is a fuel-system repair, so work slowly, keep sparks and flames away, and relieve fuel pressure before opening any fuel lines.
Difficulty Level: Advanced | Estimated Time: 3-5 hours
⚠️ Safety & Precautions
- ⚠️ Gasoline is extremely flammable. Work outdoors or in a very well-ventilated area.
- ⚠️ Keep cigarettes, heaters, shop lights with hot bulbs, grinders, and sparks away from the vehicle.
- ⚠️ Wear safety glasses and nitrile gloves any time fuel lines are open.
- ⚠️ Disconnect the negative battery cable before opening the fuel system.
- ⚠️ Support the fuel tank with a transmission jack or floor jack and wood block before removing tank straps.
- ⚠️ A nearly empty tank is much safer and easier to lower than a full tank.
- ⚠️ Do not use impact tools near open fuel vapors.
- ⚠️ Replace the fuel pump seal. Reusing the old seal can cause fuel odor or leaks.
🔧 Required Tools
You'll need the following tools for this repair:
- 10mm socket
- 12mm socket
- 14mm socket
- 3/8-inch drive ratchet
- 3/8-inch drive extension set
- Torque wrench 5-80 ft-lbs
- Fuel line disconnect tool set (specialty)
- Fuel pump lock ring tool (specialty)
- Trim clip removal tool
- Flat-blade screwdriver
- Needle-nose pliers
- Fuel-safe drain pan
- Shop towels
- Permanent marker
- Floor jack (rated 2-ton minimum)
- Jack stands (rated 2-ton minimum)
- Transmission jack (specialty)
- Wood block 12-inch
- Wheel chocks
- Nitrile gloves
- Safety glasses
- Class B fire extinguisher
🔩 Required Parts
HowToo sells all the parts you need for this repair:
- Fuel pump module assembly - Qty: 1
- Fuel pump tank seal - Qty: 1
- Fuel line retaining clips - Qty: 1 set
- Fuel tank strap bolts - Qty: 2
- Fuel-safe absorbent pads - Qty: 1 pack
📋 Before You Begin
- 🅿️ Park your CR-V on level ground, set the parking brake, and chock the front wheels with wheel chocks.
- ⛽ Run the fuel level as low as possible before starting. Less fuel means less weight and less spill risk.
- 🧯 Keep a Class B fire extinguisher nearby. Class B means it is rated for flammable liquids like gasoline.
- 🔋 Use a 10mm socket to disconnect the negative battery cable and move it away from the battery post.
- 📉 Relieve fuel pressure before disconnecting any fuel line.
- 📌 Assumption: this procedure covers the in-tank fuel pump module on your CR-V FWD.
🔨 Step-by-Step Instructions
Follow these steps in order:
Step 1: Relieve Fuel Pressure
- Use a trim clip removal tool to remove the driver-side lower dash fuse box cover.
- Use your fingers or needle-nose pliers to remove the fuel pump fuse from the under-dash fuse box.
- Start the engine and let it run until it stalls.
- Crank the engine for 3-5 seconds more to release remaining pressure.
- Turn the ignition OFF.
- Use a 10mm socket to disconnect the negative battery cable if not already disconnected.
- Some fuel may still spray.
Step 2: Raise and Support the Vehicle
- Use a floor jack (rated 2-ton minimum) at the approved rear jacking point to raise the rear of your CR-V.
- Place jack stands (rated 2-ton minimum) under the approved rear support points.
- Gently lower the vehicle onto the jack stands.
- Shake the vehicle lightly by hand to confirm it is stable.
- Keep the floor jack nearby for supporting the fuel tank.
Step 3: Remove Rear Underbody Shields
- Use a 10mm socket and trim clip removal tool to remove the rear underbody shield fasteners.
- Set the shields and fasteners aside in order.
- Use safety glasses because dirt may fall from the underbody.
Step 4: Disconnect Fuel Filler Neck and Vent Hoses
- Use a flat-blade screwdriver or needle-nose pliers to loosen the filler neck hose clamp at the fuel tank.
- Twist the filler hose gently by hand to break it loose, then slide it off the tank neck.
- Use needle-nose pliers to release the vent hose clamps.
- Mark each hose with a permanent marker before removal so it returns to the same location.
- Place a fuel-safe drain pan below the hose area to catch drips.
Step 5: Disconnect Fuel Lines and Electrical Connectors
- Use shop towels around the fuel line connection to catch leftover fuel.
- Use a fuel line disconnect tool set (specialty) to release the quick-connect fuel line. A quick-connect fitting is a spring-lock fuel fitting that releases when its tabs or collar are pressed correctly.
- Unplug the fuel pump electrical connector by pressing the lock tab with your finger.
- Inspect the fuel line retaining clip. Replace it if it is cracked, loose, or damaged.
- Keep open fuel lines pointed upward to reduce dripping.
Step 6: Support the Fuel Tank
- Place a wood block 12-inch on the pad of the transmission jack (specialty).
- Raise the jack until the wood block lightly contacts the bottom of the fuel tank.
- A transmission jack is a wide, stable jack made to support large parts like tanks and transmissions.
- Do not crush the plastic tank. Support it gently.
Step 7: Remove Fuel Tank Straps
- Use a 14mm socket, 3/8-inch drive ratchet, and 3/8-inch drive extension set to remove the fuel tank strap bolts.
- Hold each strap with one hand as the bolt comes out.
- Lower the straps away from the tank.
- If the bolts are rusty or stretched, replace them with new fuel tank strap bolts.
Step 8: Lower the Fuel Tank Slightly
- Use the transmission jack (specialty) to lower the tank slowly, only a few inches at first.
- Stop and check for any remaining hoses, wiring, or clips.
- Use a trim clip removal tool to release any harness clips still attached to the tank.
- Continue lowering the tank enough to access the fuel pump module on top.
- Lower slowly and look often.
Step 9: Clean Around the Fuel Pump Module
- Use shop towels to wipe dirt and debris from the top of the fuel tank around the pump module.
- Do not allow dirt to fall into the tank opening.
- Use a permanent marker to mark the pump module position on the tank before removal.
Step 10: Remove the Fuel Pump Lock Ring
- Use a fuel pump lock ring tool (specialty) with a 3/8-inch drive ratchet to rotate the lock ring counterclockwise.
- The lock ring is the large metal ring that clamps the fuel pump module to the tank.
- Lift the lock ring off and set it aside.
- Do not use a steel punch and hammer near fuel vapors.
Step 11: Remove the Fuel Pump Module
- Use both gloved hands to lift the fuel pump module straight up from the tank.
- Tilt it carefully to avoid bending the fuel level float arm. The float arm measures fuel level for the gauge.
- Let fuel drain from the module into the tank opening for a few seconds.
- Place the old module into a fuel-safe drain pan.
- Remove and discard the old fuel pump tank seal.
Step 12: Install the New Fuel Pump Seal
- Use shop towels to clean the seal groove on the tank.
- Install the new fuel pump tank seal into the groove by hand.
- Make sure the seal sits flat and is not twisted.
- Do not use grease unless the part instructions specifically allow it.
Step 13: Install the New Fuel Pump Module
- Use both gloved hands to lower the new fuel pump module assembly into the tank.
- Guide the float arm in carefully so it does not bend.
- Align the pump module with the mark you made using the permanent marker.
- Press the top of the module down evenly against the new seal.
Step 14: Install the Fuel Pump Lock Ring
- Install the lock ring by hand first to avoid cross-threading or uneven seating.
- Use the fuel pump lock ring tool (specialty) and 3/8-inch drive ratchet to rotate the lock ring clockwise until fully seated against its stops.
- If your replacement module includes a specific lock ring torque or alignment instruction, follow that instruction exactly.
- Confirm the pump module does not rock or lift.
Step 15: Raise the Fuel Tank Back Into Position
- Use the transmission jack (specialty) to raise the tank slowly.
- Stop halfway and reconnect any hoses, clips, and electrical connectors that are easier to reach before the tank is fully seated.
- Use your hands to route wiring away from the tank straps and body edges.
Step 16: Reinstall Fuel Tank Straps
- Position the fuel tank straps by hand.
- Use a 14mm socket, 3/8-inch drive ratchet, and new strap bolts if replacing them.
- Tighten the tank strap bolts evenly.
- Torque to 39 Nm (29 ft-lbs).
Step 17: Reconnect Fuel Lines, Filler Hose, and Vent Hoses
- Push the quick-connect fuel line onto the pump fitting by hand until it clicks.
- Gently pull back on the line by hand to confirm it is locked.
- Use needle-nose pliers or a flat-blade screwdriver to reinstall filler neck and vent hose clamps.
- Use the marks made with the permanent marker to put each hose back in its original location.
- Plug in the fuel pump electrical connector until the lock tab clicks.
Step 18: Reinstall Underbody Shields
- Use a 10mm socket and trim clip removal tool to reinstall the rear underbody shields.
- Make sure no shield touches the fuel tank, filler hose, or fuel lines.
Step 19: Reconnect Battery and Prime the Fuel System
- Reinstall the fuel pump fuse by hand or with needle-nose pliers.
- Use a 10mm socket to reconnect the negative battery cable.
- Torque to 5 Nm (44 in-lbs).
- Turn the ignition ON for 2 seconds, then OFF for 10 seconds.
- Repeat this ON/OFF cycle 3 times to prime the fuel system.
- Priming means the pump fills the fuel lines with pressure before starting.
Step 20: Check for Leaks and Start the Engine
- Before starting, use safety glasses and visually check every fuel connection for wetness or fuel smell.
- If dry, start the engine and let it idle.
- Use a flashlight only if it is fuel-safe; otherwise inspect in good daylight.
- Check again around the fuel line, pump area, filler hose, and vent hoses.
- If you smell fuel or see wetness, shut the engine OFF immediately and fix the leak before driving.
Step 21: Lower the Vehicle
- Use the floor jack (rated 2-ton minimum) to raise the rear slightly off the jack stands.
- Remove the jack stands (rated 2-ton minimum).
- Lower your CR-V slowly to the ground.
- Remove the wheel chocks.
✅ After Repair
- ✅ Let the engine idle for 5 minutes and check for fuel smell.
- ✅ Take a short test drive close to home, then recheck for leaks.
- ✅ Confirm the fuel gauge reads normally.
- ✅ If the check engine light comes on, scan for codes before driving farther.
- ✅ Dispose of fuel-soaked towels and old fuel parts according to local hazardous-waste rules.
💰 DIY vs Shop Cost
Shop Cost: $850-$1,500 (parts + labor)
DIY Cost: $250-$650 (parts only)
You Save: $600-$850 by doing it yourself!
Shop labor rates vary but typically run $100-$150/hour. This repair takes a shop approximately 3-4 hours.
🎯 Ready to get started?
HowToo makes it easy: same-day/2-day shipping on every part, plus all the tools and specialty tools you need! Check out the parts and tools sections below to add everything to your cart.