

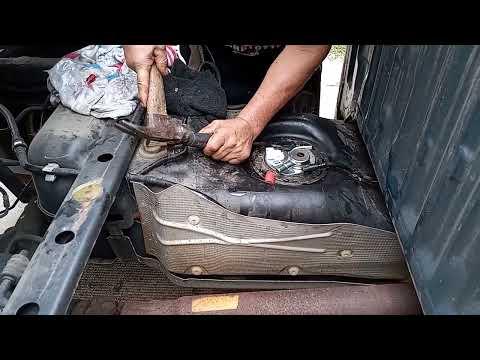





How to Replace the Fuel Pump on a 2015-2020 Chevrolet Colorado (Engine: Inline 4 2.5L)
Step-by-step in-tank fuel pump module guide with tools, parts, torque specs, and safety tips for 2015, 2016, 2017, 2018, 2019, 2020
How to Replace the Fuel Pump on a 2015-2020 Chevrolet Colorado (Engine: Inline 4 2.5L)
Step-by-step in-tank fuel pump module guide with tools, parts, torque specs, and safety tips for 2015, 2016, 2017, 2018, 2019, 2020


🔧 Colorado - Fuel Pump Module Replacement
On your Colorado, the electric fuel pump is part of the in-tank fuel pump module. Replacing it requires safely lowering the fuel tank, disconnecting the fuel lines and wiring, then swapping the pump module and seal.
Difficulty Level: Advanced | Estimated Time: 3-5 hours
⚠️ Safety & Precautions
- 🔥 Gasoline vapors are highly flammable. Work outside or in a very well-ventilated area away from flames, heaters, cigarettes, and sparks.
- 🧯 Keep a Class B/C fire extinguisher nearby before opening the fuel system.
- 👀 Wear safety glasses and fuel-resistant gloves. Fuel can splash when lines are disconnected.
- 🔋 Disconnect the negative battery cable before working near the fuel tank wiring.
- ⛽ Run the fuel tank as close to empty as possible. A full tank is heavy and unsafe to lower.
- 🚫 Do not use power tools on the fuel pump lock ring. Sparks near fuel vapors are dangerous.
- 🧼 Clean dirt from the top of the fuel tank before opening it. Dirt inside the tank can damage the new pump.
🔧 Required Tools
You'll need the following tools for this repair:
- 10mm socket
- 13mm socket
- 15mm socket
- 3/8-inch ratchet
- 3/8-inch extension set
- Torque wrench rated 10-100 ft-lbs
- Fuel line disconnect tool set (specialty)
- Fuel pump lock ring tool (specialty)
- Flat-blade screwdriver
- Plastic trim tool
- Needle-nose pliers
- Floor jack rated 3-ton minimum
- Jack stands rated 3-ton minimum
- Transmission jack or wide fuel tank support board
- Wheel chocks
- Shop towels
- Fuel-safe drain pan
- Brass punch
- Rubber mallet
- Safety glasses
- Fuel-resistant gloves
- Class B/C fire extinguisher
🔩 Required Parts
HowToo sells all the parts you need for this repair:
- Fuel pump module assembly - Qty: 1
- Fuel pump tank seal/O-ring - Qty: 1
- Fuel pump lock ring - Qty: 1
- Fuel line retaining clips - Qty: As needed
- EVAP line retaining clips - Qty: As needed
- Fuel system cleaner-safe shop towels - Qty: 1 pack
📋 Before You Begin
- 🅿️ Park your Colorado on level ground, shift to Park, and set the parking brake.
- 🧱 Place wheel chocks in front of the front wheels.
- ⛽ Make sure the fuel tank is near empty. Less fuel means less weight and less spill risk.
- 🔋 Use a 10mm socket to disconnect the negative battery cable. Set it aside so it cannot touch the battery post.
- 🧯 Place a Class B/C fire extinguisher within reach.
- 📘 A fuel line disconnect tool releases spring-lock fuel fittings without breaking them.
- 📘 A fuel pump lock ring tool turns the large metal retaining ring that holds the pump in the tank.
🔨 Step-by-Step Instructions
Follow these steps in order:
Step 1: Relieve Fuel Pressure
- Use a plastic trim tool to remove the underhood fuse box cover.
- Pull the fuel pump relay or fuel pump fuse using needle-nose pliers.
- Start the engine and let it run until it stalls. This uses up pressure in the fuel line.
- Crank the engine for 3-5 seconds more with the iginition key, then turn the key off.
- Use a 10mm socket to disconnect the negative battery cable if not already disconnected.
- Fuel may still drip.
Step 2: Raise and Support the Truck
- Use a floor jack rated 3-ton minimum to lift the rear of your Colorado at the proper rear frame lift point.
- Place jack stands rated 3-ton minimum under the frame rails.
- Lower the truck gently onto the jack stands.
- Shake the truck lightly by hand to confirm it is stable before going underneath.
Step 3: Support the Fuel Tank
- Place a transmission jack or floor jack with a wide support board under the fuel tank.
- Raise it just enough to support the tank. Do not crush the tank.
- Use shop towels and a fuel-safe drain pan under the fuel line area.
Step 4: Disconnect the Filler Neck and Vent Hoses
- Use a flat-blade screwdriver or 8mm nut driver if equipped to loosen the filler hose clamp at the tank.
- Use needle-nose pliers to release spring clamps on the smaller vent hose if equipped.
- Twist the hoses gently by hand to break them loose, then slide them off the tank fittings.
- Twist first, then pull.
Step 5: Disconnect EVAP and Electrical Connectors
- Use a plastic trim tool to lift the locking tabs on EVAP vapor line connectors.
- Press the connector tabs by hand and pull the EVAP lines straight off.
- Use a flat-blade screwdriver only if needed to gently unlock electrical connector safety locks.
- Disconnect the fuel pump electrical connector by pressing the tab and pulling straight back.
Step 6: Disconnect the Fuel Feed Line
- Place shop towels around the fuel line connection.
- Use the correct size fuel line disconnect tool from the fuel line disconnect tool set to release the fitting.
- Push the line inward first, insert the disconnect tool, then pull the line straight off.
- Catch any fuel in a fuel-safe drain pan.
- Do not pry plastic fittings.
Step 7: Remove the Fuel Tank Straps
- Use a 15mm socket, 3/8-inch ratchet, and extension to remove the fuel tank strap bolts.
- Keep one hand on the tank or jack while removing the last bolt.
- Lower the tank a few inches with the jack and check for any remaining lines or wiring.
- If anything is still attached, stop and disconnect it using the correct tool before lowering farther.
Step 8: Lower the Fuel Tank
- Use the floor jack or transmission jack to slowly lower the tank to the ground.
- Keep the tank level so remaining fuel does not spill out.
- Slide the tank out from under your Colorado.
Step 9: Clean the Pump Area
- Use shop towels to wipe dirt from the top of the fuel tank around the pump module.
- Use a soft brush if needed, but do not blow dirt into the tank opening.
- Mark the pump position with a marker or small piece of tape so the new pump faces the same way.
Step 10: Remove the Fuel Pump Lock Ring
- Use a fuel pump lock ring tool to turn the lock ring counterclockwise.
- If the lock ring is stuck, use a brass punch and rubber mallet to tap the lock ring tabs counterclockwise.
- Do not use a steel punch because it can create sparks.
- Lift off the lock ring and set it aside if it is being reused, though replacement is recommended.
Step 11: Remove the Old Fuel Pump Module
- Lift the fuel pump module straight up by hand.
- Tilt it slightly to clear the fuel level float arm. The float arm measures the fuel level.
- Let fuel drain from the module into the tank for a few seconds.
- Remove the old tank seal/O-ring by hand and discard it.
Step 12: Install the New Seal and Pump Module
- Wipe the tank sealing surface clean with shop towels.
- Install the new fuel pump tank seal/O-ring by hand into the groove on the tank.
- Lower the new fuel pump module into the tank carefully.
- Make sure the fuel level float arm does not bend or catch.
- Align the new pump module with the position mark made earlier.
Step 13: Install the Lock Ring
- Install the new fuel pump lock ring by hand until it sits evenly.
- Use the fuel pump lock ring tool to turn the lock ring clockwise until fully seated against the stops.
- If using a brass punch and rubber mallet, tap gently and evenly around the ring.
- Confirm the pump module is flat and the seal is not pinched.
Step 14: Reinstall the Fuel Tank
- Slide the tank back under your Colorado.
- Use the transmission jack or floor jack with support board to raise the tank slowly.
- Reconnect any upper electrical connector, EVAP line, or fuel line that is easier to reach before the tank is fully raised.
- Push quick-connect fuel and EVAP lines on until they click.
- Gently tug each line by hand to verify it is locked.
Step 15: Reinstall the Fuel Tank Straps
- Position the tank straps by hand.
- Start the strap bolts by hand to avoid cross-threading.
- Use a 15mm socket and torque wrench to tighten the fuel tank strap bolts to Torque to 35 Nm (26 ft-lbs).
Step 16: Reconnect Filler Neck, Vent Hoses, and Wiring
- Slide the filler hose fully onto the tank neck by hand.
- Use a flat-blade screwdriver or 8mm nut driver to tighten the filler hose clamp snugly.
- Reconnect vent hoses and spring clamps using needle-nose pliers.
- Reconnect the fuel pump electrical connector until it clicks.
- Recheck that all lines are routed away from sharp edges and exhaust parts.
Step 17: Lower the Truck
- Use the floor jack to lift the rear slightly off the jack stands.
- Remove the jack stands by hand.
- Lower your Colorado slowly to the ground with the floor jack.
Step 18: Reconnect Battery and Prime the Fuel System
- Use a 10mm socket to reconnect the negative battery cable.
- Reinstall the fuel pump fuse or relay if removed.
- Turn the key to ON for 5 seconds without starting the engine.
- Turn the key OFF for 10 seconds.
- Repeat this ON/OFF cycle 3 times to fill the fuel lines.
- Priming helps prevent long cranking.
Step 19: Start and Inspect
- Start the engine and let it idle.
- Use a flashlight to inspect under the truck near the fuel tank and fuel lines.
- Look and smell for fuel leaks. Shut the engine off immediately if any leak appears.
- Do not drive until all leaks are fixed.
✅ After Repair
- ✅ Let the engine idle for 2-3 minutes and confirm it runs smoothly.
- 🔍 Check the fuel gauge. If it reads incorrectly, the float arm may be stuck or bent.
- ⛽ Add several gallons of fuel, then recheck for leaks around the tank.
- 🚗 Take a short test drive close to home, then inspect again for fuel smell or dripping.
- 🧠 If a check engine light is on, scan for codes related to fuel pressure, EVAP, or fuel level sensor.
💰 DIY vs Shop Cost
Shop Cost: $750-$1,300 (parts + labor)
DIY Cost: $250-$600 (parts only)
You Save: $500-$700 by doing it yourself!
Shop labor rates vary but typically run $100-$150/hour. This repair takes a shop approximately 2.5-4.0 hours.
🎯 Ready to get started?
HowToo makes it easy: same-day/2-day shipping on every part, plus all the tools and specialty tools you need! Check out the parts and tools sections below to add everything to your cart.