

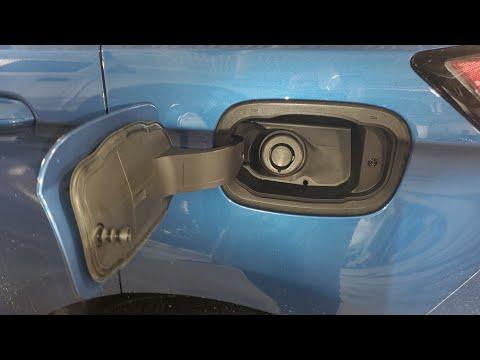






How to Replace the Fuel Filler Cap or Insert on a 2018 Ford Edge
Step-by-step capless Easy Fuel guide with tools, parts, safety tips, and EVAP checks
How to Replace the Fuel Filler Cap or Insert on a 2018 Ford Edge
Step-by-step capless Easy Fuel guide with tools, parts, safety tips, and EVAP checks


🔧 Edge - Fuel Cap Replacement
Your Edge uses Ford’s capless Easy Fuel system from the factory, so there is normally no screw-on fuel cap to replace. If you are replacing the fuel filler door area dust plug, tethered emergency fuel funnel, or aftermarket locking cap/insert, this is a simple exterior job.
Difficulty Level: Beginner | Estimated Time: 5-15 minutes
⚠️ Safety & Precautions
- ⚠️ Work in a well-ventilated area and keep sparks, flames, cigarettes, and hot tools away from the fuel filler area.
- ⚠️ Do not force tools into the capless filler neck. The capless door seals can be damaged.
- ⚠️ Battery disconnect is not required for this repair.
- ⚠️ If you smell raw fuel strongly or see liquid fuel leaking, stop and do not drive until the fuel filler system is inspected.
🔧 Required Tools
You'll need the following tools for this repair:
- Nitrile gloves
- Safety glasses
- Clean microfiber cloth
- Flashlight
🔩 Required Parts
HowToo sells all the parts you need for this repair:
- Fuel filler dust cap or locking fuel filler insert - Qty: 1
- Capless fuel funnel - Qty: 1, if missing
📋 Before You Begin
- Park your Edge on level ground and shift to Park.
- Turn the ignition off and keep the key away from the push-button start area.
- Let the fuel filler area cool if the vehicle has been sitting in direct sun.
- The capless fuel filler has a spring-loaded flap inside the filler neck. A “flap” is a small door that seals the filler opening when no fuel nozzle is inserted.
🔨 Step-by-Step Instructions
Follow these steps in order:
Step 1: Open the Fuel Filler Door
- Use your hand to press the rear edge of the fuel filler door inward, then release it so the door pops open.
- Use a flashlight to inspect the filler opening and the area around the door.
- There are no bolts for a normal capless fuel filler cover replacement, so no torque spec applies.
Step 2: Remove the Old Fuel Filler Dust Cap or Insert
- Put on nitrile gloves and safety glasses.
- If a dust cap or locking insert is installed, pull it straight outward by hand.
- If it has a small tether, unhook the tether from the fuel door hinge area by hand.
- Do not use pliers or a screwdriver inside the filler neck.
- Pull straight, not sideways.
Step 3: Clean the Fuel Filler Opening
- Use a clean microfiber cloth to wipe dust from the outer filler pocket.
- Use a flashlight to check that the spring-loaded capless flap is closed and sitting flat.
- Do not push the cloth into the filler neck.
Step 4: Install the New Fuel Filler Dust Cap or Insert
- Use your hand to align the new fuel filler dust cap or locking insert with the filler opening.
- Push it straight in until it seats evenly.
- If it has a tether, attach the tether to the same fuel door hinge point by hand.
- If the part twists to lock, turn it by hand only until it stops. Do not overtighten.
Step 5: Verify Fitment
- Use your hand to gently tug the installed cap or insert to make sure it is seated.
- Close the fuel filler door by hand until it clicks flush with the body.
- Use a flashlight to confirm the door sits even with the quarter panel.
Step 6: If the Check Engine Light Was On
- Drive your Edge normally for a few trips after the replacement.
- The evaporative emissions monitor may need several drive cycles to retest. A “drive cycle” means starting, driving, parking, and letting the vehicle sit long enough for the computer to run checks.
- If the light stays on, the issue may be the capless filler seal, purge valve, vent valve, or an EVAP leak rather than the cap.
✅ After Repair
- ✅ Make sure the fuel filler door closes fully and does not pop open while driving.
- ✅ At your next fuel stop, insert the fuel nozzle normally and confirm fuel flows without splash-back.
- ✅ If you replaced a locking insert, test the key operation before driving away.
- ✅ No battery reset, scan tool command, or infotainment reset is required.
💰 DIY vs Shop Cost
Shop Cost: $40-$120 (parts + labor)
DIY Cost: $10-$45 (parts only)
You Save: $30-$75 by doing it yourself!
Shop labor rates vary but typically run $100-$150/hour. This repair takes a shop approximately 0.2-0.5 hours.
🎯 Ready to get started?
HowToo makes it easy: same-day/2-day shipping on every part, plus all the tools and specialty tools you need! Check out the parts and tools sections below to add everything to your cart.