

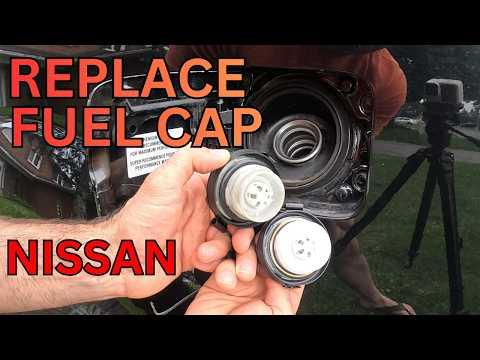






How to Replace the Fuel Cap on a 2011-2024 Nissan Murano (Engine: V6 3.5L)
Step-by-step DIY instructions with required tools, parts, safety tips, and seal checks for 2011, 2012, 2013, 2014, 2015, 2016, 2017, 2018, 2019, 2020, 2021, 2022, 2023, 2024
How to Replace the Fuel Cap on a 2011-2024 Nissan Murano (Engine: V6 3.5L)
Step-by-step DIY instructions with required tools, parts, safety tips, and seal checks for 2011, 2012, 2013, 2014, 2015, 2016, 2017, 2018, 2019, 2020, 2021, 2022, 2023, 2024


🔧 Murano - Fuel Cap Replacement
Replacing the fuel cap is a simple repair. A worn seal or loose cap can allow fuel vapors to escape and may turn on the check-engine light.
Difficulty Level: Beginner | Estimated Time: 5-10 minutes
⚠️ Safety & Precautions
- ⚠️ Turn the engine off and keep flames, cigarettes, and sparks away from the fuel-filler area.
- 🧤 Avoid touching spilled fuel; wipe it up immediately if present.
- 🔋 Battery disconnection is not required.
🔧 Required Tools
You'll need the following tools for this repair:
- Nylon trim-removal tool
- Nitrile work gloves
- ANSI-rated safety glasses
- Clean shop towel
🔩 Required Parts
HowToo sells all the parts you need for this repair:
- Fuel-filler cap with tether - Qty: 1
📋 Before You Begin
- 🚗 Park your Murano outdoors on level ground, select Park, and turn the engine off.
- 🔓 Unlock all doors. The fuel-filler door locks and unlocks with the vehicle’s power door locks.
- ⛽ Use a direct-fit cap designed for your Murano. The cap must seal correctly and maintain the fuel system’s specified vapor pressure.
🔨 Step-by-Step Instructions
Follow these steps in order:
Step 1: Open the Fuel-Filler Door
- Put on the nitrile work gloves and ANSI-rated safety glasses.
- With the doors unlocked, press the right-hand edge of the fuel-filler door and release it.
- Open the door fully by hand. No tool is required.
Step 2: Remove the Old Fuel Cap
- Turn the old cap counterclockwise by hand until it releases from the filler neck.
- Move slowly in case a small amount of vapor pressure is released.
- Use a clean shop towel to wipe dirt from around the filler-neck opening. Do not push debris into the opening.
Step 3: Release the Retaining Tether
- Locate the tether anchor attached to the inside of the fuel-filler door or hinge area.
- A tether is the flexible strap that prevents the cap from being lost.
- Use a nylon trim-removal tool to gently lift or push the tether anchor from its mounting hole.
- Do not use excessive force or pry against the painted outer panel.
- Compare both caps before installation.
Step 4: Install the New Tether
- Align the new cap’s tether anchor with the original mounting hole.
- Press the anchor into place by hand until it is fully seated.
- If needed, use the flat edge of the nylon trim-removal tool to press the anchor evenly.
- Confirm the tether is not twisted and cannot interfere with closing the fuel door.
Step 5: Install the New Fuel Cap
- Inspect the new cap’s rubber seal by hand. It must be clean, flat, and undamaged.
- Place the cap squarely onto the filler neck.
- Turn the cap clockwise by hand until you hear and feel one click.
- No numerical torque specification applies; the cap’s built-in ratchet sets the correct tightening force.
- Do not use pliers or any other tool to tighten the cap.
Step 6: Close the Fuel-Filler Door
- Place the tether so it remains completely inside the fuel-filler pocket.
- Close the fuel-filler door by hand and press its right-hand edge until it latches flush with the body.
- Lock the vehicle and gently press the door by hand to verify that it is locked.
✅ After Repair
- ✅ Start the engine and check that there is no strong fuel odor around the filler door.
- 🔍 If the check-engine light was caused by a loose cap, it may take several normal driving cycles to turn off automatically.
- 🧰 If the light remains on, use an OBD-II scan tool to check for evaporative-emissions codes. Do not erase codes before recording them.
- ⚠️ Seek diagnosis if the new cap will not click, the filler neck is damaged, or fuel odor continues.
💰 DIY vs Shop Cost
Shop Cost: $45-$100 (parts + labor)
DIY Cost: $15-$40 (parts only)
You Save: $30-$60 by doing it yourself!
Shop labor rates vary but typically run $100-$150/hour. This repair takes a shop approximately 0.1-0.3 hours.
🎯 Ready to get started?
HowToo makes it easy: same-day/2-day shipping on every part, plus all the tools and specialty tools you need! Check out the parts and tools sections below to add everything to your cart.