

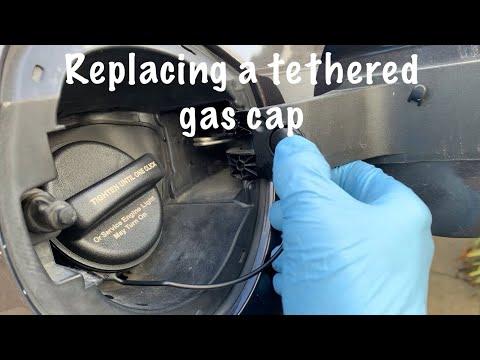





How to Replace the Fuel Cap on a 1998-2019 Toyota Avalon (Engine: V6 3.5L)
Step-by-step instructions, required parts, tools, and safety tips for a secure seal for 1998, 1999, 2000, 2001, 2002, 2003, 2004
How to Replace the Fuel Cap on a 1998-2019 Toyota Avalon (Engine: V6 3.5L)
Step-by-step instructions, required parts, tools, and safety tips for a secure seal for 1998, 1999, 2000, 2001, 2002, 2003, 2004


🔧 Avalon - Fuel Cap Replacement
Replacing the fuel cap is a quick repair. A properly sealing cap keeps fuel vapors contained and can correct a loose-cap warning or an EVAP-related check-engine light.
Difficulty Level: Beginner | Estimated Time: 5-10 minutes
⚠️ Safety & Precautions
- 🔥 Park outdoors away from cigarettes, flames, sparks, and hot equipment.
- 🧤 Avoid touching spilled fuel; wear nitrile gloves and safety glasses.
- ⛽ Do not insert tools or cloth into the filler neck.
- 🔋 Battery disconnection is not required.
🔧 Required Tools
You'll need the following tools for this repair:
- Nylon trim-removal tool (specialty)
- Fuel-resistant nitrile gloves
- ANSI Z87.1 safety glasses
🔩 Required Parts
HowToo sells all the parts you need for this repair:
- Fuel filler cap with retaining tether - Qty: 1
📋 Before You Begin
- 🅿️ Park your Avalon on level ground, shift into Park, engage the parking brake, and switch the engine off.
- 🧊 Allow the exhaust and surrounding area to cool if the vehicle was recently driven.
- 🔍 Compare the new cap with the old one. The seal, threads, and tether attachment should match.
- 🚫 Do not use a generic vented cap. Your Avalon requires a cap designed for its sealed evaporative-emissions system.
🔨 Step-by-Step Instructions
Follow these steps in order:
Step 1: Open the Fuel Door
- 🧤 Put on the nitrile gloves and safety glasses.
- 🚪 With the vehicle unlocked, press the rear edge of the fuel door and allow it to open.
- 🧰 No hand tool is needed for this step.
Step 2: Remove the Old Fuel Cap
- ↩️ Use your gloved hand to turn the old cap counterclockwise until it releases from the filler neck.
- 🔍 Inspect the filler opening for dirt or damage without placing tools inside it.
- ⚠️ Stop if the filler neck is bent, heavily corroded, or has damaged threads.
Step 3: Release the Retaining Tether
- 🧰 A trim-removal tool is a smooth plastic pry tool that releases clips without scratching painted surfaces.
- 🔓 Use the nylon trim-removal tool to gently release the tether’s plastic anchor from its mounting point inside the fuel-door area.
- 🛑 Pry only on the plastic anchor. Do not lever against the filler neck or painted outer body panel.
- 💡 If the new cap does not include a tether, retain the existing tether and follow the cap manufacturer’s transfer arrangement.
- Support the clip while gently prying it free.
Step 4: Attach the New Tether
- 🔗 Position the new tether anchor in the same orientation as the original.
- 🧤 Use your gloved thumb to press the anchor into its mounting point until it is fully seated.
- 🧰 If needed, use the flat face of the nylon trim-removal tool to apply gentle, even pressure.
- 🔄 Confirm the tether is not twisted and will not become trapped by the fuel door.
Step 5: Install the New Fuel Cap
- ➡️ Place the new cap squarely onto the filler neck using your gloved hand.
- 🔁 Turn the cap clockwise until you hear and feel one click. Toyota’s ratcheting cap controls its own tightening force.
- 🚫 No torque wrench or additional tightening is required.
- ✅ Gently pull on the cap to verify it is locked in place.
Step 6: Close the Fuel Door
- 🧤 Arrange the tether inside the recess using your gloved hand.
- 🚪 Swing the fuel door closed and press its rear edge until it latches flush with the body.
✅ After Repair
- 🚗 Start your Avalon and verify that no fuel-cap message appears.
- 💡 If the check-engine light was caused by the loose or leaking cap, it may require several normal driving cycles to turn off.
- 🔍 If the warning remains after several trips, the evaporative-emissions system should be scanned for diagnostic trouble codes and leak-tested.
- ⛽ After the next refueling stop, confirm the cap still clicks once and the tether stays clear of the fuel door.
💰 DIY vs Shop Cost
Shop Cost: ₹4,000-₹9,000 (part + labor/import markup)
DIY Cost: ₹1,500-₹5,000 (part only)
You Save: ₹2,500-₹4,000 by doing it yourself!
Local pricing varies because US-market Avalon parts may require special ordering. This repair takes a shop approximately 0.1-0.2 hour.
🎯 Ready to get started?
HowToo makes it easy: same-day/2-day shipping on every part, plus all the tools and specialty tools you need! Check out the parts and tools sections below to add everything to your cart.