

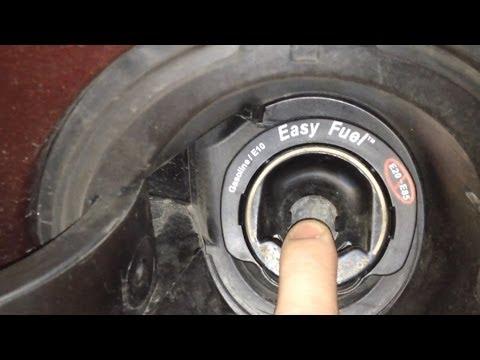






How to Replace the Fuel Cap (Easy Fuel Capless) on a 2014 Ford Fusion
Step-by-step install tips for capless-compatible/locking caps, plus cleaning checks to prevent EVAP leak codes
How to Replace the Fuel Cap (Easy Fuel Capless) on a 2014 Ford Fusion
Step-by-step install tips for capless-compatible/locking caps, plus cleaning checks to prevent EVAP leak codes


🔧 Fusion - Fuel Cap Replacement
On most Fusions, there isn’t a traditional screw-on gas cap. They use Ford’s Easy Fuel (capless) system, so “replacing the fuel cap” usually means installing a capless-compatible replacement/locking cap or fixing the capless filler if it’s damaged.
Difficulty Level: Beginner | Estimated Time: 5-15 minutes
⚠️ Safety & Precautions
- ⚠️ Work outside or in a well-ventilated area—fuel vapors are flammable.
- ⚠️ No smoking, sparks, or open flames near the fuel door.
- ⚠️ Turn the engine off and remove the key before opening the fuel door.
🔧 Required Tools
You'll need the following tools for this repair:
- Flashlight
- Clean shop towels
- Nitrile gloves
- Safety glasses
🔩 Required Parts
HowToo sells all the parts you need for this repair:
- Fuel cap (Easy Fuel capless-compatible or locking cap) - Qty: 1
📋 Before You Begin
- Park on level ground and shut the engine off.
- Open the fuel door and use a flashlight to look for dirt or damage around the filler opening.
🔨 Step-by-Step Instructions
Follow these steps in order:
Step 1: Confirm what style you have
- Open the fuel door.
- If you see a flap system with no screw-on cap, you have Easy Fuel (capless) (most common on your Fusion).
- If you do have a screw-on cap, skip to Step 4.
Step 2: Clean the capless sealing area
- Put on nitrile gloves and safety glasses.
- Use a clean shop towel to wipe the area around the filler opening.
- Tip: Dirt here can trigger EVAP leak codes.
Step 3: Install the replacement/locking cap (capless-compatible)
- Align the new fuel cap with the filler opening.
- Press it in (or thread it on, depending on the cap design) until it’s fully seated.
- If it’s a locking style, use the key and confirm it locks/unlocks smoothly.
Step 4: If you have a traditional screw-on cap (less common)
- Twist the old cap counterclockwise by hand and remove it.
- Inspect the rubber seal (the soft ring). If it’s cracked or flattened, replace the cap.
- Install the new cap and tighten by hand until it clicks (if it’s a click-type).
✅ After Repair
- Start the engine and check that the fuel door closes normally.
- If you had a check engine light for an EVAP leak, it may take a few drive cycles to turn off on its own.
- If the light stays on, the capless filler seal may be dirty/damaged (not the “cap”).
💰 DIY vs Shop Cost
Shop Cost: $60-$150 (parts + labor)
DIY Cost: $15-$60 (parts only)
You Save: $45-$90 by doing it yourself!
Shop labor rates vary but typically run $100-$150/hour. This repair takes a shop approximately 0.2-0.5 hours.
🎯 Ready to get started?
HowToo makes it easy: same-day/2-day shipping on every part, plus all the tools and specialty tools you need! Check out the parts and tools sections below to add everything to your cart.