

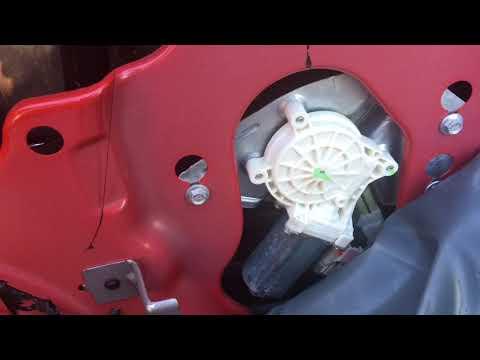





How to Replace the Front Window Regulator on a 2018 Dodge Challenger (Driver/Passenger)
Step-by-step door panel removal, bolts vs rivets guidance, tools/parts list, safety tips, and window re-learn for 2008, 2009, 2010, 2011, 2012, 2013, 2014, 2015, 2016, 2017, 2018, 2019, 2020, 2021, 2022, 2023
How to Replace the Front Window Regulator on a 2018 Dodge Challenger (Driver/Passenger)
Step-by-step door panel removal, bolts vs rivets guidance, tools/parts list, safety tips, and window re-learn for 2008, 2009, 2010, 2011, 2012, 2013, 2014, 2015, 2016, 2017, 2018, 2019, 2020, 2021, 2022, 2023


🔧 Challenger - Front Window Regulator Replacement
Replacing the front window regulator on your Challenger means removing the inner door trim panel, supporting the glass, swapping the regulator assembly, then reattaching and re-indexing the window. The exact steps (and the correct torque specs) depend on whether your door uses bolts or factory rivets to hold the regulator.
Difficulty Level: Intermediate | Estimated Time: 2-4 hours
Quick questions (so I give the exact OEM-correct steps + torque specs):
- 🧩 Which side are you replacing: driver or passenger?
- 📸 Can you upload a photo of the regulator mounting points inside the door (or tell me if you see large aluminum rivet heads instead of bolts)?
⚠️ Safety & Precautions
- ⚠️ Disconnect the negative battery cable before working inside the door (protects against accidental airbag/short circuits).
- ⚠️ Support the window glass securely—glass can drop suddenly when the regulator is detached.
- ⚠️ Keep fingers clear of the scissor/cable mechanism while testing.
- ⚠️ If rivets are used, drilling creates sharp metal and flying debris—use eye protection.
🔧 Required Tools
You'll need the following tools for this repair:
- 10mm socket
- 13mm socket
- 1/4" drive ratchet
- 3/8" drive ratchet
- 6" extension (1/4")
- Trim panel removal tool set
- Torx T20 screwdriver
- Torx T30 screwdriver
- Pick tool
- Painters tape (1.5")
- Work light
- Needle-nose pliers
- Torque wrench (5–80 Nm range)
- Safety glasses
- Mechanic gloves
- Drill
- Drill bit set
- Heavy-duty rivet gun (specialty)
🔩 Required Parts
HowToo sells all the parts you need for this repair:
- Front window regulator (correct side) - Qty: 1
- Front window regulator motor - Qty: 1
- Door trim panel retainer clips - Qty: 1 set
- Water shield butyl sealant - Qty: 1
- Regulator rivets (if equipped) - Qty: 1 set
📋 Before You Begin
- Park on level ground, key off, and lower the window to about halfway if it still moves.
- Disconnect the battery: use a 10mm socket to remove the negative terminal and isolate it.
- Have painters tape ready to hold the glass up to the door frame.
- “Regulator” = the mechanism that raises/lowers glass.
🔨 Step-by-Step Instructions
Follow these steps in order:
Step 1: Confirm the mounting style (bolts vs rivets)
- Remove the sail panel (small triangle trim by the mirror) using a trim panel removal tool set.
- Pop off the door handle trim and switch bezel using a trim panel removal tool set and pick tool.
- Remove any visible screws using a Torx T20 screwdriver or Torx T30 screwdriver.
- Lift the door panel upward to unhook it, then disconnect connectors using a pick tool.
- Peel back the water shield carefully (reuse if possible). If it tears, plan to reseal with water shield butyl sealant.
Step 2: Stop here—torque specs depend on what you see
- If you see large round aluminum heads holding the regulator: it’s a riveted setup (requires drilling + new rivets).
- If you see regular fasteners with hex heads: it’s a bolted setup (straight unbolt/bolt back in).
- Reply with the side (driver/passenger) and whether it’s rivets or bolts (or upload a photo), and I’ll give you the exact remaining steps with the correct Torque to XX Nm (YY ft-lbs) specs for your setup.
✅ After Repair
- Reconnect the battery with a 10mm socket.
- Cycle the window fully down/up and verify smooth travel and proper sealing at the top.
- If auto-up/down acts weird, tell me what it’s doing and I’ll walk you through the correct re-learn for your Challenger.
💰 DIY vs Shop Cost
Shop Cost: $450-$900 (parts + labor)
DIY Cost: $120-$350 (parts only)
You Save: $330-$550 by doing it yourself!
Shop labor rates vary but typically run $100-$150/hour. This repair takes a shop approximately 2-3 hours.
🎯 Ready to get started?
HowToo makes it easy: same-day/2-day shipping on every part, plus all the tools and specialty tools you need! Check out the parts and tools sections below to add everything to your cart.