

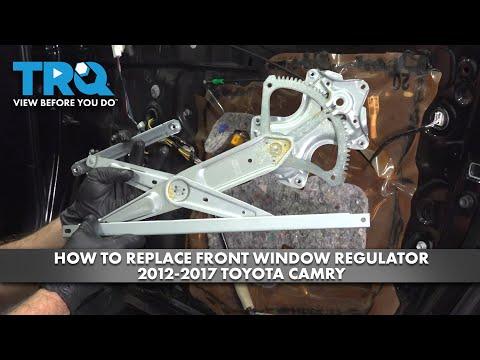







How to Replace the Front Power Window Regulator on a 2014 Toyota Camry
Step-by-step door panel removal, glass support, parts/tools list, and key torque specs for 2012, 2013, 2014, 2015, 2016, 2017
How to Replace the Front Power Window Regulator on a 2014 Toyota Camry
Step-by-step door panel removal, glass support, parts/tools list, and key torque specs for 2012, 2013, 2014, 2015, 2016, 2017


🔧 Camry - Front Window Regulator Replacement
Replacing the front window regulator fixes a window that won’t move, moves crooked, or makes grinding/clicking noises. You’ll remove the door trim panel, secure the glass, swap the regulator (and motor if needed), then reassemble and re-initialize the auto-up/down.
Difficulty Level: Intermediate | Estimated Time: 2-3 hours (one door)
⚠️ Safety & Precautions
- ⚠️ Disconnect the 12V battery negative cable before starting to prevent accidental window movement and electrical shorts.
- ⚠️ Support the window glass at all times; it can drop suddenly and shatter or cut you.
- ⚠️ Keep your hands clear of the regulator scissors/cable path while moving parts.
- ⚠️ Use painter’s tape to hold the glass; do not rely on friction alone.
🔧 Required Tools
You'll need the following tools for this repair:
- Safety glasses
- Work gloves
- Trim removal tool set
- Phillips #2 screwdriver
- 10mm socket
- 1/4" ratchet
- 3" extension for 1/4" ratchet
- Torque wrench (5–25 Nm range)
- Needle-nose pliers
- Painter’s tape (1.5" wide)
- Plastic razor blade scraper
- Magnetic pickup tool
- Flashlight
🔩 Required Parts
HowToo sells all the parts you need for this repair:
- Front window regulator (left or right, as needed) - Qty: 1
- Front window regulator motor - Qty: 1 (only if your motor is bad or not included)
- Door panel retainer clips - Qty: 6-12 (handy to have; some usually break)
- Butyl tape (door vapor barrier adhesive) - Qty: 1
📋 Before You Begin
- Park on level ground, shift to Park, and set the parking brake.
- Lower the window to about halfway if it still moves (this gives access to the glass clamps).
- Disconnect the 12V battery negative cable using a 10mm socket. Wait 2 minutes before unplugging connectors.
- Have painter’s tape ready to secure the glass to the door frame.
🔨 Step-by-Step Instructions
Follow these steps in order:
Step 1: Remove the front door trim panel
- Use a trim removal tool set to gently pry up the window switch panel and unplug the electrical connectors.
- Use a Phillips #2 screwdriver to remove the screw(s) behind the inner handle trim and/or armrest pocket (locations vary slightly by door).
- Use the trim removal tool set to pop the door panel clips around the edges, then lift the panel upward to unhook it from the window ledge.
- Unclip the door handle cable(s) carefully. (A cable latch is a small plastic clip that locks the cable end into place.)
Step 2: Remove the vapor barrier (water shield)
- Use a plastic razor blade scraper to peel the vapor barrier off slowly without tearing it.
- Set it aside clean-side up. You’ll reseal it later with butyl tape.
Step 3: Position the glass so you can access the clamp bolts
- If the old regulator still moves: temporarily reconnect the window switch, reconnect the 12V negative, and use the switch to align the glass clamp bolts with the access holes.
- Disconnect the 12V negative again using a 10mm socket, then unplug the switch.
- If the regulator is stuck: you may need to manually slide the glass carefully to line up the clamp bolts.
Step 4: Secure the glass so it can’t drop
- Use painter’s tape (1.5" wide) to tape the glass to the top door frame in at least 2–3 strips.
- Tape from outside over the top to inside.
Step 5: Detach the glass from the regulator
- Through the door access holes, use a 10mm socket with a 3" extension for 1/4" ratchet to loosen/remove the glass clamp bolts.
- Gently lift the glass fully up by hand and add more painter’s tape to keep it secure.
- Torque spec (reassembly): Torque to 9 Nm (80 in-lbs) for the glass clamp bolts.
Step 6: Unplug the regulator motor and remove the regulator assembly
- Unplug the window motor connector (press the lock tab, then pull). Use needle-nose pliers only if needed, and don’t crush the connector.
- Use a 10mm socket to remove the regulator mounting bolts.
- Carefully maneuver the regulator out through the large door opening. Use a flashlight to avoid snagging the cables.
- Torque spec (reassembly): Torque to 8 Nm (71 in-lbs) for regulator mounting bolts.
Step 7: Transfer or install the window motor (if required)
- If your new regulator doesn’t include the motor, move the motor over from the old assembly.
- Use a 10mm socket to remove/install the motor bolts.
- Torque spec (reassembly): Torque to 6 Nm (53 in-lbs) for motor bolts.
Step 8: Install the new regulator
- Slide the new regulator into the door and hand-start all bolts using a 10mm socket so it doesn’t cross-thread.
- Tighten the regulator mounting bolts with a torque wrench (5–25 Nm range). Torque to 8 Nm (71 in-lbs).
- Plug in the window motor connector until it clicks.
Step 9: Reattach the glass to the regulator
- Remove some tape, then lower the glass carefully into the regulator clamps.
- Install/tighten the glass clamp bolts using a 10mm socket.
- Tighten with a torque wrench (5–25 Nm range). Torque to 9 Nm (80 in-lbs).
- Remove all painter’s tape.
Step 10: Quick function check before reassembly
- Reconnect the 12V battery negative cable using a 10mm socket.
- Plug in the window switch and test the window movement slowly.
- Watch for binding, crooked travel, or clicking. If it binds, stop and check that the glass sits correctly in its front/rear guides.
Step 11: Reinstall the vapor barrier and door panel
- Apply butyl tape to reseal the vapor barrier. Press it firmly by hand all the way around.
- Reconnect door handle cable(s), then hang the door panel on the top lip and press the clips in around the edges.
- Reinstall screws using a Phillips #2 screwdriver.
- Reconnect the window switch panel connectors and snap the switch panel back in using the trim removal tool set if needed.
✅ After Repair
- Initialize auto up/down: with the door closed, run the window all the way down (hold the switch 2 seconds), then all the way up (hold 2 seconds).
- Confirm the window seals well at the top and doesn’t wind-noise on a short drive.
- Recheck that the door handle works from inside and outside.
- If any door panel clips are loose, replace them to prevent rattles.
💰 DIY vs Shop Cost
Shop Cost: $450-$900 (parts + labor)
DIY Cost: $120-$350 (parts only)
You Save: $330-$550 by doing it yourself!
Shop labor rates vary but typically run $100-$150/hour. This repair takes a shop approximately 1.5-2.5 hours.
🎯 Ready to get started?
HowToo makes it easy: same-day/2-day shipping on every part, plus all the tools and specialty tools you need! Check out the parts and tools sections below to add everything to your cart.
Assumption: Standard power window front door (no aftermarket alarm/audio in door).