

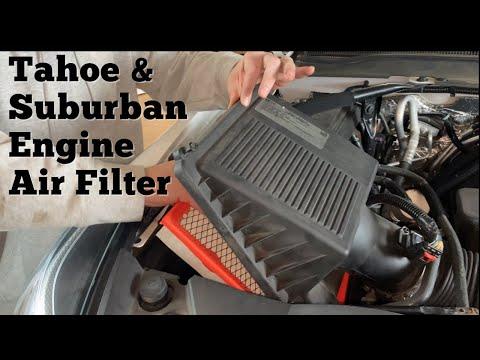






How to Replace the Engine Air Filter on a 2015-2020 Chevrolet Suburban 5.3L V8 (Engine: V8 5.3L)
Beginner-friendly steps covering tools, parts, safety tips, filter installation, and final checks for 2015, 2016, 2017, 2018, 2019, 2020
How to Replace the Engine Air Filter on a 2015-2020 Chevrolet Suburban 5.3L V8 (Engine: V8 5.3L)
Beginner-friendly steps covering tools, parts, safety tips, filter installation, and final checks for 2015, 2016, 2017, 2018, 2019, 2020


🔧 Suburban - Engine Air Filter Replacement
The engine air filter sits inside the air-cleaner housing at the front passenger side of your Suburban’s engine compartment. Replacing it restores proper airflow and helps prevent dirt from entering the 5.3L V8.
Difficulty Level: Beginner | Estimated Time: 10-20 minutes
⚠️ Safety & Precautions
- ⚠️ Turn the engine off and let it cool before working under the hood.
- 🛑 Keep tools and loose clothing away from the cooling fan, which can start unexpectedly.
- 🔋 Battery disconnection is not required for this repair.
- 🧤 Do not allow leaves, dirt, or hardware to fall into the clean-air outlet.
🔧 Required Tools
You'll need the following tools for this repair:
- Torx T25 screwdriver
- LED inspection flashlight
- Portable vacuum with crevice attachment
- Nitrile mechanic gloves
- ANSI Z87.1 safety glasses
🔩 Required Parts
HowToo sells all the parts you need for this repair:
- 5.3L V8 engine air filter - Qty: 1
📋 Before You Begin
- 🅿️ Park your Suburban on level ground, select Park, apply the parking brake, and switch off the ignition.
- 🌡️ Wait for the engine compartment to cool.
- 🔎 Compare the new filter with the old one before installation. Their length, width, and sealing shape must match.
- 📱 No infotainment setting, scan tool, programming, or service reset is required.
🔨 Step-by-Step Instructions
Follow these steps in order:
Step 1: Open and secure the hood
- Wear the nitrile mechanic gloves and ANSI Z87.1 safety glasses.
- Pull the interior hood-release handle, release the secondary latch under the front edge, and raise the hood using gloved hands.
- Confirm that the hood supports remain fully extended before reaching into the engine compartment.
Step 2: Locate the air-cleaner housing
- Use the LED inspection flashlight to find the large black plastic air-cleaner housing at the front passenger side of the engine compartment.
- Follow the wide intake duct from the engine toward the housing if needed.
- The air-cleaner housing is the box that holds the rectangular filter.
Step 3: Loosen the housing-cover screws
- Use the Torx T25 screwdriver to loosen the captive screws around the air-cleaner cover.
- Captive screws remain attached to the cover after they are fully loosened.
- Turn each screw counterclockwise until it spins freely. Do not force or remove it from the cover.
- Keep steady downward pressure on the screwdriver.
Step 4: Lift the air-cleaner cover
- Use gloved hands to lift the cover only far enough to access the filter.
- Move the attached intake duct gently. Do not pull on the airflow-sensor wiring or disconnect its electrical connector.
- Support the cover with one hand instead of placing strain on the intake duct.
Step 5: Remove the old filter
- Use gloved hands to note the filter’s orientation, then lift it straight out of the lower housing.
- Use the LED inspection flashlight to check that nothing falls into the clean-air outlet leading toward the engine.
- Do not start the engine while the filter is removed.
Step 6: Clean and inspect the housing
- Use the portable vacuum with crevice attachment to remove loose leaves, dust, and insects from the bottom of the housing.
- Keep the vacuum nozzle away from the airflow sensor and clean-air outlet.
- Use the LED inspection flashlight to inspect the housing for cracks, water, or damaged sealing surfaces.
- Do not use compressed air because it can push debris into the intake.
Step 7: Install the new filter
- Use gloved hands to place the new filter into the lower housing in the same orientation as the old filter.
- Make sure the filter’s rubber sealing edge lies flat around the entire opening.
- Confirm that no corner is folded, raised, or trapped outside its groove.
- A flat seal is more important than pressure.
Step 8: Refit the housing cover
- Use gloved hands to lower the cover squarely over the new filter.
- Check that the cover sits flush and does not pinch the filter seal.
- Make sure no hose or wire is trapped between the upper and lower housing sections.
Step 9: Tighten the cover screws
- Use the Torx T25 screwdriver to start every captive screw by hand before fully tightening any one screw.
- Tighten the screws gradually in an alternating pattern so the cover seats evenly.
- GM does not publish a separate service torque for these air-cleaner cover screws. Tighten them evenly until lightly seated; do not overtighten the plastic housing.
Step 10: Complete a final inspection
- Use the LED inspection flashlight to confirm the cover is fully seated on every side.
- Use gloved hands to verify the intake duct and airflow-sensor connector remain secure.
- Remove the tools, lower the hood carefully, and press it closed using gloved hands.
✅ After Repair
- ✅ Start the engine and let it idle for about one minute.
- 👂 Listen for a whistle or loud air-sucking sound, which could indicate a loose cover or pinched filter seal.
- 🚨 Confirm that no check-engine warning appears.
- 🔍 If a warning appears immediately, switch off the engine and inspect the airflow-sensor connector and intake duct.
- 📅 No dashboard reset is required. Record the mileage and replacement date for maintenance tracking.
💰 DIY vs Shop Cost
Shop Cost: $55-$110 (parts + labor)
DIY Cost: $20-$40 (parts only)
You Save: $35-$70 by doing it yourself!
Shop labor rates vary but typically run $100-$150/hour. This repair takes a shop approximately 0.2-0.4 hours.
🎯 Ready to get started?
HowToo makes it easy: same-day/2-day shipping on every part, plus all the tools and specialty tools you need! Check out the parts and tools sections below to add everything to your cart.