

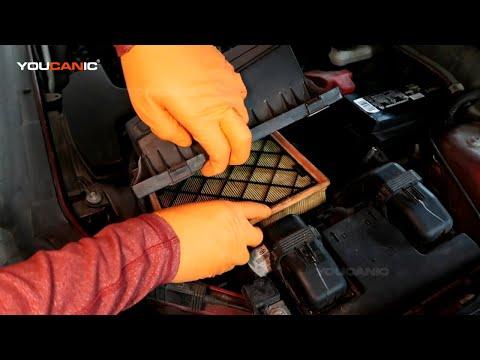







How to Replace the Engine Air Filter on a 2013-2020 Ford Fusion 1.5L (Trim: SE | Engine: Inline 4 2.0L)
Step-by-step DIY guide with required tools, parts, safety tips, and air box screw torque for 2013, 2014, 2015, 2016, 2017, 2018, 2019, 2020
How to Replace the Engine Air Filter on a 2013-2020 Ford Fusion 1.5L (Trim: SE | Engine: Inline 4 2.0L)
Step-by-step DIY guide with required tools, parts, safety tips, and air box screw torque for 2013, 2014, 2015, 2016, 2017, 2018, 2019, 2020


🔧 Fusion - Engine Air Filter Replacement
Replacing the engine air filter on your Fusion helps the 1.5L turbo engine breathe clean air and maintain proper fuel economy and performance. This is a simple beginner-friendly job that does not require lifting the vehicle.
Difficulty Level: Beginner | Estimated Time: 10-20 minutes
⚠️ Safety & Precautions
- ⚠️ Let the engine cool before working near the air filter box.
- ⚠️ Keep dirt, leaves, and loose debris out of the air intake tube.
- ⚠️ Do not run the engine with the air filter removed.
- ⚠️ Battery disconnect is not required for this repair.
🔧 Required Tools
You'll need the following tools for this repair:
- 8mm socket
- 1/4-inch ratchet
- Flathead screwdriver
- Clean shop towel
- Safety glasses
- Nitrile gloves
🔩 Required Parts
HowToo sells all the parts you need for this repair:
- Engine air filter - Qty: 1
📋 Before You Begin
- 🅿️ Park your Fusion on level ground and shift to Park.
- 🔥 Turn the engine off and let it cool for a few minutes.
- 🧤 Put on safety glasses and gloves.
- 📍 Open the hood and locate the air filter box on the driver-side/front area of the engine bay.
- ℹ️ The air filter box is the black plastic housing connected to the large intake tube going toward the engine.
🔨 Step-by-Step Instructions
Follow these steps in order:
Step 1: Open the Hood
- Use your hand to pull the hood release inside the cabin near the driver footwell.
- Use your hand to lift the secondary hood latch at the front of the hood.
- Raise the hood and secure it with the hood prop rod if equipped.
- Good lighting makes this easier.
Step 2: Locate the Air Filter Box
- Use your eyes and hands to find the black plastic air filter box near the front driver-side of the engine bay.
- Follow the large black intake tube from the front of the vehicle toward the engine; it attaches to the air filter box.
- The top cover of the box is held by small screws.
Step 3: Loosen the Air Filter Box Screws
- Use an 8mm socket and 1/4-inch ratchet to loosen the air box cover screws.
- These screws are usually captive screws, meaning they stay attached to the cover and do not fully come out.
- If a screw is hard to start, use a flathead screwdriver carefully to help guide the cover upward slightly.
- Do not force the plastic cover because it can crack.
Step 4: Lift the Air Filter Box Cover
- Use your hands to gently lift the air filter box cover just enough to access the filter.
- You do not need to remove the intake tube for a normal engine air filter replacement.
- Hold the cover up carefully so the plastic tabs do not bind or snap.
- Lift slowly and watch the rear tabs.
Step 5: Remove the Old Engine Air Filter
- Use your hand to pull the old engine air filter straight out of the lower air box.
- Look at how the old filter sits before removing it fully, so the new one goes in the same way.
- Use a clean shop towel to wipe loose dust from the bottom of the air box.
- Do not push dirt into the intake opening.
Step 6: Install the New Engine Air Filter
- Use your hands to place the new engine air filter into the lower air box.
- Make sure the rubber edge of the filter sits flat all the way around.
- The rubber edge is the sealing lip; it keeps unfiltered air from entering the engine.
- If the filter is tilted or pinched, remove it and reseat it.
Step 7: Reinstall the Air Filter Box Cover
- Use your hands to lower the air filter box cover back into place.
- Make sure the rear plastic tabs are seated before tightening the screws.
- Use the 8mm socket and 1/4-inch ratchet to tighten the air box cover screws snugly.
- Torque to snug only, about 2-3 Nm (18-27 in-lbs)
- Do not overtighten because the screws thread into plastic.
Step 8: Final Visual Check
- Use your hands to gently tug the air box cover and confirm it is secure.
- Check that the intake tube is still fully seated and not twisted.
- Use your eyes to confirm no tools, towels, or debris are left in the engine bay.
✅ After Repair
- ✅ Start the engine and let it idle for 30 seconds.
- 👂 Listen for hissing or whistling near the air filter box, which could mean the cover is not sealed.
- ✅ If the engine runs smoothly and no warning lights appear, the repair is complete.
- 🗓️ Check the engine air filter about every 15,000-30,000 miles, or sooner in dusty driving conditions.
💰 DIY vs Shop Cost
Shop Cost: $60-$120 (parts + labor)
DIY Cost: $15-$35 (parts only)
You Save: $45-$85 by doing it yourself!
Shop labor rates vary but typically run $100-$150/hour. This repair takes a shop approximately 0.2-0.4 hours.
🎯 Ready to get started?
HowToo makes it easy: same-day/2-day shipping on every part, plus all the tools and specialty tools you need! Check out the parts and tools sections below to add everything to your cart.