






How to Replace the Diesel Fuel Cap on a 2019 GMC Canyon
Beginner-friendly steps, required tools, safety tips, and tether installation guidance
How to Replace the Diesel Fuel Cap on a 2019 GMC Canyon
Beginner-friendly steps, required tools, safety tips, and tether installation guidance


🔧 Canyon - Fuel Cap Replacement
This is a quick, beginner-friendly job. You’ll remove the old diesel fuel cap, transfer or release its retaining tether, then install the correctly matched replacement cap.
Difficulty Level: Beginner | Estimated Time: 5-10 minutes
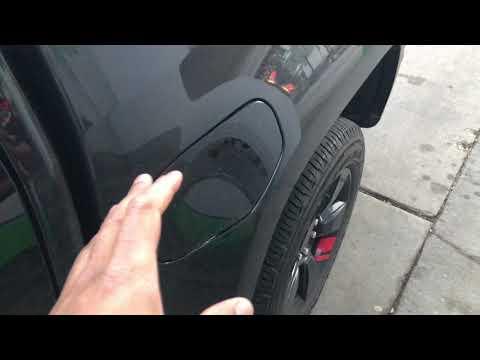
Assumption: These instructions cover the screw-on diesel filler cap, not the painted exterior fuel door.
⚠️ Safety & Precautions
- ⚠️ Switch the engine off and keep cigarettes, flames, and sparks away.
- 🧤 Avoid touching diesel residue with bare skin.
- 🧹 Clean loose dirt from around the filler opening before removing the cap.
- 🔋 Battery disconnection is not required.
🔧 Required Tools
You’ll need the following tools for this repair:
- Nitrile gloves
- Safety glasses
- Plastic trim removal tool
- Clean microfiber cloth
🔩 Required Parts
HowToo sells all the parts you need for this repair:
- Diesel fuel filler cap with sealing gasket - Qty: 1
Use a cap specifically confirmed for your Canyon’s diesel filler neck. The universal caps currently shown may have different neck diameters or venting, so I wouldn’t gamble on one. A cheap cap gets expensive when it doesn’t seal.
📋 Before You Begin
- 🅿️ Park your Canyon on level ground, shift into Park, and apply the parking brake.
- ⛽ Switch the ignition completely off.
- 🧽 Use the clean microfiber cloth to wipe dirt from the fuel door and filler area.
- 🔍 Compare the new cap with the old one. Check the threads, sealing gasket, depth, and tether attachment.
🔨 Step-by-Step Instructions
Follow these steps in order:
Step 1: Open the fuel door
- Open the exterior fuel door by hand.
- Identify the black diesel filler cap and its retaining tether. The tether is the small strap that keeps the cap attached to the truck.
Step 2: Remove the old cap
- Grip the cap by hand and rotate it counterclockwise.
- Turn slowly in case a small amount of tank pressure is present.
- Remove the cap completely without letting dirt enter the filler neck.
Step 3: Release the retaining tether
- Inspect where the tether attaches to the fuel-door housing.
- If it uses a push-in clip, use the plastic trim removal tool to lift the clip gently.
- If the tether slips over a molded post, stretch its retaining loop only enough to slide it free.
- Don’t pry against painted metal or force a brittle clip.
- Warm plastic bends more safely.
Step 4: Inspect the filler neck
- Use the clean microfiber cloth to wipe only the outer sealing surface.
- Check for damaged threads, corrosion, or dirt that could keep the new cap from sealing.
- Do not push the cloth or debris into the filler pipe.
Step 5: Attach the new tether
- Position the new tether exactly like the original.
- Press its clip into the mounting hole by hand, or slide its loop over the retaining post.
- If necessary, use the plastic trim removal tool to seat the clip gently.
- Tug lightly on the tether to confirm it is secure.
Step 6: Install the new fuel cap
- Place the new cap squarely against the filler neck.
- Rotate it clockwise by hand. If it immediately feels crooked or unusually tight, remove it and start again.
- Tighten until the cap clicks or reaches its built-in stop.
- No separate torque specification applies. Hand-tighten only.
Step 7: Check cap and door operation
- Pull gently on the installed cap to confirm it is locked onto the filler neck.
- Place the cap tether so it cannot become pinched.
- Close the exterior fuel door and confirm it sits flush.
✅ After Repair
- ✅ Start your Canyon and verify that no fuel-system warning appears.
- 👃 Stop the engine and recheck the cap if you notice a persistent diesel odor around the fuel door.
- 🔍 After the next drive, confirm the cap remains tight and the tether is not trapped.
- 💡 A warning caused by the old cap may require several normal drive cycles to clear. A persistent warning needs a diagnostic scan.
💰 DIY vs Shop Cost
Shop Cost: $40-$100 USD, depending on cap price and minimum labor charge
DIY Cost: $15-$45 USD for a properly matched cap
You Save: Approximately $25-$55 USD by doing it yourself!
Shop labor rates vary. This repair takes a shop approximately 0.1-0.2 hour.
🎯 Ready to get started?
HowToo makes it easy: same-day/2-day shipping on every part, plus all the tools and specialty tools you need! Check out the parts and tools sections below to add everything to your cart.