

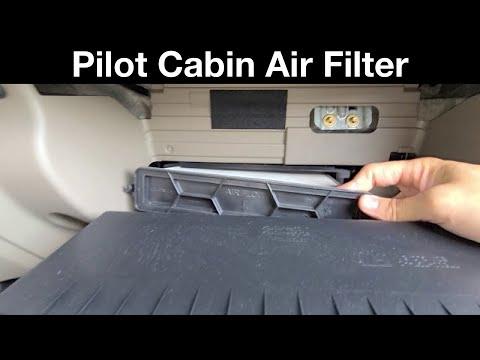





How to Replace the Cabin Air Filter on a 2018 Honda Pilot (Step-by-Step)
Glove box removal, filter direction (airflow arrow), tools/parts list, and quick post-install checks for 2009, 2010, 2011, 2012, 2013, 2014, 2015, 2016, 2017, 2018, 2019, 2020, 2021, 2022
How to Replace the Cabin Air Filter on a 2018 Honda Pilot (Step-by-Step)
Glove box removal, filter direction (airflow arrow), tools/parts list, and quick post-install checks for 2009, 2010, 2011, 2012, 2013, 2014, 2015, 2016, 2017, 2018, 2019, 2020, 2021, 2022


🔧 Pilot - Cabin Air Filter Replacement
Your Pilot’s cabin air filter cleans the air coming through the HVAC vents (A/C and heat). Replacing it helps airflow, reduces dust/pollen, and can get rid of musty odors.
Difficulty Level: Beginner | Estimated Time: 10-20 minutes
⚠️ Safety & Precautions
- ⚠️ Turn the ignition OFF and remove the key/fob from the vehicle.
- ⚠️ Use gentle pressure on the glove box and plastic tabs to avoid breaking them.
- ⚠️ Battery disconnect is not required for this job.
🔧 Required Tools
You'll need the following tools for this repair:
- Nitrile gloves
- Safety glasses
- Small flashlight
🔩 Required Parts
HowToo sells all the parts you need for this repair:
- Cabin air filter - Qty: 1
📋 Before You Begin
- Park on level ground and set the parking brake.
- Move the front passenger seat back for more space.
- Tip: Take a photo before removing parts.
🔨 Step-by-Step Instructions
Follow these steps in order:
Step 1: Open and empty the glove box
- Open the glove box and remove anything inside so it doesn’t fall out.
- Use a small flashlight to see the right-side damper arm (a small shock-like arm that slows the glove box opening).
Step 2: Disconnect the glove box damper
- On the right side of the glove box, gently unclip the damper arm from the glove box (it pops off its small peg).
- Use nitrile gloves for grip if it’s tight.
Step 3: Lower the glove box fully
- Gently push inward on both sides of the glove box near the stops (the built-in plastic “ears” that keep it from dropping).
- Let the glove box swing down slowly.
Step 4: Remove the cabin filter cover
- Behind the lowered glove box, find the rectangular cabin filter housing.
- Pinch the left and right tabs on the cover, then pull the cover straight off.
- Use a small flashlight to confirm the tabs are fully released before pulling.
Step 5: Remove the old filter
- Slide the filter tray/filter straight out toward you.
- Keep it level to avoid dumping leaves and dust.
- Wear safety glasses in case debris falls.
Step 6: Install the new filter (correct direction)
- Look for the airflow arrow on the new filter.
- Install it so the arrow points down (toward the floor) on your Pilot’s cabin filter housing.
- Tip: Wrong direction can reduce airflow.
Step 7: Reinstall the cover and glove box
- Reinstall the filter cover by pushing until both tabs click.
- Lift the glove box back up and push the sides inward again to get past the stops.
- Reconnect the damper arm on the right side (press it back onto its peg).
✅ After Repair
- Start the engine and run the blower on medium to confirm strong airflow and no rattles.
- Switch between fresh air and recirculation to ensure the glove box area is quiet and secure.
- If you still smell musty odor, consider an HVAC deodorizer service next.
💰 DIY vs Shop Cost
Shop Cost: $60-$140 (parts + labor)
DIY