

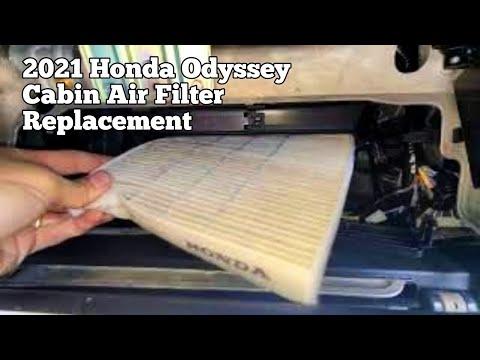





How to Replace the Cabin Air Filter on a 2018-2026 Honda Odyssey (Engine: V6 3.5L)
Step-by-step DIY guide with glove box access, airflow direction, tools, and savings for 2018, 2019, 2020, 2021, 2022, 2023, 2024, 2025, 2026
How to Replace the Cabin Air Filter on a 2018-2026 Honda Odyssey (Engine: V6 3.5L)
Step-by-step DIY guide with glove box access, airflow direction, tools, and savings for 2018, 2019, 2020, 2021, 2022, 2023, 2024, 2025, 2026


🔧 Odyssey - Cabin Air Filter Replacement
The cabin air filter cleans the air entering your Odyssey’s heating and A/C system. Replacing it helps improve airflow, reduce odors, and keep dust and pollen out of the cabin.
Difficulty Level: Beginner | Estimated Time: 10-15 minutes
⚠️ Safety & Precautions
- ⚠️ Park your Odyssey on level ground and switch the ignition fully OFF.
- ⚠️ Do not force the glove box or filter door; the plastic tabs can break if pulled at the wrong angle.
- ⚠️ No battery disconnect is required for this repair.
🔧 Required Tools
You'll need the following tools for this repair:
- Safety glasses
- Nitrile gloves
- Flashlight
🔩 Required Parts
HowToo sells all the parts you need for this repair:
- Cabin air filter - Qty: 1
📋 Before You Begin
- Park your Odyssey on level ground.
- Turn the ignition OFF.
- Open the front passenger door fully so you have room to work.
- Empty the glove box so items do not fall out when it drops down.
- The cabin air filter is located behind the glove box on your Odyssey.
🔨 Step-by-Step Instructions
Follow these steps in order:
Step 1: Open and Empty the Glove Box
- Use your hands to open the glove box fully.
- Remove all contents from the glove box.
- Use a flashlight if the area behind the glove box is hard to see.
- Keep small items in a cup.
Step 2: Release the Glove Box Damper
- Look on the right side of the glove box for the small damper arm.
- A damper is a small slow-drop arm that keeps the glove box from falling open quickly.
- Use your hands to gently slide the damper arm off its mounting pin.
- Do not pull hard; it should pop off with light pressure.
Step 3: Lower the Glove Box
- Use both hands to squeeze the left and right sides of the glove box inward.
- This lets the glove box stops clear the dashboard opening.
- Slowly lower the glove box toward the floor.
- Do not remove the glove box hinges; it only needs to swing down.
Step 4: Remove the Cabin Filter Cover
- Use your flashlight to locate the rectangular cabin filter cover behind the glove box.
- Use your hands to press the cover tabs inward.
- Pull the cover straight off and set it aside.
- No bolts are used, so there are no torque specs for this step.
Step 5: Remove the Old Cabin Air Filter
- Put on nitrile gloves before handling the old filter.
- Use your fingers to slide the old cabin air filter straight out.
- Notice the airflow arrow printed on the old filter before removal.
- On your Odyssey, install the new filter with the airflow arrow pointing down.
- Do not shake dust inside the van.
Step 6: Install the New Cabin Air Filter
- Compare the new cabin air filter to the old one to confirm the size matches.
- Use your hands to slide the new filter into the housing.
- Make sure the airflow arrow points down.
- Push it in gently until it sits flat and fully inside the slot.
Step 7: Reinstall the Filter Cover
- Use your hands to line up the cabin filter cover with the housing.
- Press the cover into place until both tabs click securely.
- Lightly tug the cover by hand to make sure it is locked in.
Step 8: Raise and Secure the Glove Box
- Use both hands to lift the glove box back toward its normal position.
- Squeeze the glove box sides inward so the stops pass back through the dashboard opening.
- Reconnect the right-side damper arm by pushing it back onto its mounting pin by hand.
- Open and close the glove box once to confirm it moves smoothly.
✅ After Repair
- Start your Odyssey and turn the blower fan on low, then high.
- Check that airflow comes from the vents normally.
- Listen for rattling behind the glove box; if you hear noise, recheck that the filter cover is fully clipped in.
- No scan tool, reset, coding, or infotainment menu step is required after this repair.
💰 DIY vs Shop Cost
Shop Cost: $60-$120 (parts + labor)
DIY Cost: $15-$35 (parts only)
You Save: $45-$85 by doing it yourself!
Shop labor rates vary but typically run $100-$150/hour. This repair takes a shop approximately 0.2-0.4 hours.
🎯 Ready to get started?
HowToo makes it easy: same-day/2-day shipping on every part, plus all the tools and specialty tools you need! Check out the parts and tools sections below to add everything to your cart.